6
WARNING: Remove the DENALI
®
Filter using an intravascular loop snare only.
WARNING: Do not attempt to remove the D
ENALI
®
Filter if significant amounts of thrombus are trapped
within the filter or if the filter snare hook is embedded within the vena cava wall.
PRECAUTION: Care should be taken when advancing a guidewire or imaging catheter through a filter to
prevent entanglement.
PRECAUTION: The retrieval of the D
ENALI
®
Filter should only be performed using minimum 9F I.D./11F I.D.
dual retrieval sheaths. Misuse of these devices or improper retrieval technique may result in intimal injury
or caval narrowing.
Procedural Instructions
1. Select a suitable jugular venous access route on either the right or left side depending upon the patient’s size or
anatomy, operator’s preference, or location of venous thrombosis. (The right jugular vein is preferred).
2. Prior to use, remove the retrieval sheaths from their packaging and flush them with heparinized saline or
suitable isotonic solution.
3. Prepare all other procedure components according to the manufacturers’ Instructions for Use.
4. Perform a venacavagram in the AP and lateral views to determine the orientation and configuration of the filter,
taking care not to disrupt the filter while crossing through. Also, use the appropriate technique to determine that
the filter, the jugular retrieval route, and distal IVC are free of thrombus.
5. Select the appropriate loop diameter size of the intravascular snare.
6. Assemble the intravascular snare according to the Instructions for Use provided by its manufacturer.
7. Assemble the components of both retrieval sheaths and ensure all components are flushed.
8. Carefully advance the guidewire into the IVC under fluoroscopic guidance such that it is caudal to the filter if it is
not positioned there already.
9. Introduce and advance the 11F retrieval sheath with dilator over the guidewire.
10. Remove the 11F dilator. Introduce and advance the 9F retrieval sheath with dilator over the guidewire such that
the tip of the sheath is approximately 3cm cephalad to the filter snare hook.
11. Remove the guidewire and dilator.
12. Insert and advance the intravascular snare assembly through the 9F retrieval sheath until it protrudes out such
that the marker band of the snare catheter is cephalad to the filter snare hook.
13. The retrieval of the D
ENALI
®
Filter uvsing an intravascular snare is illustrated below.
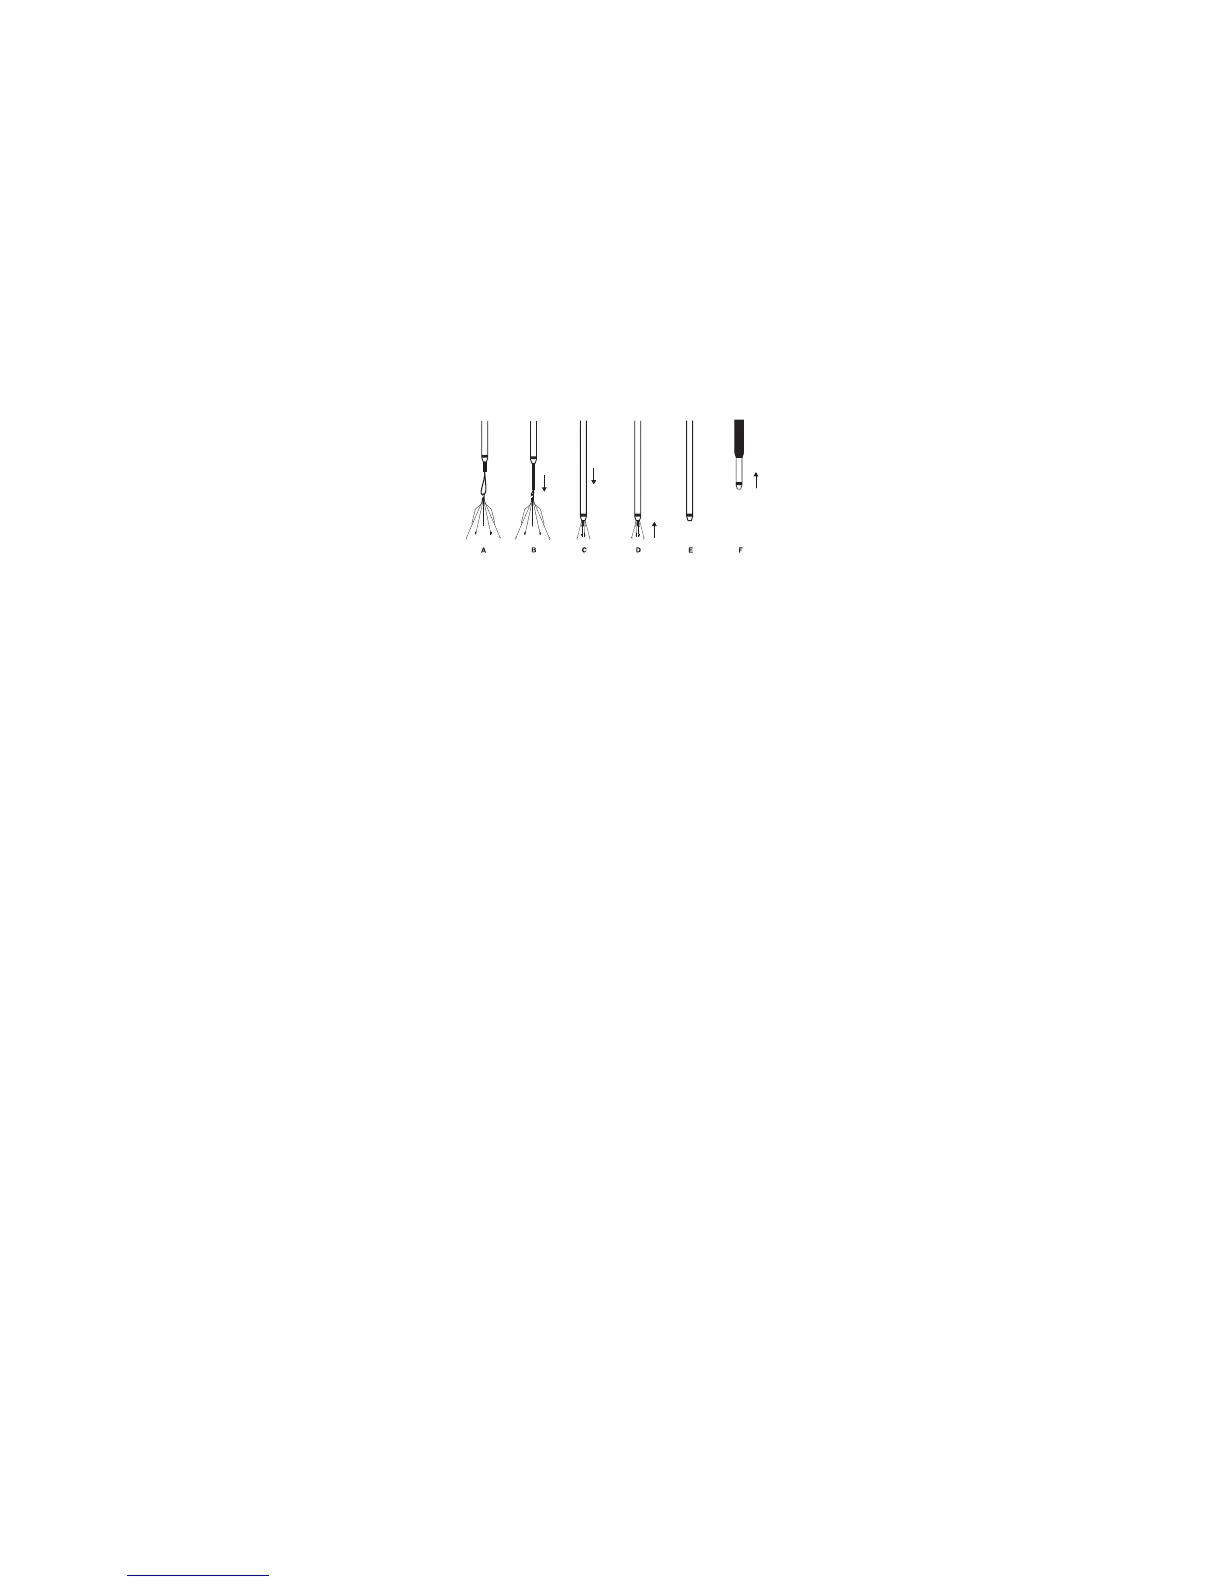
Figure 10: Retrieval of D
ENALI
®
Filter using an Intravascular Snare
Figure 10A: Slowly advance the loop forward over the filter snare hook.
Figure 10B: Reduce the loop diameter by advancing the snare catheter while simultaneously pulling the snare
backwards until the loop engages the filter snare hook.
Note: Under fluoroscopic guidance, ensure that the loop of the snare has properly engaged the filter snare hook
and that the filter snare hook, retrieval sheath and snare are aligned. Be careful to snare the top of the hook; not
the side. The marker tip of the snare catheter must be cephalad to the filter snare hook.
Note: Always maintain tension on the snare to prevent disengagement of the snare loop from the filter snare hook.
Figure 10C: Advance the retrieval sheath in the caudal direction until it covers half of the filter.
PRECAUTION: Care should be taken when advancing the 9F retrieval sheath in the caudal direction to
avoid completely covering the arms and legs.
Figure 10D: While keeping tension of the snare, hold the retrieval sheath stationary and withdraw the filter into the
sheath by retracting the intravascular snare.
Figure 10E: Retract the snare until the filter and cranial anchors are completely contained inside the retrieval
sheath.
Figure 10F: Once the filter is fully collapsed inside the 9F retrieval sheath, retract the filter, the snare, and the
retrieval sheath as one unit out through the 11F retrieval sheath.
14. Remove the filter from the retrieval sheath and examine the filter to assure that the complete filter has been
removed.
Note: Take care when handling the filter as the anchors are sharp.
15. A follow-up venacavogram should be performed prior to withdrawing the 11F retrieval sheath (typically 30mL of
contrast medium at 15mL/s).
PRECAUTION: Do not use the 9F retrieval sheath for imaging or flushing once the filter has been removed.
16. Remove the 11F retrieval sheath and apply routine compression over the puncture site in the usual way to
achieve hemostasis.
J. How Supplied
Each DENALI
®
Vena Cava Filter is supplied preloaded in a storage tube. Each DENALI
®
Vena Cava Filter is sterile
and nonpyrogenic unless the package is damaged or opened. It is for single use only. The delivery system is pre-
assembled. If the filter is inadvertently deployed, do not attempt to re-sterilize or reload it. The D
ENALI
®
Vena Cava
Filter should be stored in a cool (room temperature), dark, dry place.
K. Warranty
Bard Peripheral Vascular warrants to the first purchaser of this product that this product will be free from defects in
materials and workmanship for a period of one year from the date of first purchase and liability under this limited
product warranty will be limited to repair or replacement of the defective product, in Bard Peripheral Vascular’s sole
discretion or refunding your net price paid. Wear and tear from normal use or defects resulting from misuse of this
product are not covered by this limited warranty.
TO THE EXTENT ALLOWABLE BY APPLICABLE LAW, THIS LIMITED PRODUCT WARRANTY IS IN LIEU
OF ALL OTHER WARRANTIES, WHETHER EXPRESS OR IMPLIED, INCLUDING, BUT NOT LIMITED TO,
ANY IMPLIED WARRANTY OF MERCHANTABILITY OR FITNESS FOR A PARTICULAR PURPOSE. IN NO
EVENT WILL BARD PERIPHERAL VASCULAR BE LIABLE TO YOU FOR ANY INDIRECT, INCIDENTAL OR
CONSEQUENTIAL DAMAGES RESULTING FROM YOUR HANDLING OR USE OF THIS PRODUCT.
Some states/countries do not allow an exclusion of implied warranties, incidental or consequential damages. You
may be entitled to additional remedies under the laws of your state/country.
An issue or revision date and a revision number for these instructions are included for the user's information on the
last page of this booklet. In the event 36 months have elapsed between this date and product use, the user should
contact Bard Peripheral Vascular to see if additional product information is available.
L. References:
1. Quality Improvement Guidelines for Percutaneous Permanent Inferior Vena Cava Filter Placement for the
Prevention of Pulmonary Embolism. Caplin, Nikolic, Kalva, et al.: J Vasc Interv Radiol 2011; 1499-1506.
For additional vena cava filter clinical information please refer to the following societal guidelines:
• "Practice Guideline for the Performance of Percutaneous Inferior Vena Cava Filter Placement for the Prevention
of Pulmonary Embolism" [ACR Practice Guideline 2007; 38:673-684].
• "American College of Chest Physicians: Opinions regarding the diagnosis and management of venous
thromboembolic disease. ACCP Consensus Committee on Pulmonary Embolism. American College of Chest
Physicians" [Chest 1998 Feb; 113(2): 499-504].
• "Practice Management Guidelines for the Prevention of Venous Thromboembolism in Trauma Patients: The
EAST Practice Management Guidelines Work Group” [J Trauma 2002; 53:142-614].
• "Quality Improvement Guidelines for Percutaneous Inferior Vena Cava Filter Placement for the Prevention of
Pulmonary Embolism" [JVIR 2003; 14:S271-S275].
 Loading...