\Q
6
Repeating
playback
................scssscscesssescesseseees
pancccidevenssurcossses
DEMON
ccs
comm
ere
en
wee
CR
(
>
PLAY)
©®
Press
the
repeat
button
(REPEAT).
@
Press
the
play
button
(
»
PLAY).
e
Pressing
the
repeat
ail
tracks
button
(REPEAT),
is
displayed.
e
Steps
@
and
@
above
may
be
reversed.
e
To
cancel
repeat
playback
of
all
tracks,
press
the
repeat
button
(REPEAT)
once
more.
e
Pressing
the
repeat button
(REPEAT)
during
programmed
playback,
playback
of
the
tracks
entered
into
the
memory
will
be
repeated.
@
Pausing
playback
at
any
Point
................-.--ccsccsssseesercescsereceeceees
[oo
Sl
Koamnstacdamsaedhanmannadienstiend
Beier.
|
2RBEecas
inl
eee
|
tT
(
PAUSE)
e
Playback
can
be
temporarily
halted
and
then
continued
from
the
same
point
in
the
track.
1.
Press
the
pause
button
(lf
PAUSE)
during
playback.
2.
To
continue
playback,
press
the
play
button
(
»
PLAY)
or
the
pause
button
(i
PAUSE)
once
more.
@
Audible
quick
search
..cccccsccccsscsescccscnceseccccnsneesesessesees
.
|
Manual
Search
e
Using
this
function,
you
can
cue
to
a
desired
point
within
a
track,
either
in
the
forward
or
reverse
direction.
e
Release
the
manual
search button
(
€¢
or
PP
)
when
the
desired
point
has
been
reached.
Normal
playback
then
continues.
(1)
Manual
Search
Forward
1.
Press
the
manual
search
forward
button
(
PP
)
during
playback.
Playback
of
the
track
is
sped
up.
©
As
a
reference,
the
current
track
number
and
elapsed
playback
time
within
the
track
are
displayed.
e
Manual
search
forward
is
approximately
three
times
faster
when
engaged
during
the
pause
state
compared
to
playback.
In
this
case,
no
sound
is
heard
however.
e
ifthe
manual
search
forward
button
(
DP
)
is
kept
pressed
after
the
end
of
the
final
track
on
the
disc
is
reached,
(3))
is
displayed
and
manual
search
stops.
To
return
to
another
point,
press
the
manual!
search
reverse
button
(
44
)
until
(33)
disappears.
(2)
Manual
Search
in
Reverse
1,
Press
the
manual
search
reverse
button
(
44)
during
playback.
Reverse
playback
of
the
track
is
sped
up.
e
As
a
reference,
the
current
track
number
and
elapsed
playback
time
within
the
track
are
disptayed.
e
Manual
search
in
reverse
is
approximately
three
times
faster
when
engaged
during
the
pause
state
compared
to
playback.
In
this
case,
no
sound
is
heard
however.
e
If
the
manual
search
reverse
button
(
44
)
is-kept
pressed
after
the
beginning
of
the
first
track
on
the
disc
is
reached,
(CD)
is
displayed
and
manual
search
stops.
To
return
to
another
point,
press
the
manual
search
forward
button
(
PP
)
until
(CL)
disappears.
@
Finding
Sections
Within
a
Track
......--.ccssssesscessseeseeect-|
Index
Search
|-
e
Use
this
function
to
start
playback
from
certain
sections
within
a
track
divided
by
index
numbers.
(INDEX)
(Number
buttons)
@
Press
the
INDEX
button.
*--”
appears
at
the
TRACK
NO.
display.
@
Use
the
number
buttons
to
specify
the
track
number.
“.-”
now
appears
at
the
INDEX
display.
Input
the
desired
index
number.
Playback
starts
from
there.
For
example,
to
start
listening
from
index
number
2
on
track
3,
press
INDEX,
3
and
2.
indexes
e
indexes
are
numbers
which
are
assigned
to
sections
within
a
track.
Check
the
disc’s
explanatory
notes
for
the
index
numbers.
lf
you
make
an
index
search
for
an
index
number
that
is
not
on
the
disc,
playback
wil!
start
from
the
last
index
number
on
the
track.
9]
inserting
blanks
between
tracks
.............csccsccscensseeenees
|
Auto
Space
|
e
This
is
convenient
feature
that
will
insert
4-second
blanks
between
tracks,
which
can
be
used
when
recording
compact
discs
on
tape.
{AUTO
SPACE)
1.
Pressing
the
auto
space
button
(AUTO
SPACE)
will
cause
the
indicator
to
light.
2.
Press
the
play
button
(
PB
PLAY)
to
start
playback.
When
a
track
has
been
played
to
its
end,
a
4-second
silence
is
made
before
the
next
track
starts
playing.
3.
Press
the
auto
space
button
(AUTO
SPACE)
again
to
cancel
the
function.
;
@
Searching
and
Pausing
at
the
Beginning
of
the
Track
(1)
With
Direct
Search
e
In
this
case,
the
set
pauses
at
the
beginning
of
the
track
found
with
the
direct
search
operation.
{
t!
PAUSE)
(Number
buttons)
1
Press
the
number
button(s)
for
the
desired
track.
2
Press
the
({
tf!
PAUSE)
button.
e
To
start
playback,
press
the
(
»
PLAY)
or
(
If
PAUSE)
button.
(2)
With
Program
Search
e
Press
the
(i
PAUSE)
button
after
the
program
search
operation
is
compicted.
The
set
will
pause
at
the
beginning
of
the
first
programmed
track.
@
Playing
in
Random
Order
.................
acssaesdsdcsteedeicetestestcs
Random
Play
(Remote
control
only)
e
With
this
function,
the
tracks
recorded
on
the
disc
can
be
played
in
a
completely
random
order.
JANDOM
|
DENON
e
When
the
RANDOM
button
is
pressed,
the
indicator
lights
and
random
play
begins
automatically.
e
Jf
the
RANDOM
button
is
pressed
when
tracks
have
been
programmed,
only
the
programmed
tracks
wil!
be
played,
in
random
order.
e
If
the
RANOOM
button
is
pressed
when
the
repeat
function
is
set,
the
tracks
will
be
played
through
once
in
random
order,
then
played
through
again
in
a
different
order,
etc.
e
During
random
play,
all
of
the
tracks
on
the
disc
are
displayed
rapidly
on
the
TRACK
NO.
display,
and
the
track
which
will
be
played
next.
cannot
be
known
until
playback
starts.
NOTE:
e
The
remaining
time
in
the
total
mode
cannot
be
displayed
during
random
play.
e
{f
the
RANDOM
button
is
pressed
when
in
the
time
edit
mode,
the
time
edit
mode
is
cleared.
@
Edit
Recording
on
Sides
A
and
8
OF
Che
TOGO
oasis
cLicsscsascdadectiden
dense
setesencocdsechdeses
Sesessees
Edit
Function
|
(1)
Editing
by
Tape
Time
Specification
(TIME
EDIT)
CEN
wv
woe
wrmee
Re
a
se
ces
SC
Ge
(TIME
EDIT)
(SIDE
A/B
TIME)
(Number
buttons)
The
time
edit
function
permits
highly
efficient
editing
in
conjunction
with
the
length
(tape
time)
of
the
cassette
tape
to
be
recorded.
@
When
the
TIME
EDIT
button
is
pressed,
(C
-
..-)
will
appear
and
the
player
will
wait
for
the
tape
time
to
be
input.
will
light
up.
@
input
the
tape time
with
the
number
buttons.
(The
tape
time
is
the
total
time
of
sides
A
and
B.)
Example:
For
a
46-minute
tape,
press
4
and
6.
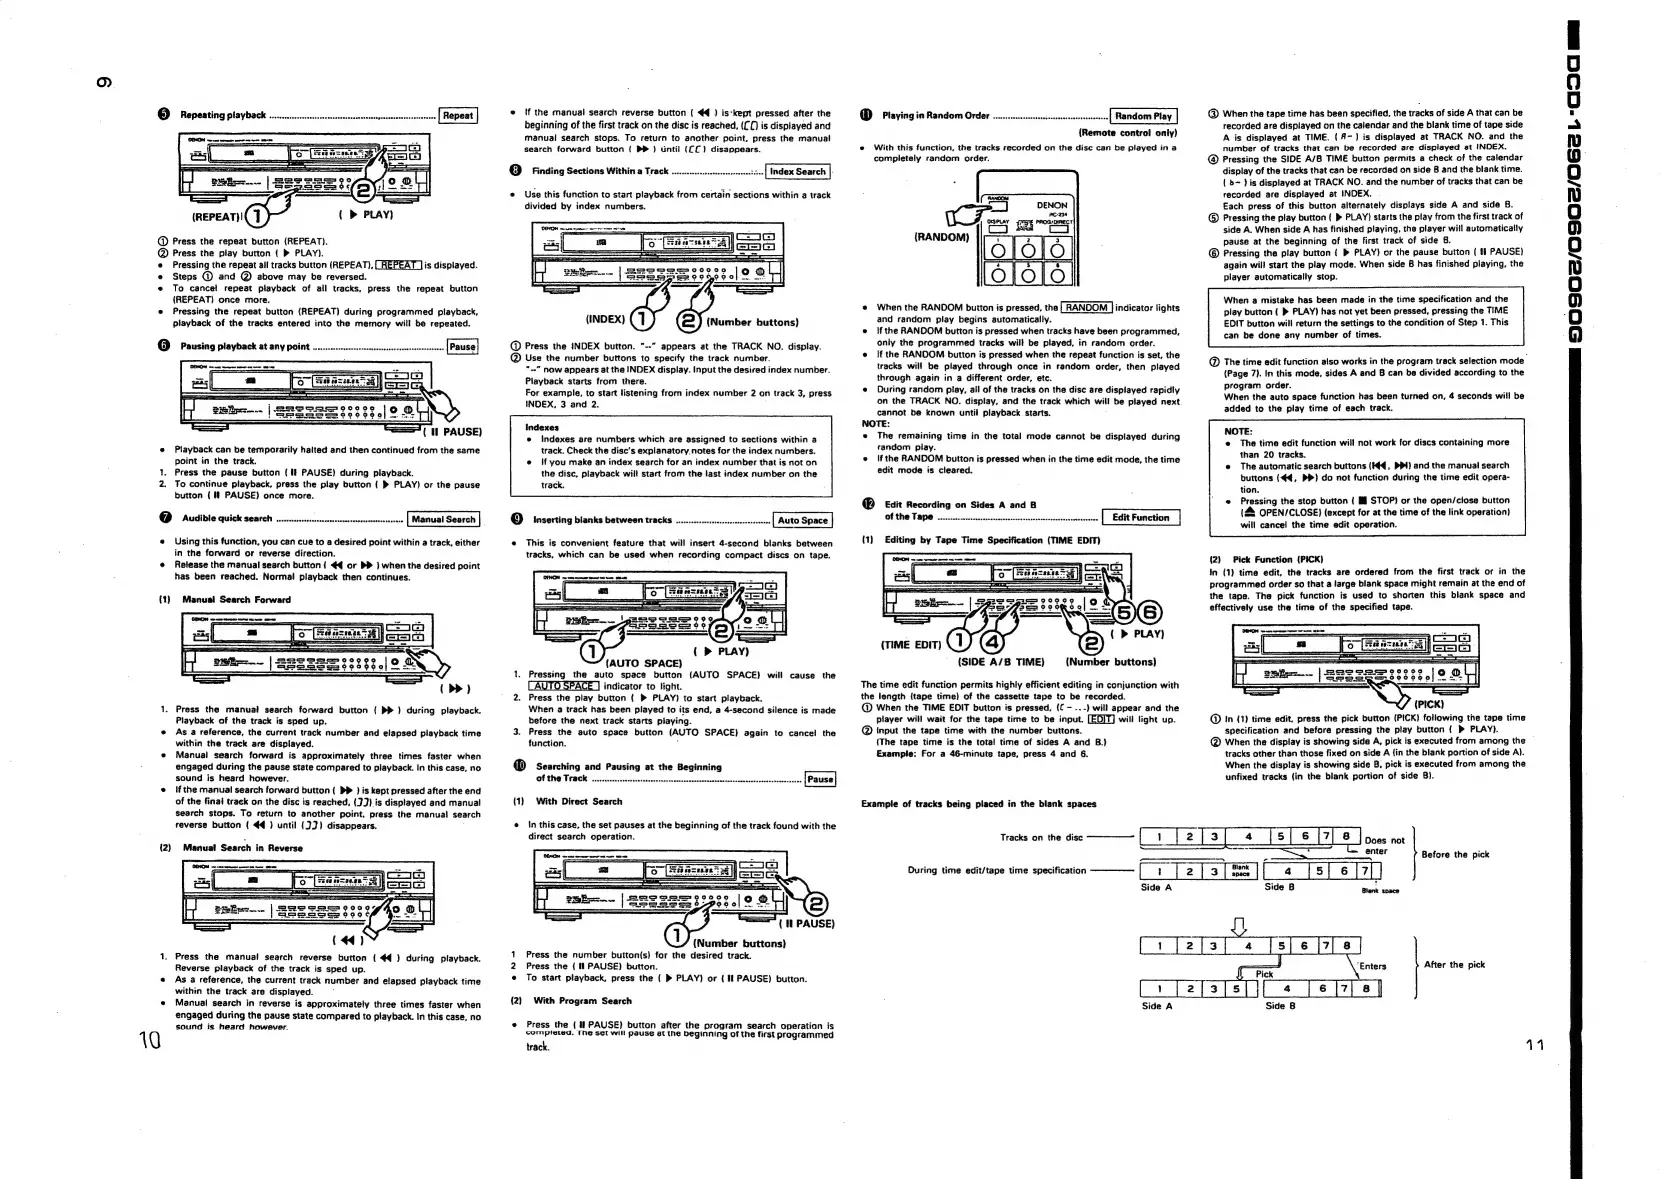
Example
of
tracks
being
placed
in
the
blank
spaces
Tracks
on
the
disc
———"
Ouring
time
edit/tape
time
specification
Side
A
1
f2]3f
4
[5]
6
[7]
&
J
oc0s
not
ee
eee
.
enter
pa
ys]
e]al
Side
B
@)
When
the
tape
time
has
been
specified,
the
tracks
of
side
A
that
can
be
recorded
are
displayed
on
the
calendar
and
the
blank
time
of
tape
side
A
is
displayed
at
TIME.
(A-)
is
displayed
at
TRACK
NO.
and
the
number
of
tracks
that
can
be
recorded
are
displayed
at
INDEX.
@
Pressing
the
SIDE
A/B
TIME
button
permits
a
check
of
the
calendar
display
of
the
tracks
that
can
be
recorded
on
side
8
and
the
blank
time.
(
b-
}
is
displayed
at
TRACK
NO.
and
the
number
of
tracks
that
can
be
recorded
are
displayed
at
INDEX.
.
Each
press
of
this
button
alternately
displays
side
A
and
side
8.
©
Pressing
the
play
button
(
»
PLAY)
starts
the
play
from
the
first
track
of
side
A.
When
side
A
has
finished
playing,
the
player
will
automatically
pause
at
the
beginning
of
the
first
track
of
side
8.
©
Pressing
the
play
button
{
®
PLAY)
or
the
pause
button
(
tl
PAUSE)
again
will
start
the
play
mode.
When
side
B
has
finished
playing,
the
player
automatically
stop.
When
a
mistake
has
been
made
in
the
time
specification
and
the
play
button
(
»
PLAY)
has
not
yet
been
pressed,
pressing
the
TIME
EDIT
button
will
return
the
settings
to
the
condition
of
Step
1.
This
can
be
done
any
number
of
times.
@
The
time
edit
function
also
works
in
the
program
track
selection
mode.
(Page
7).
In
this
mode,
sides
A
and
B
can
be
divided
according
to
the
program
order.
When
the
auto
space
function
has
been
turned
on,
4
seconds
will
be
added
to
the
play
time
of
each
track.
NOTE:
e
The
time
edit
function
will
not
work
for
discs
containing
more
than
20
tracks.
The
automatic
search
buttons
(44,
PP)
and
the
manual
search
buttons
(44,
PP)
do
not
function
during
the
time
edit
opera-
tion.
Pressing
the
stop
button
(
BJ
STOP)
or
the
open/close
button
(4
OPEN/CLOSE)
(except
for
at
the
time
of
the
link
operation)
will
cancel
the
time
edit
operation.
(2)
Pick
Function
(PICK)
in
(1)
time
edit,
the
tracks
are
ordered
from
the
first
track
or
in
the
programmed
order
so
that
a
large
blank
space
might
remain
at
the
end
of
the
tape.
The
pick
function
is
used
to
shorten
this
blank
space
and
effectively
use
the
time
of
the
specified
tape.
90000
1g
ins
@
In
(1)
time
edit.
press
the
pick
button
(PICK)
following
the
tape
time
specification
and
before
pressing
the
play
button
{
>
PLAY).
@
When
the
display
is
showing
side
A,
pick
is
executed
from
among
the
—
tracks
other
than
those
fixed
on
side
A
(in
the
blank
portion
of
side
A).
When
the
display
is
showing
side
B,
pick
is
executed
from
among
the
unfixed
tracks
(in
the
blank
portion
of
side
8B).
————
Before
the
pick
Blank
space
After
the
pick
11
ee
ee
50902/0902/0G2
L-c90¢C
ma
 Loading...