PLAYBACK
USING
THE
REMOTE
CONTROL
UNIT
The
accessory
RC-234/235
remote
control
unit
can
be
used
to
control
the
CD
player
from
a
convenient
distance.
(1)
Inserting
the
dry
cell
batteries
1,
Remove
the
battery
cover
on
the
back
of
the
remote
contro!
unit.
2.
Insert
two
R6P
(standard
size
AA)
dry
cell
batteries
with
correct
polarity
as
indicated
inside
the
battery
compartment.
3.
Replace
the
battery
cover.
Notes
on
the
Batteries
e
The
remote
control
unit
uses
standard
size
AA
dry
cell
batteries.
e
The
batteries
will
need
to
be
replaced
approximately
once
a
year.
Replacement
may
be
necessary
earlier
depending
on
how
much
the
remote
control
unit
is
used.
e
if,
in
less
than
a
year
from
the
time
new
batteries
were
inserted,
the
remote
control
fails
to
operate
the
CD
player
from
a
near-by
position,
it
is
time
to
replace
the
batteries.
REMOTE
CONTROL
UNIT
RC-234/235
Random
button
(RANDOM)
Display
Button
(DISPLAY)
e
Press
this
button
to
change
the
brightness
of
the
display.
e
Press
once
to
make
the
display
2/3
as
bright
as
normal.
e
Press
again
to
make
the
display
1/3
as
bright
as
normal.
e@
Press
once
again
to
turn
the
entire
display
off
during
playback
and
all
but
the
track
number
off
in
any
other
made.
Number
Buttons
(0
~
9)
Play
Button
{
>
PLAY)
Pause
Button
(
#1
PAUSE)
Stop
Button
(
MM
STOP)
Pitch
-
Button
(PITCH
-)
Pitch
+
Button
(PITCH
+)
Checking
Programmed
Contents
By
pressing
the
CALL
button
on
the
remote
control
unit,
programmed
contents
will
be
displayed.
Tracks
entered
into
the
memory,
will
be
displayed
starting
from
the
first
track
entered,
and
will
advance
one
step
at
a
time
each
time
the
CALL
button
is
pressed.
e
Insert
the
batteries
properly,
following
the
polarity
diagram
inside
the
battery
compartment,
in
other
words
make
sure
(+)
and
(~)
terminals
are
properly
aligned.
;
e
Batteries
are
prone
to
damage
and
leakage.
Therefore:
,
e
Do
not
combine
new
batteries
with
used
ones.
“
@
Do
not
combine
different
types
of
batteries.
e
Do
not
jumper
opposite
poles
of
the
batteries,
expose
them
to
heat,
break
them
open
nor
expose
of
them
in
open
fire.
e
if
the
remote
control
unit
is
not
to
be
used
for
a
long
period
of
time,
remove
the
batteries
from
the
unit.
e
If
the
batteries
have
leaked,
remove
any
traces
of
battery
fluid
from
the
battery
compartment,
wiping
thoroughly
with
a
dry
cloth.
Then
insert
new
batteries.
(2)
Directions
for
Use
e
Operate
the
remote
controi
unit
while
pointing
it
towards
the
remote
control
sensor
on
the
CD
player
(see
below).
Right
30°
BD
When
a
remote
control
signai
is
received,
the
remote
control
indicator
on
front
of
the
CD
player
lights
briefly.
e
The
remote
control
unit
can
be
used
at
a
distance
up
to
8
meters
in
a
straight
line
from
the
CD
player.
This
distance
decreases
if
there
are
obstructions
blocking
the
signal
path
or
when
the
remote
control
unit
is
operated
at
an
angle
from
the
remote
control!
sensor.
e
The
buttons
on
the
remote
control
unit
have
identical
functions
with
those
on
the
CD
player.
However,
the
following
functions
cannot
be
remote
controlled:
Power
ON/OFF.
Remote
control
sensor
Left
30°
Setting
to
the
Program
Mode
e
For
program
search,
press
the
PROG/DIRECT
button
then
the
number
buttons
(0
through
9
and
+10).
The
remote
control
unit
is
normally
set
to
the
direct
mode.
Program/Direct
Button
(PROG/DIRECT)
+10
Button
Call
Button
(CALL)
The
level
of
the
Variable
Output
Terminal
output
can
be
varied.
Pressing
the
(+)
button
increases
the
volume
and
pressing
the
(—)
button
decreases
the
volume.
Volume
Buttons
(+)
Volume
Buttons
(—)
Automatic
Search
Forward
Button
(
DDI)
Automatic
Search
Reverse
Button
(
Kd
)
Manual
Search
Forward
Button
(
DP
)
Manual
Search
Reverse
Button
(
44
)
Track
Selection
Use
the
numeric
track
buttons
(0
~
9
and
+10)
while
programming
and
to
access
a
desired
track
almost
instantly.
The
track
search
buttons
(
144
and
DPI)
are
best
used
to
advance
or
return
from
the
current
track
to
the
next
track.
Notes
on
Operation
©
Do
not
press
identical
buttons
on
the
CD
player
and
remote
control
unit
simultaneously
as
this
may
cause
malfunction.
e
The
remote
control
unit
may
be
difficult
to
operate
if
the
remote
control
sensor
is
exposed
to
strong
light,
such
as
direct
suntight
or
light
from
fluorescent
lamps,
or
if
there
are
obstacles
between
the
remote
control
unit
and
the
sensor.
e
Direct
track
selection
Using
the
track
number
buttons
(0
~
9,
+10),
tracks
can
be
directly
assigned
for
playback.
©
Track
selection
while
programming
Press
the
program
button
(PROG/DIRECT)
and
then
the
track
numbers
you
wish
to
enter
into
the
memory.
Example:
PROG/DIRECT
~
3
~
+10
&
1-5
....
(Tracks
3,
11,
5
and
so
on
are
entered
into
the
memory.)
Memorized
tracks
are
erased
by
pressing
the
PROG/DIRECT
button
(PROG/
DIRECT).
INSTALLATION
PRECAUTIONS
The
CD
player
uses
a
microcomputer
for
controlling
internal
electronic
circuits,
In
the
event
that
the
player
is
used
while
a
near-by
tuner
or
TV
is
turned
on,
although
unlikely,
interference
could
occur
either
in
the
sound
from
the
tuner
or
the
picture
of
the
TV.
To
avoid
this,
please
take
the
following
precautions.
e
Keep
the
CD
player
as
far
away
from
the
tuner
or
TV
set
as
possible.
e
Keep
the
power
cable
and
connecting
cabie
of
the
CD
player
separate
from
the
antenna
wires
of
the
tuner
and
TV.
e
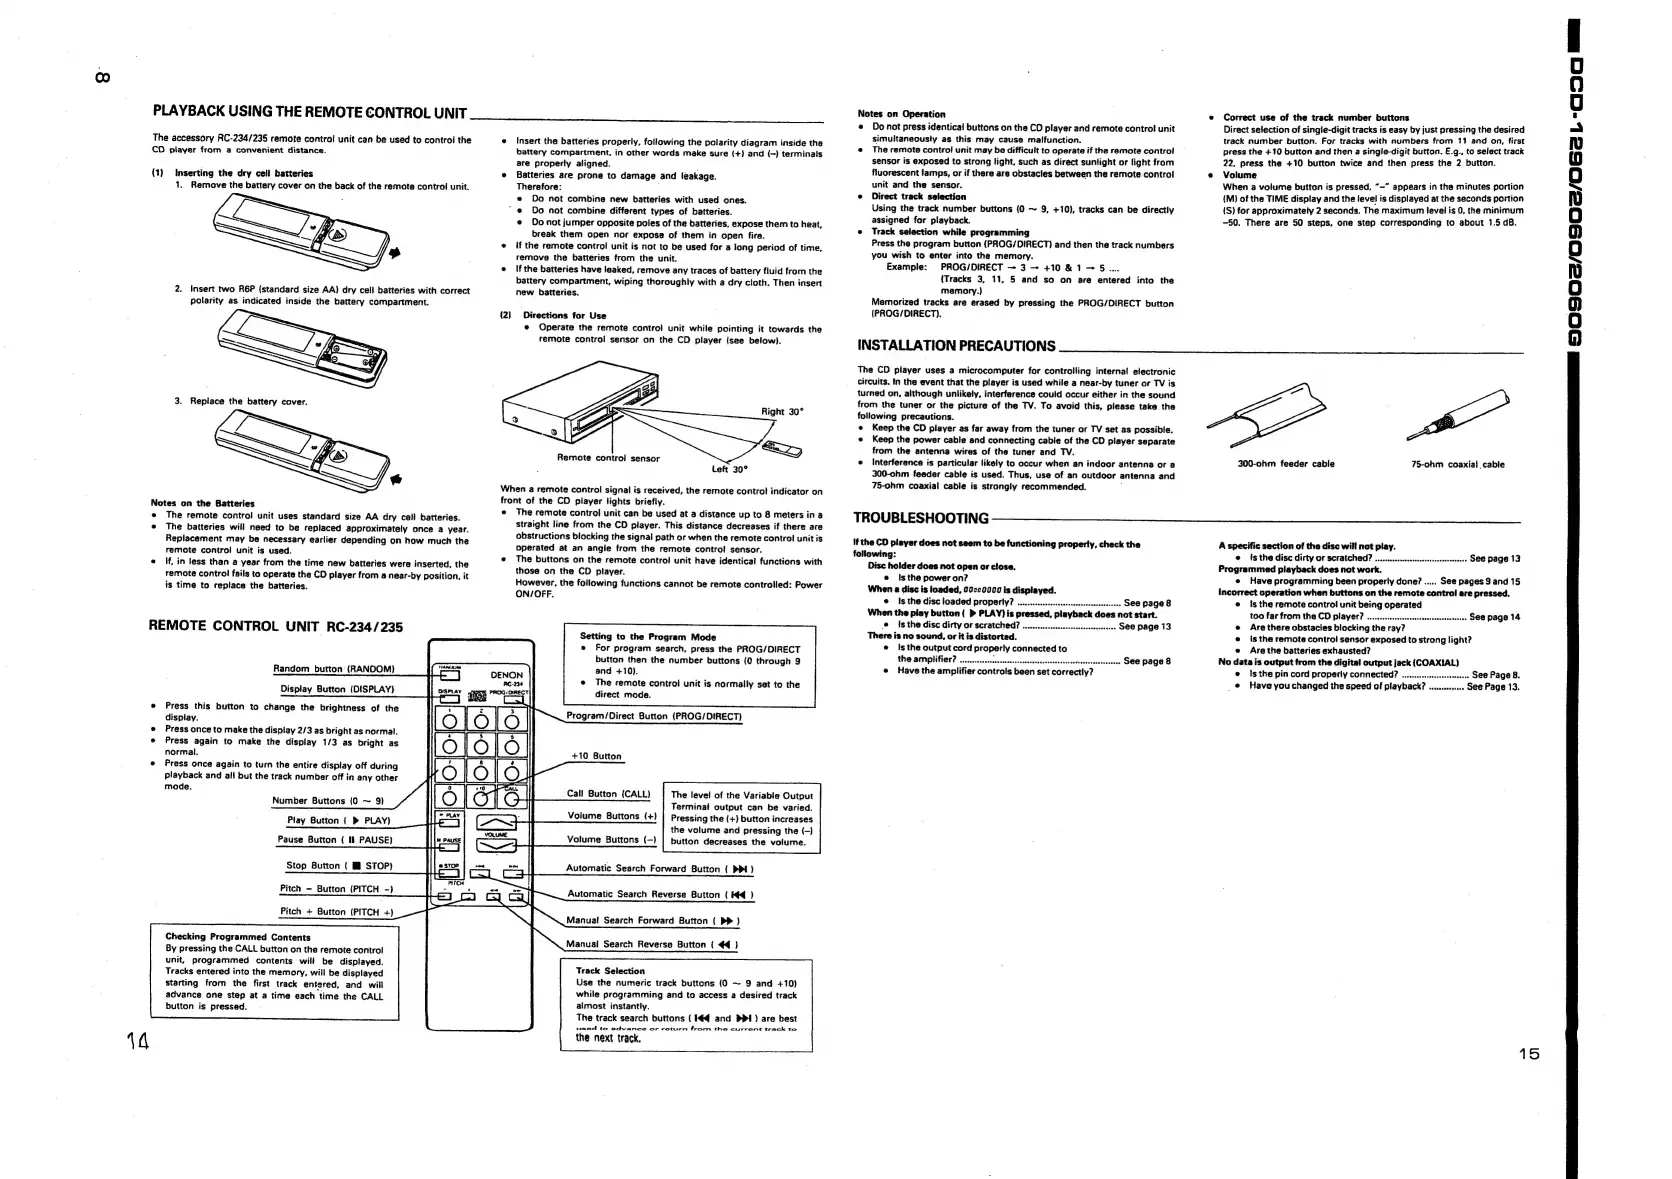
Interference
is
particular
likely
to
occur
when
an
indoor
antenna
or
a
300-ohm
feeder
cable
is
used.
Thus,
use
of
an
outdoor
antenna
and
75-ohm
coaxial
cable
is
strongly
recommended.
:
TROUBLESHOOTING
if
the
CD
player
does
not
seem
to
be
functioning
properly,
check
the
following:
Disc
holder
does
not
open
or
close.
e
Isthe
power
on?
When
a
disc
is
loaded,
00200000
is
displayed.
@
Is
the
disc
loaded
properly?
............ccccscccscssssssececcscereoes
See
page
8
When
the
play
button
(
>
PLAY)
is
pressed,
playback
does
not
start.
@
Isthe
disc
dirty
or
scratched?
.............c:scsccsssssssseessseeee
See
page
13
There
is
no
sound,
or
it
is
distorted.
e
ts
the
output
cord
properly
connected
to
the
amplifier?
0.0...
eecscscecsserscsescessacacesssssecesssccesserecores
See
page
8
e
Have
the
amplifier
controls
been
set
correctly?
e
Correct
use
of
the
track
number
buttons
Direct
selection
of
single-digit
tracks
is
easy
by
just
pressing
the
desired
track
number
button.
For
tracks
with
numbers
from
11
and
on,
first
press
the
+10
button
and
then
a
single-digit
button.
E.g.,
to
select
track
22,
press
the
+10
button
twice
and
then
press
the
2
button.
Volume
When
a
volume
button
is
pressed,
“—"
appears
in
the
minutes
portion
(M)
of
the
TIME
display
and
the
level
is
displayed
at
the
seconds
portion
{S)
for
approximately
2
seconds.
The
maximum
level
is
0,
the
minimum
-50.
There
are
50
steps,
one
step
corresponding
to
about
1.5
dB.
300-ohm
feeder
cable
75-ohm
coaxial
cable
A
specific
section
of
the
disc
will
not
play.
@
ts
the
disc
dirty
or
scratched?
...........c.ccccccsssescsseeseeseees
See
page
13
Programmed
playback
does
not
work.
e
Have
programming
been
properly
done?
.....
See
pages
9
and
15
incorrect
operation
when
buttons
on
the
remote
control
are
pressed.
e
Is
the
remote
control
unit
being
operated
too
far
from
the
CD
player?
.............sscsessssssesconesenserses
See
page
14
e
Are
there
obstacles
blocking
the
ray?
e
isthe
remote
control
sensor
exposed
to
strong
light?
e
Are
the
batteries
exhausted?
No
data
is
output
from
the
digital
output
jack
(COAXIAL)
e
Isthe
pin
cord
properly
connected?
............c.cccssseseers
See
Page
8.
_@
Have
you
changed
the
speed
of
playback?
.........
see
900
Page
13.
|
a
ee
§FO90-/0O90c/0GeL-dac20
m=

 Loading...