9
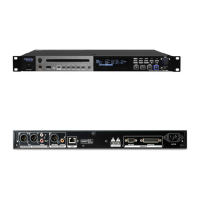
Setup / Connection Diagram
ZONE 2
SOURCE
ZONE 3 ZONE 3
SOURCE STATUS DIMMER
VIDEO
AUX 1
SETUP MIC
INTEGRATED NETWORK AV RECEIVER
SSEERI
AVR-X4000
IN-Command
L - AUDIO - R
1 CBL/SAT 3 GAME 4 NETWORK
QUICK SELECT
2 Blu-ray
PHONES BACK
ENTER
INFO
SETUP
ZONE 2
SOURCE SELECT
MASTER VOLUME
ON/OFF
AUX 1
HDMI 7 5V/1A
ON/OFF
OPTION
Items not listed under the Box Contents are sold separately.
Important: Connect all cables securely and properly (with stereo cables: left with left, right with right), and do not
bundle them with the power cable.
1. Use a stereo RCA cable to connect the Tuner Outputs (unbalanced) to the analog inputs of your external
receiver, amp, etc. Make sure the Tuner Region Select Switch is set to the number for your location: 1 (North
and South America, 2 (Europe and Asia Pacific region), or 3 (Japan).
Note: If the unit’s power is on, turn the power off and on again. If the unit is powered on, turn its power off and
on again after changing this setting. When the unit powers on again, it will be set for the selected area.
2. Use XLR cables or a stereo RCA cable to connect the CD/USB/SD/AUX/BT Outputs (balanced or unbalanced)
to the analog inputs of your external receiver, amp, powered monitors, etc.
3. Connect the included Bluetooth antenna to the Bluetooth Antenna Terminal.
4. Connect the included FM antenna to the FM Antenna Terminal.
5. Connect the included AM antenna loop to the AM Antenna Terminals.
Make sure the AM loop antenna lead terminals do not touch metal
parts of the panel. (Even if you use an external AM antenna, do not
disconnect the AM loop antenna.)
If you want to hang the AM antenna loop on a wall, use a nail or tack to attach it (unassembled) to the wall.
If you want to stand the AM antenna loop on a flat surface, assemble it (see images below):
i. Put the stand section through the bottom of the loop antenna from the rear and bend it forward.
ii. Insert the projecting part into the square hole in the stand.
6. After completing all the connections, use the included power cable to connect the AC In to a power outlet.
FM Antenna
AM Antenna Loop Receiver, amp, etc. Power
1 2 6
M Loop
Antenna
Projecting
part
Square
hole
Stand
ii.i.
4 5 3
Bluetooth Antenna Powered Monitors
2
 Loading...