DANSK
10
• Kontrollér for eventuelle skader på værktøjet,
dele og tilbehør, der kan være opstået under
transport.
• Tag dig tid til at læse denne vejledning grundigt
og forstå den før betjening.
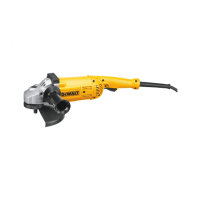
Beskrivelse (fi g. 1)
ADVARSEL: Modificér aldrig elektrisk
værktøj eller nogle dele heraf. Det kan
medføre materiale- eller personskade.
a. Tænd/sluk-kontakt
b. Åbningskontakt
c. Spindellås
d. Skærm
e. Sidehåndtag
TILSIGTET BRUG
De kraftige D28940, D28941, D28942, D28942S,
D28943 vinkelslibere er blevet fremstillet til
professionel slibning, skæring og pudsning.
ANVEND IKKE andre slibehjul udover
navforsænkede hjul og papirskiver.
MÅ IKKE anvendes under våde forhold eller i
nærheden af brændbare væsker eller gasser.
Disse slidstærke vinkelslibere er professionelt
elværktøj.
LAD IKKE børn komme i kontakt med værktøjet.
Overvågning er påkrævet, når uerfarne brugere
anvender dette værktøj.
• Dette produkt er ikke beregnet til anvendelse af
personer (inklusive børn) med nedsatte fysiske,
sensoriske eller mentale handicaps; mangel på
erfaringer, viden eller færdigheder, medmindre
de er under overvågning af en person, der er
ansvarlig for deres sikkerhed. Børn må aldrig
efterlades alene med dette produkt.
Blød opstart
D28492S
Med denne funktion øges hastigheden langsomt
for at undgå ubehagelige ryk under opstarten.
Funktionen er særlig nyttig ved arbejde under trange
forhold.
El-sikkerhed
Elmotoren er kun designet til én spænding.
Kontrollér altid, at strømforsyningen svarer til
spændingen på mærkepladen.
Dit DEWALT-værktøj er dobbeltisoleret i
overensstemmelse med EN 60745, og
derfor er en jordledning ikke påkrævet.
Hvis forsyningsledningen er beskadiget, skal den
udskiftes med en særlig ledning, der kan fås
gennem DEWALT’s serviceorganisation.
Brug af forlængerledning
Hvis en forlængerledning er påkrævet, skal du
anvende en godkendt 3-koret forlængerledning, der
passer til dette værktøjs effektforbrug (se Tekniske
data). Den minimale lederstørrelse er 1,5 mm
2
; den
maksimale længde er 30 m.
Ved brug af en kabeltromle skal kablet altid rulles
helt ud.
ADVARSEL: Sørg altid for at kablets
holdeanordning er korrekt og sikkert
fastgjort til kabelkappen.
SAMLING OG JUSTERING
ADVARSEL: For at reducere risikoen
for personskade skal du slukke
for værktøjet og afbryde det fra
strømkilden, inden der foretages
justeringer, eller der fjernes/
monteres tilbehør eller ekstraudstyr.
Før værktøjet tilsluttes igen, skal du
trykke på udløserkontakten og slippe
den igen for at sikre, at værktøjet er
slukket.
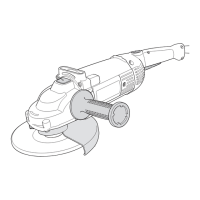
Påsætning af sidehåndtag (fi g. 2)
ADVARSEL: Før du anvender værktøjet,
skal du sikre, at håndtaget sidder godt
fast.
ADVARSEL: Sidehåndtaget skal altid
bruges for hele tiden at opretholde
kontrol over værktøjet.
Skru sidehåndtaget (e) godt fast i et af hullerne (g)
på en af gearkassens sider.
Montering og fjernelse af
beskyttelsesskærmen (fi g. 3)
ADVARSEL: For at reducere risikoen
for personskade skal du slukke
for værktøjet og afbryde det fra
strømkilden, inden der foretages
justeringer, eller der fjernes/
monteres tilbehør eller ekstraudstyr.
Før værktøjet tilsluttes igen, skal du
trykke på udløserkontakten og slippe
den igen for at sikre, at værktøjet er
slukket.
 Loading...