EasyManua.ls Logo

DeWalt DC390B - User Manual

DeWalt DC390B
20 pages
Print Icon
To Next Page IconTo Next Page
Loading...
1
English
1) WORK AREA SAFETY
a) Keep work area clean and well lit. Cluttered or dark areas
invite accidents.
b) Do not operate power tools in explosive atmospheres,
such as in the presence of flammable liquids, gases or
dust. Power tools create sparks which may ignite the dust or
fumes.
c) Keep children and bystanders away while operating a
power tool. Distractions can cause you to lose control.
2) ELECTRICAL SAFETY
a) Power tool plugs must match the outlet. Never modify
the plug in any way. Do not use any adapter plugs with
earthed (grounded) power tools. Unmodified plugs and
matching outlets will reduce risk of electric shock.
b) Avoid body contact with earthed or grounded surfaces
such as pipes, radiators, ranges and refrigerators. There
is an increased risk of electric shock if your body is earthed or
grounded.
c) Do not expose power tools to rain or wet conditions.
Water entering a power tool will increase the risk of electric
shock.
d) Do not abuse the cord. Never use the cord for carrying,
pulling or unplugging the power tool. Keep cord away
from heat, oil, sharp edges or moving parts. Damaged or
entangled cords increase the risk of electric shock.
e) When operating a power tool outdoors, use an extension
cord suitable for outdoor use. Use of a cord suitable for
outdoor use reduces the risk of electric shock.
f) If operating a power tool in a damp location is unavoidable,
use a ground fault circuit interrupter (GFCI) protected
supply. Use of a GFCI reduces the risk of electric shock.
Defi nitions: Safety Guidelines
The definitions below describe the level of severity for each
signal word. Please read the manual and pay attention to
these symbols.
DANGER: Indicates an imminently hazardous situation
which, if not avoided, will result in death or serious injury.
WARNING: Indicates a potentially hazardous situation
which, if not avoided, could result in death or serious injury.
CAUTION: Indicates a potentially hazardous situation which,
if not avoided, may result in minor or moderate injury.
NOTICE: indicates a practice not related to personal injury
which, if not avoided, may result in property damage.
IF YOU HAVE ANY QUESTIONS OR COMMENTS ABOUT THIS OR
ANY D
EWALT TOOL, CALL US TOLL FREE AT: 1-800-4-DEWALT
(1-800-433-9258).
WARNING: To reduce the risk of injury, read the instruction
manual.
General Power Tool Safety Warnings
WARNING! Read all safety warnings and all instructions.
Failure to follow the warnings and instructions may result in
electric shock, fire and/or serious injury.
SAVE ALL WARNINGS AND INSTRUCTIONS
FOR FUTURE REFERENCE
The term “power tool” in the warnings refers to your mains-operated
(corded) power tool or battery-operated (cordless) power tool.
Question and Answer IconNeed help?

Do you have a question about the DeWalt DC390B and is the answer not in the manual?

Summary

General Power Tool Safety Warnings

Definitions: Safety Guidelines

Definitions for signal words like DANGER, WARNING, CAUTION, NOTICE.

Work Area Safety

Guidelines for maintaining a safe and hazard-free work environment.

Electrical Safety

Precautions to prevent electric shock and hazards related to power.

Personal Safety

Stay alert and use common sense.

Emphasizes awareness, avoiding fatigue, and influence of substances.

Use Personal Protective Equipment.

Mandates wearing eye protection and other PPE for various conditions.

Prevent unintentional starting.

Ensure the switch is off before connecting power or handling the tool.

Power Tool Use and Care

Maintain power tools.

Regularly check for damage, misalignment, or binding before use.

Battery Tool Use and Care

Recharge only with specified charger.

Using an incompatible charger can create a fire risk.

Additional Safety Rules for Circular Saws

Keep hands away from cutting area.

Keep second hand on auxiliary handle or motor housing.

Causes and Operator Prevention of Kickback

Sudden reaction from pinched, bound, or misaligned blade causing uncontrolled movement.

Kickback Prevention and Blade Binding

When blade is binding, release trigger.

Hold saw motionless until blade stops; investigate cause.

Lower Guard Safety Instructions

Ensuring the proper function and maintenance of the lower blade guard.

Personal Protective Equipment (PPE)

Always use safety glasses.

Everyday glasses are not safety glasses; use certified eye protection.

Wear certified safety equipment.

Includes ANSI Z87.1 eye, ANSI S12.6 hearing, and NIOSH respiratory protection.

Dust and Chemical Exposure Precautions

Minimize dust exposure.

Work in ventilated areas and use approved dust masks.

Important Safety Instructions for All Battery Packs

Recharge only with specified charger.

Using an incompatible charger can create a fire risk.

Battery Pack Handling and Charging Safety

Do not charge or use in explosive atmospheres.

Avoid flammable liquids, gases, or dust around charging.

Never attempt to open battery pack.

Damaged packs can cause electric shock or electrocution.

Specific Safety Instructions for NiCd;NiMH

Do not incinerate damaged battery packs.

Severely damaged packs can explode in fire.

Specific Safety Instructions for Li-Ion

Do not incinerate Li-Ion battery packs.

Packs can explode in fire, creating toxic fumes.

Important Safety Instructions for All Battery Chargers

Read all instructions and cautionary markings.

Familiarize yourself with charger, battery, and product warnings.

Beware of electrical hazards.

120 volts present; do not probe contacts with conductive objects.

Keep foreign material away from charger contacts.

Prevent conductive materials from contacting exposed contacts.

Extension Cord Safety and Usage

Ensure adequate wire size (AWG) for safety.

Undersized cords cause voltage drop, overheating; use heavier gauge if in doubt.

Charger Placement and Maintenance

Do not block ventilation slots.

Avoid placing objects on charger or using on soft surfaces.

Disconnect charger before cleaning.

Reduces risk of electric shock; removing battery does not.

Charger Operation and Features

Never connect two chargers together.

Avoid potential damage or hazards.

Using Automatic Tune-Up Mode

Purpose of Tune-Up Mode.

Equalizes individual cells for peak capacity and performance.

Chargers and Indicator Lights

Charging Procedure.

Plug in charger, insert battery, observe red charging light.

Charge Indicators and Troubleshooting

Interpreting flashing red light.

Indicates pack or charger problems; re-insert or try different pack.

Important Charging Notes

Optimal charging temperature.

Charge between 65°F-75°F (18°-24°C) to prevent damage.

Recharge when power is insufficient.

Recharge when jobs easily done previously become difficult.

Charger Operation and Storage

Never attempt to open battery pack.

Damaged packs require return to service center.

Storage Recommendations

Best storage location.

Cool and dry place away from direct sunlight and extreme temperatures.

OPERATION

Turn tool off before adjustments.

Remove battery pack before making adjustments or installing accessories.

Installing and Removing the Battery Pack

Engage switch lock-off button.

Prevent switch actuation before installing or removing battery.

Switch Operation

Release lock-off button to operate.

Press lock-off button, pull trigger to turn motor ON.

Changing Blades

To Install the Blade.

Place washers, blade, and tighten screw using blade wrench.

Never engage blade lock while saw is running.

Serious damage can result from engaging lock during operation.

Replacing the Blade

Loosen blade clamping screw.

Depress blade lock, turn spindle with wrench to loosen screw.

Select proper blade for application.

Use correct size, shape, and maximum recommended speed.

Lower Blade Guard Safety

Never use saw if lower guard is missing or not working.

Guard is essential for reducing serious personal injury.

Blade Safety and Selection

Always use eye protection.

Minimize risk of eye injury from flying debris or broken tips.

Dull blades cause problems.

Lead to slow cutting, motor overload, splintering, and kickback.

Kickback: Causes and Conditions

Kickback definition.

Sudden reaction to pinched, bound, or misaligned blade.

Kickback Prevention - Operator Actions

Improper Depth of Cut Setting.

Expose only 1/2 tooth for efficient cut, minimize twisting.

Blade Twisting (Misalignment in Cut).

Caused by pushing harder, turning saw in cut, or poor body control.

Cutting Depth Adjustment

Set depth adjustment for efficient cutting.

1/2 tooth projection minimizes friction, removes sawdust.

Bevel Angle Adjustment

Setting the Saw for a Bevel Cut.

Loosen knob, tilt shoe to desired angle, retighten knob.

Work Piece Support

Support work properly and hold saw firmly.

Prevents loss of control and potential injury.

Support board or panel NEAR the cut.

Ensures stability and prevents kickback.

Cutting Techniques

Be sure saw is up to full speed before contacting material.

Starting with blade against material can cause kickback.

If cut goes off line, do not force it back.

Release trigger, stop saw, sight anew, and start a new cut.

If saw stalls, release trigger and back out.

Ensure blade is straight and clear before restarting.

Ripping and Pocket Cutting

Never tie blade guard in raised position.

This can cause the unit to raise and result in injury.

Never move saw backwards when pocket cutting.

Can cause unit to raise off surface, resulting in injury.

MAINTENANCE & Cleaning

Turn tool off and remove battery before maintenance.

Prevents accidental start-up and injury during adjustments.

Blow dirt and dust out of air vents.

Use clean, dry air at least weekly; wear eye protection.

CHARGER CLEANING INSTRUCTIONS

Disconnect charger from AC outlet before cleaning.

Remove dirt/grease with cloth or brush; do not use water.

Accessories

Use only DEWALT recommended accessories.

Using untested accessories can be hazardous.

Repairs

Have repairs performed by qualified personnel.

Use DEWALT service centers and identical replacement parts.

Register Online

Benefits of product registration.

Warranty service, proof of ownership, and safety notifications.

Three Year Limited Warranty

Warranty coverage details.

Covers defects in materials/workmanship for three years.

DEWALT BATTERY PACKS Warranty

Tampering voids battery warranty.

DEWALT is not responsible for injury caused by tampering.

90 DAY MONEY BACK GUARANTEE

Full refund policy.

Return product within 90 days for a full refund if not satisfied.

FREE WARNING LABEL REPLACEMENT

Request replacement warning labels.

Call 1-800-4-DEWALT for illegible or missing labels.

Overview

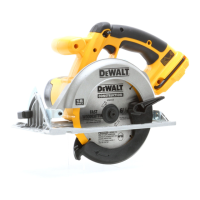
This document describes the operation, safety, and maintenance of a DEWALT cordless circular saw, specifically the DCXXX 6 1/2" (165mm) model.

Function Description:

The DEWALT DCXXX is a cordless circular saw designed for cutting various materials, primarily wood. It operates on a battery pack, providing portability and freedom from power cords. The saw is equipped with a lower blade guard for safety, depth and bevel adjustment mechanisms for versatile cutting, and a kerf indicator for accurate guidance. It is intended for general purpose cutting, smooth wood cutting, and non-carbide, plywood/vinyl siding cutting, depending on the blade used.

Important Technical Specifications:

  • Model: DCXXX 6 1/2" (165mm) Cordless Circular Saw
  • Blade Diameter: 6-1/2" (165mm)
  • Power Source: DEWALT battery packs (specific models listed: DC9071, DC9091, DC9096, DC9182, DC9280, DC9360, DC9180, DCB120, DCB127, DCB201, DCB203, DCB207, DCB200, DCB204, DCB205)
  • Charger Compatibility: DEWALT chargers (specific models not detailed but implied to be compatible with listed battery packs)
  • Bevel Adjustment: 0° to 50°
  • Depth Adjustment: Allows blade to protrude 1/2 of a tooth below the material for efficient cutting.
  • Blade Arbor Holes: Designed for correct size and shape (diamond versus round) to prevent eccentric running.

Usage Features:

  • Personal Safety: Users are instructed to stay alert, wear eye protection (ANSI Z87.1, CAN/CSA Z94.3), hearing protection (ANSI S12.6, S3.19), and respiratory protection (NIOSH/OSHA/MSHA) when operating the tool, especially in dusty conditions. Loose clothing, jewelry, and long hair should be kept away from moving parts.
  • Work Area Safety: The work area must be clean, well-lit, and free from explosive atmospheres. Children and bystanders should be kept away.
  • Electrical Safety (for chargers): Charger plugs must match outlets. Avoid body contact with earthed surfaces. Do not expose chargers to rain or wet conditions. Use extension cords suitable for outdoor use when operating outdoors, and a GFCI-protected supply in damp locations.
  • Battery Pack Installation/Removal: The battery pack slides into the tool handle until it snaps into place. Removal requires pressing release buttons and pulling the pack out. The switch lock-off button (A) should be engaged before installing or removing the battery.
  • Switch Operation: The trigger switch (B) turns the motor ON when pulled and OFF when released. There is no provision to lock the switch in the ON position.
  • Blade Changing: Involves placing inner and outer clamp washers, ensuring correct blade rotation direction, and tightening the blade clamping screw (H) using the blade lock (K) and blade wrench. The blade lock should never be engaged while the saw is running.
  • Cutting Depth Adjustment: The depth adjustment knob (D) is loosened to move the shoe and set the desired depth, then retightened.
  • Bevel Angle Adjustment: The bevel adjustment knob (J) is loosened to tilt the shoe to the desired angle, then retightened.
  • Kerf Indicator: Located at the front of the saw shoe, it helps guide the saw along cutting lines, aligning with the left (outer) side of the blade.
  • Workpiece Support: Emphasizes supporting the workpiece firmly with clamps or a stable platform, positioning the body to either side of the blade (not in line), and supporting the board or panel near the cut to prevent kickback.
  • Ripping: The use of a rip fence is recommended for cutting wider boards into narrower strips along the grain.
  • Pocket Cutting: Requires adjusting cutting depth, tilting the saw forward, retracting the lower blade guard, lowering the shoe until blade teeth almost touch the cutting line, releasing the guard, starting the motor, and gradually lowering the saw until the shoe rests flat on the material.
  • Kickback Prevention: Avoid blade binding, improper depth setting, blade twisting, and using dull or dirty blades. Maintain a firm grip and proper body position.
  • Battery Charging: DEWALT chargers are designed for 120-volt household electrical power. The charging process is indicated by a blinking red light, which becomes solid when fully charged. The "Automatic Tune-Up™" mode equalizes individual cells for peak capacity, lasting up to 8 hours after the initial charge.
  • Hot/Cold Pack Delay: Some chargers feature this to suspend charging if the battery is too hot, resuming once it cools to ensure maximum battery life.
  • Problem Power Line Indicator: Some chargers will flash the red light with two fast blinks followed by a pause if the power source is out of limits.

Maintenance Features:

  • General Maintenance: Power tools should be maintained by checking for misalignment or binding of moving parts, breakage, and other conditions affecting operation. Damaged tools must be repaired before use. Cutting tools should be kept sharp and clean.
  • Service: Power tools should be serviced by qualified repair personnel using identical replacement parts to ensure safety.
  • Lubrication: The tool uses self-lubricating ball and roller bearings, so relubrication is not required. However, an annual cleaning, inspection, and lubrication of the gear case by a certified service center is recommended.
  • Cleaning: Air vents should be blown out with clean, dry air at least once a week. Non-metallic parts can be cleaned with a cloth dampened with water and mild soap. Chargers should be disconnected from the AC outlet before cleaning, and dirt/grease can be removed from the exterior with a cloth or soft non-metallic brush.
  • Battery Pack Storage: Best stored in a cool, dry place away from direct sunlight and excessive heat or cold. For long storage, a fully charged battery pack should be stored out of the charger.
  • Charger Maintenance: Do not operate chargers with damaged cords or plugs, or if they have received a sharp blow or damage. Do not disassemble chargers; take them to an authorized service center for repair. Disconnect from the outlet before cleaning.

Safety Guidelines (General):

  • DANGER: Indicates an imminently hazardous situation that will result in death or serious injury if not avoided.
  • WARNING: Indicates a potentially hazardous situation that could result in death or serious injury if not avoided.
  • CAUTION: Indicates a potentially hazardous situation that may result in minor or moderate injury if not avoided.
  • NOTICE: Indicates a practice not related to personal injury that may result in property damage if not avoided.

Battery Safety:

  • Never incinerate battery packs, as they can explode.
  • Avoid contact with battery liquid; if contact occurs, wash skin with soap and water, and flush eyes with clean water for 10 minutes, seeking medical attention if needed.
  • Do not store or carry battery packs with metal objects that could short the terminals.
  • Do not store or use battery packs in temperatures exceeding 105 °F (40 °C).
  • Do not force battery packs into non-compatible chargers.
  • Do not splash or immerse battery packs in water or other liquids.
  • Damaged battery packs should be returned to a service center for recycling.

Warranty Information:

  • Three Year Limited Warranty: Covers defects due to faulty materials or workmanship for three years from the date of purchase. Does not cover normal wear or tool abuse.
  • 1 Year Free Service: DEWALT will maintain the tool and replace worn parts caused by normal use for free during the first year.
  • 2 Years Free Service on DEWALT Battery Packs: Applies to specific battery models (DC9071, DC9091, DC9096, DC9182, DC9280, DC9360, DC9180, DCB120, DCB127, DCB201, DCB203, DCB207).
  • 3 Years Free Service on DEWALT Battery Packs: Applies to specific battery models (DCB200, DCB204, DCB205).
  • 90 Day Money Back Guarantee: Allows return for a full refund within 90 days of purchase with a receipt if not completely satisfied.
  • Online Registration: Recommended for warranty service, proof of ownership, and safety notifications.

DeWalt DC390B Specifications

General IconGeneral
BrandDeWalt
ModelDC390B
CategorySaw
LanguageEnglish

Related product manuals