ENGLISH
9
8
3. Retract the rack by pulling the rack handle
5
away from
thetool.
NOTE: If using cartridge designed for a mixing nozzle
to be attached before loading into dispenser, screw the
static mix nozzle onto the cartridge before proceeding
to step3.
4. Insertcartridge.
5. Line up the cartridge and the cartridge nozzle opening
to assure correctpositioning.
6. Push rack handle forward, lining up pistons
6
with the
openings on thecartridge.
7. Remove caps and plugs on the dispensing end of
cartridge.
NOTE: If using cartridge designed to be loaded into
dispenser before mixing nozzle is attached, screw the
static mix nozzle onto thecartridge.
Adjusting/Setting the Material Dosage
and Rate of Flow (Fig. E)
Specifications
Max Speed*: 6-1/8” per minute
Minimum Speed*: ¼” per minute
Max Dose*: 28 - 32 seconds
Min Dose*: 2-5 seconds
* Specifications are estimates and can vary depending upon the tool,
temperature and adhesive type.
Dose Control
The dose control dial
3
is used to set the dosage/amount
of adhesive dispensed per triggerpull.
• To set the dosage, rotate the dosing control dial until
the amount of adhesive needed per trigger
1
pull
isdischarged. Keep trigger depressed while applying
adhesive. Dose control will stop the tool automatically.
Speed Control
The speed feature allows you to speed up or slow down the
rate of flow ofadhesive.
• To set the rate of flow, rotate the speed control dial
2
to the flow that is best suited to theapplication.
Changing the speed while using the dosing feature will
reduce or increase the amount of adhesivedispensed.
NOTE: Both the dose control and speed control dials will act
as an "off" switch when adjusted to their minimumsetting.
The tool will not function and the racks will not move when
in this state from eitherdial.
Fig. E
3
2
OPERATION
WARNING: To reduce the risk of serious personal
injury, turn unit off and remove the battery pack
before making any adjustments or removing/
installing attachments or accessories. An
accidental start-up can causeinjury.
Installing and Removing the Battery Pack
(Fig. F)
CAUTION: Release trigger and wait for tool to stop
before removing battery pack. Removal of battery
pack or cartridges during operation is prohibited. This
could cause damage to tool or personalinjury.
NOTE: For best results, make sure your battery pack is
fullycharged.
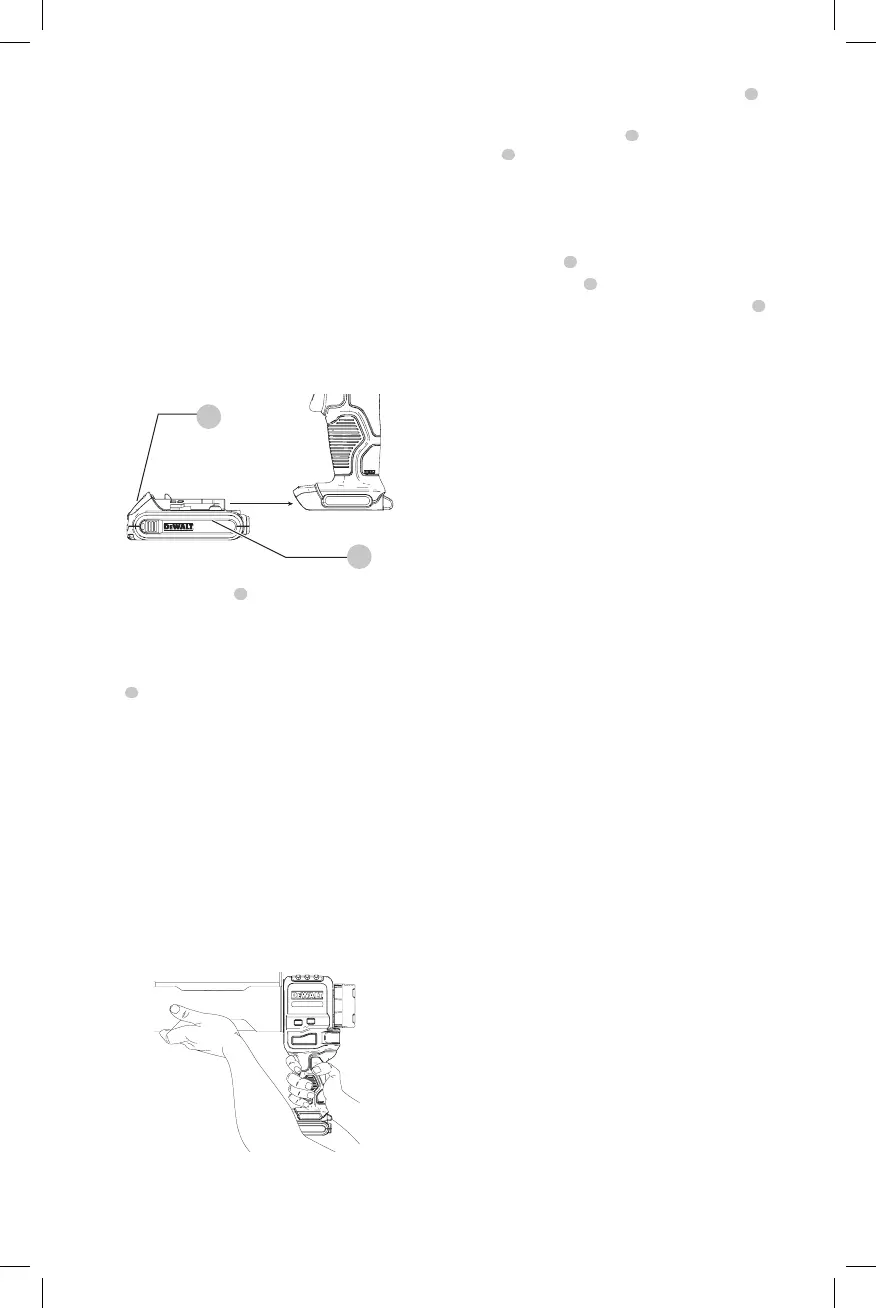
Fig. F
9
8
To install the battery pack
8
into the tool handle, align the
battery pack with the rails inside the tool’s handle and slide
it into the handle until the battery pack is firmly seated in
the tool and ensure that it does notdisengage.
To remove the battery pack from the tool, press the release
button
9
and firmly pull the battery pack out of the tool
handle. Insert it into the charger as described in the charger
section of thismanual.
Proper Hand Position (Fig. G)
WARNING: To reduce the risk of serious personal injury,
ALWAYS use proper hand position asshown.
WARNING: To reduce the risk of serious personal
injury, ALWAYS hold securely in anticipation of a
suddenreaction.
Proper hand position requires one hand on the handle to
actuate the trigger, and the other under the front end to
support the weight of the tool andcartridge.
Fig. G
Dispensing Material (Fig. A)
NOTICE: DO NOT dispense epoxy when it is above or
below manufacturers reccomendedtemperature.
1. With battery in the tool, close the clutch lever
4
to
engageclutch.
2. Adjust speed control dial
2
and/or dosing control
dial
3
to your need. Refer to Adjusting/Setting the
Material Dosage and Rate ofFlow.
3. Hold trigger to begin dispensingadhesive.
When Finished Dispensing Or When End Of Cartridge
Is Reached:
1. Releasetrigger
1
.
2. Open clutchlever
4
.
3. Retract rack by pulling back on the rackhandle
5
.
4. Removecartridge.
NOTE: Store or dispose of used cartridge in accordance
with manufacturer’s instructions and any applicable
laws orregulations.
WARNING: When not in use, rotate speed control
to the off position and remove battery pack. This
prevents tool from startingunintentionally.
MAINTENANCE
WARNING: To reduce the risk of serious personal
injury, turn unit off and remove the battery pack
before making any adjustments or removing/
installing attachments or accessories. An
accidental start-up can causeinjury.
Cleaning
WARNING: Blow dirt and dust out of all air vents with
clean, dry air at least once a week. To minimize the risk
of eye injury, always wear ANSI Z87.1 approved eye
protection when performingthis.
WARNING: Never use solvents or other harsh
chemicals for cleaning the non-metallic parts of
the tool. These chemicals may weaken the plastic
materials used in these parts. Use a cloth dampened
only with water and mild soap. Never let any liquid
get inside the tool; never immerse any part of the tool
into aliquid.
NOTICE: Material left in the cartridge/sausage
holder may dry if left unattended. Do not attempt to
dispense material under this condition. Follow the
adhesive manufacturer's recommendations when
using caulk or adhesive material to reduce the risk of
propertydamage.
To clean the cartridge holder, follow adhesive
manufacturer's recommendations for cleaning material
from nozzle, barrel plunger and plungerrod.
Accessories
WARNING: Since accessories, other than those
offered by
, have not been tested with this
product, use of such accessories with this tool could be
hazardous. To reduce the risk of injury, only
recommended accessories should be used with
thisproduct.
Recommended accessories for use with your tool
are available at extra cost from your local dealer or
authorized service center. If you need assistance in