ENGLISH
12
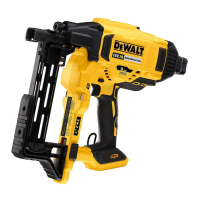
To select rapid sequential operating mode (RapidCycle),
slide the tool free mode select switch
4
to display the
double arrow icon.
NOTE: Battery life in RapidCycle mode will be shorter than
in standard sequential mode. Leaving the tool in standard
sequential will give maximum batterylife.
Sequential Mode
The sequential mode is used for intermittent stapling. It
offers the maximum battery life for drivingstaples.
1. Using the tool free mode select switch
4
, select the
sequentialmode.
2. Release the trigger lock-off
2
.
3. Push the contact trip
7
against the worksurface.
4. Pull the trigger switch
1
to actuate thetool.
5. Release the trigger and raise the stapler from the
worksurface.
6. Repeat steps 3–5 to actuate the nextstaple.
RapidCycle Mode
In RapidCycle mode, the motor rotation speed is
automatically restored after driving a staple to allow fast
consecutive stapling. While offering the ability to drive more
staples in less time, this mode more quickly depletes the
batterycharge.
1. Using the tool free mode select switch
4
, select the
RapidCyclemode.
2. Release the trigger lock-off
2
.
3. Push the contact trip
7
against the worksurface.
4. Pull the trigger switch
1
to actuate thetool.
5. Release the trigger and raise the stapler from the
worksurface.
NOTE: The tool motor returns to full speed
automatically without the contact trip
7
beingdepressed.
6. Repeat steps 3–5 to actuate the nextstaple.
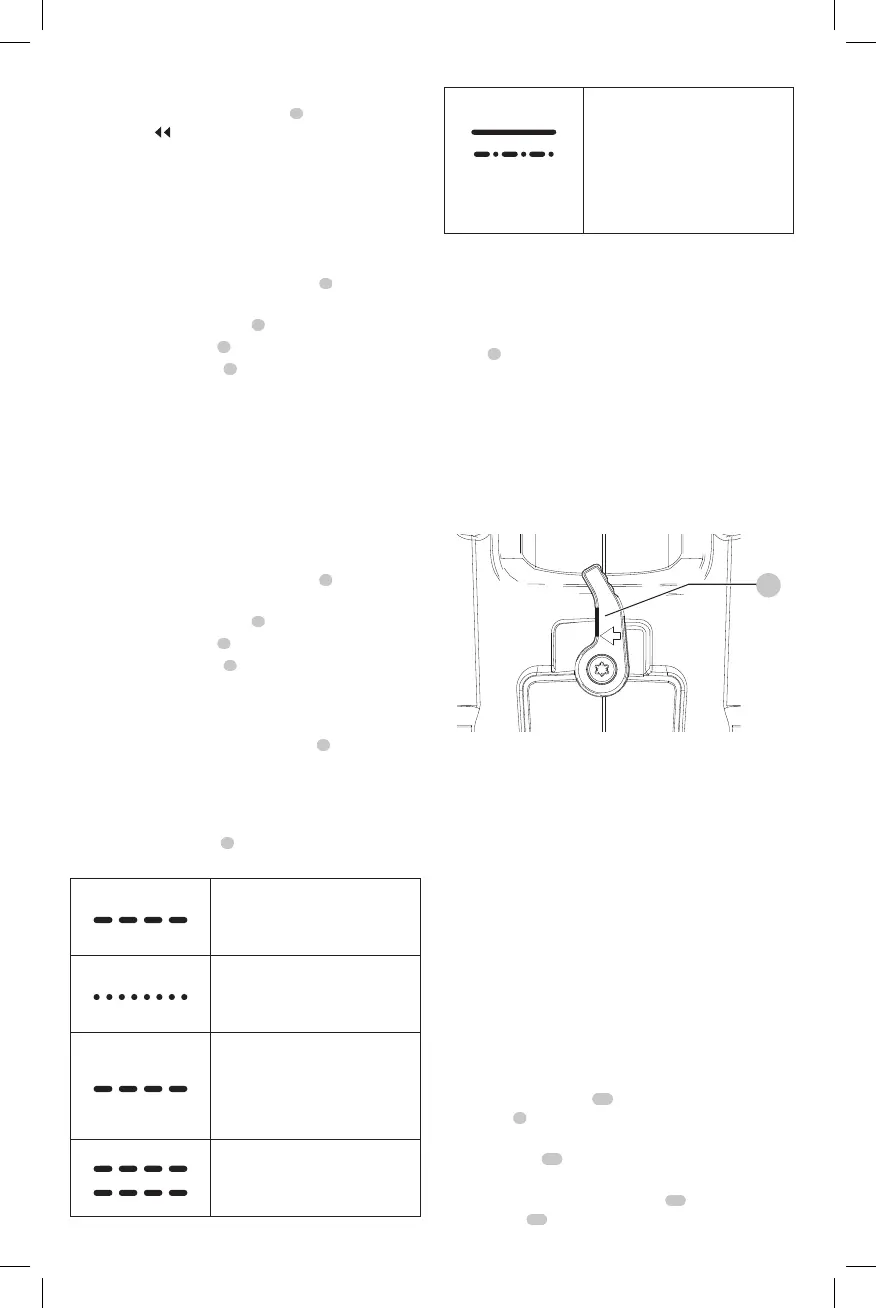
Headlights/LED Indicator (Fig. A)
There are LED work lights
9
located on the front of the tool
on each side of themagazine.
LOW BATTERY
Replace battery with a
chargedpack.
HOT PACK
Let the battery cool or replace it
with a coolpack.
JAM/STALL CONDITION
Rotate the stall release lever
torelease.
Refer to Tool Free Stall Release
or Clearing a JammedStaple.
HOT TOOL (Both LEDs Flashing)
Let the tool cool down before
continuinguse.
or any
other combination.
ERROR
Reset tool by removing and
reinserting battery pack or
cycling trigger lock off. If
error code persist, take tool
to an authorized
servicecenter.
Tool Free Stall Release (Fig. L)
If the stapler is used in harder material where all available
energy in the motor is used to drive a fastener, the tool
may stall. The driver will not complete the drive cycle and
the jam/stall indicator will flash. Rotate the tool free stall
release
8
on the tool and the mechanism willrelease.
NOTE: The tool will disable itself and not reset until the
battery pack has been removed and reinserted. If the
driver does not automatically return to the home position,
proceed to Clearing a Jammed Staple. If the unit continues
to stall please review the material and fastener length to be
sure that it is not too rigorous an application. The stapler
could also be overheated and needs time to cool before
furtheruse.
Fig. L
8
Clearing a Jammed Staple (Fig. A, M)
WARNING: To reduce the risk of serious personal
injury, disconnect battery pack from tool before
making any adjustments, changing accessories,
servicing, or moving the tool. Such preventative
safety measures reduce the risk of starting the
toolaccidentally.
CAUTION: When removing a jammed staple, DO
NOT orient the stapler with the nose up or with
the battery foot up. Positioning the stapler this way
makes the jammed staple or pieces of the staple more
likely to be ingested into the stapler. If any portion of
a staple is ingested into the tool, the staple should be
retrieved by removing the topcap.
If a staple becomes jammed in the nosepiece, keep the
tool pointed away from you and follow these instructions
toclear:
1. Remove battery pack
14
from tool and engage trigger
lock-off
2
.
2. After laying the tool on its side, slide the spring-loaded
pusher latch
12
to the base of the magazine to lock it
into place and unload staplestrip.
3. Rotate the magazine release lever
11
and rotate the
magazine
10
forward.