25
ENGLISH
4
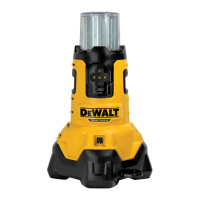
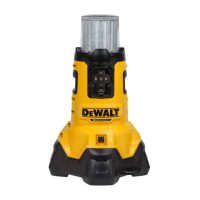
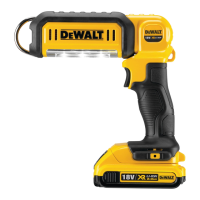
Power button
5
Brightness button
6
Date code (Fig. C)
Intended Use
This area light is designed for professional lightingapplications.
DO NOT use under wet conditions or in the presence of
flammable liquids orgases.
This area light is a professional powertool.
DO NOT let children come into contact with the tool.
Supervision is required when inexperienced operators use
thistool.
• Young children and the infirm. This appliance is not
intended for use by young children or infirm persons
withoutsupervision.
• This product is not intended for use by persons (including
children) suffering from diminished physical, sensory or
mental abilities; lack of experience, knowledge or skills
unless they are supervised by a person responsible for their
safety. Children should never be left alone with thisproduct.
Suspending/Mounting the Area Light
(Fig. C, D)
CAUTION: When the area light hangs by the hang hook or
hang inset, do not shake the light or the object from which it
hangs. Do not hang the area light from any electrical wires
or anything that is not secure. Personal injury or property
damage mayoccur.
CAUTION: Only use the hang hook or hang inset for
hanging the area light. The hang hook and hang inset are
not intended to support additional weight. Do not attach
or hang anything additional to the light or risk of breakage
mayoccur.
CAUTION: Do not use the hang hook to reach with.
Do not use the hang hook or hang inset to support your
weight in anysituation.
CAUTION: Do not stand underneath the area light when
it is mounted overhead. Serious personal injury or damage
to the light may result if the lightfalls.
CAUTION: Do not mount the area light to theceiling.
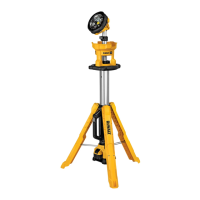
Your area light has multiple options for suspending ormounting.
Hang Hook (Fig. C)
The hang hook
7
is provided on the bottom of the area light to
allow suspending thelight.
Hang Inset (Fig. D)
A cord may be used to hang the light by looping it through the
hang inset
13
found on the bottom of thelight.
Screw Threads (Fig. D)
Screw threads, 1/4"-20
8
and 5/8"-11
9
, are provided on the
bottom of the area light to allow mounting to atripod.
CAUTION: Use only with
heavy-duty tripod
to ensure stability when mounted. Refer to Optional
Accessories for moreinformation.
1. Place the tripod's mounting screw into the appropriate
screw thread on the base of thelight and screw the tripod
to thelight.
2. Ensure the light is securelyattached.
Carrying the Area Light (Fig. A)
Carry the area light using one or two of the four side handles
2
.
Never use the side handles to attach the light to anything. Refer
to Suspending/Mounting the AreaLight.
ASSEMBLY AND ADJUSTMENTS
WARNING: To reduce the risk of serious personal
injury, turn tool off and disconnect battery pack
before making any adjustments or removing/
installing attachments or accessories. An accidental
start-up can causeinjury.
WARNING: Use only
battery packs andchargers.
Inserting and Removing the Battery Pack
from the Tool (Fig. B)
NOTE: Make sure your battery pack
10
is fullycharged.
1. To install the battery pack
10
into the area light, open the
battery compartment door
12
, align the battery pack with
the rails inside the battery compartment and slide it in until
the battery pack is firmly seated and latched. Ensure that it
does not disengage, then close thedoor.
2. To remove the battery pack from the area light, press the
battery release button
11
on the battery pack and firmly
pull the battery packout.
Fuel Gauge Battery Packs (Fig. B)
Some
battery packs include a fuel gauge which consists
of three green LED lights that indicate the level of charge
remaining in the batterypack.
To actuate the fuel gauge, press and hold the fuel gauge button.
A combination of the three green LED lights will illuminate
designating the level of charge left. When the level of charge
in the battery is below the usable limit, the fuel gauge will not
illuminate and the battery will need to berecharged.
NOTE: The fuel gauge is only an indication of the charge left on
the battery pack. It does not indicate tool functionality and is
subject to variation based on product components, temperature
and end-userapplication.
OPERATION
Instructions for Use
WARNING: Always observe the safety instructions and
applicableregulations.
WARNING: To reduce the risk of serious personal
injury, turn tool off and disconnect battery pack
before making any adjustments or removing/
installing attachments or accessories. An accidental
start-up can causeinjury.
Do not store anything inside the batterycompartment.