13
ENGLISH
IMPORTANT: Never operate a pole saw that is damaged or
improperly adjusted or that is not completely and securely
assembled. Be sure that the saw chain
7
stops moving when
the trigger switch is released. Never adjust the guide bar
6
or saw chain when the motor is operating or the battery
isattached.
Pole Saw Trimming/Pruning
WARNINGS:
• Never stand directly under the limb you are cutting.
Always position yourself out of the path of fallingdebris.
• Always wear head, eye, foot and body protection.
Wearing body protection helps reduce the risk of injury when
operating thisunit.
• Never stand on a ladder or other unstable support while
using the pole saw. Always avoid any position which can
cause you to loose your balance and cause severeinjury.
• Keep other persons at least 15m from the work area.
Distractions can cause you to losecontrol.
• Electrocution Hazard. To prevent shock, do not operate
within 15m of overhead electrical lines. Always check
surrounding area for hidden electricallines.
• Do not hold pole saw switch handle above
shoulderheight.
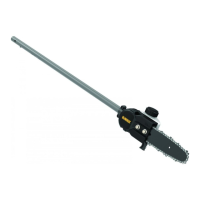
Branch Removal Hook (Fig. A)
CAUTION: The branch removal hook is not a belt hook.
Your pole saw includes a branch removal hook
5
for the
intended purpose of helping to remove small to moderately sized
prunedbranches.
Pruning With the Pole Saw (Fig. A, M–O)
WARNING: Let the tool work at its own pace. Do
notoverload.
WARNING: When pruning trees: guard against kickback
which can result in severe injury or death. See Guard
Against Kickback, to avoid the risk of kickback. Do not
overreach. Make sure your footing is firm. Keep feet apart.
Divide your weight evenly on both feet.
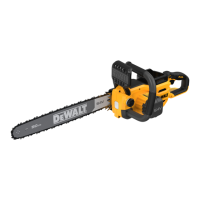
1. Use both hands to grip pole saw as shown in Fig.M, N.
Use a firm grip. Thumbs and fingers must wrap around the
powerhead handle
22
and auxiliary handle
23
. Keep fingers
away from sawdust exhaust chute
30
shown in Fig.O.
2. Never operate while in a tree, in any awkward position or on
a ladder or other unstable surface. You may lose control of
pole saw causing severe injury.
3. Follow directions below to trim atree.
a. Make sure pole saw is running at full speed before
making a cut. When starting a cut, place moving saw
chain
7
against limb. Hold pole saw firmly in place to
avoid possible bouncing or skating (sideways movement)
of polesaw.
b. Guide pole saw using light pressure. Make first cut 152mm
from tree trunk on underside of limb. Use top of guide
Operating the Pole Saw (Fig. A)
WARNING: Read and understand all instructions. Failure
to follow all instructions listed below may result in electric
shock, fire and/or serious personalinjury.
CAUTION: Always reduce the tension off the chain again
after finishing work. The chain contracts as it cools down.
If it is not slackened off, it can damage the polesaw.
WARNING: Hold the tool using only the designated
gripping surfaces: The powerhead handle and the
auxiliary handle.
WARNING: Do not use the pole as a grippingsurface.
Proper hand position requires one hand on the powerhead
handle
22
and one hand on the auxiliary handle
23
.
Proper Hand Position (Fig. L)
WARNING: To reduce the risk of serious personal injury,
ALWAYS use proper hand position asshown.
WARNING: To reduce the risk of serious personal
injury, ALWAYS hold securely in anticipation of a
suddenreaction.
OPERATION
Instructions for Use
WARNING: Always observe the safety instructions and
applicableregulations.
WARNING: To reduce the risk of serious personal
injury, turn tool off and disconnect battery pack
before making any adjustments or removing/
installing attachments or accessories. An accidental
start‑up can causeinjury.
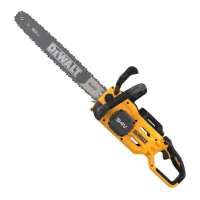
Transporting Chainsaw (Fig. K)
• Always turn unit off, remove the battery and cover the guide
bar
6
with the scabbard
14
when transporting thesaw.
Attaching and Adjusting the Shoulder Strap
(Fig. E)
WARNING: The shoulder strap should only be slung over
one shoulder and not across thebody.
WARNING: Use of a shoulder strap(8 is required while
using thistool.
Attach the strap to the tool as shown in Fig. E and adjust for
proper balance and support.
1. Attach the strap mount.
2. Snap the shoulder strap latch
23
onto the strap
mount
7
located on the unit, just in front of the ON/OFF
trigger as shown in Fig.E. Adjust the strap so it fits over
yourshoulder and provides proper balance andsupport.
2. Turn the screw counterclockwise to increase oil flow to the
bar andchain.
3. Turn the screw clockwise to reduce the oil flow to the bar
andchain.