11
ENGLISH
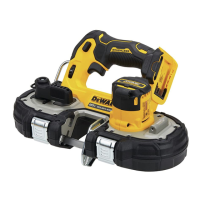
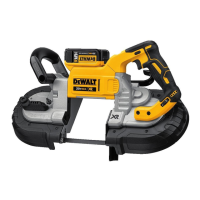
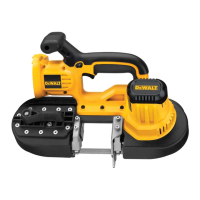
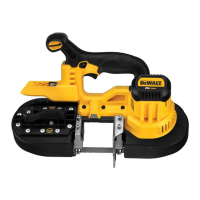
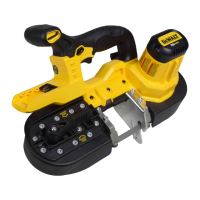
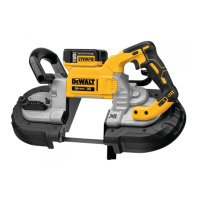
Cutting (Fig.A, H, J)
Refer to Recommended Cutting Positions for
recommended cutting positions for variousmaterials.
NOTE: Select and use a band saw blade that is most
appropriate for the material being cut. See Bi‑Metal Band
Saw BladeDescription.
This portable band saw may be hung using the hang hook
(
10
, Fig.H). Hang tool on a pipe vise or other suitable,
stablestructure.
WARNING: When using the hang hook make sure it is
secure and stable before releasing it. The saw may fall
resulting in serious injury to you orothers.
WARNING: To reduce the risk of injury, only use hang
hook to support the weight of the tool. Never rely on
the hang hook for your own support or to help you
maintain yourbalance.
WARNING: Never attempt to use this tool by resting
it upside down on a work surface and bringing the
material to the tool. Always securely clamp the
workpiece and bring the tool to the workpiece, securely
holding the tool as shown in FigureJ.
1. Material to be cut must be ridgidly secure where it is or
clamped in a vise or other clampingdevice.
2. Bring the work stop
6
into contact with the workpiece
while keeping the blade off of the workpiece. Turn the
sawon.
3. When saw reaches desired rotation speed, slowly and
gently tilt the main body of the tool to bring the band
saw blade into contact with the workpiece. Do not apply
additional pressure in excess of the weight of the main
body of the tool. Carefully avoid bringing the band saw
blade suddenly and heavily into contact with the upper
surface of the workpiece. This will cause serious damage
to the band saw blade. To obtain maximum service life of
the band saw blade, ensure there is no sudden impact at
the beginning of the cuttingoperation.
4. Straight cutting can be accomplished by keeping the
band saw blade aligned perpendicular to the material.
Proper Hand Position (Fig. J)
WARNING: To reduce the risk of serious personal injury,
ALWAYS use proper hand position as shown.
WARNING: To reduce the risk of serious personal
injury, ALWAYS hold securely in anticipation of a
suddenreaction.
Hold the saw firmly with one hand on the main handle
4
.
Keep your free hand clear of the blade area and do not allow
the saw to fall against the clamped or supported material or
your body when the cut iscomplete.
To install the battery pack
3
into the tool handle, align the
battery pack with the rails inside the tool’s handle and slide
it into the handle until the battery pack is firmly seated in the
tool and ensure that it does notdisengage.
To remove the battery pack from the tool, press the release
button
15
and firmly pull the battery pack out of the tool
handle. Insert it into the charger as described in the charger
section of thismanual.
Installing and Removing the Battery Pack
(Fig.I)
NOTE: For best results, make sure your battery pack is
fullycharged.
OPERATION
WARNING: To reduce the risk of serious personal
injury, turn unit off and remove the battery pack
before making any adjustments or removing/
installing attachments or accessories. An
accidental start‑up can causeinjury.
LED Worklight (Fig.A)
CAUTION: Do not stare into worklight. Serious eye
injury couldresult.
There is a worklight
17
located above the blade The
worklight is activated when the trigger switch is depressed,
and will automatically turn off 20seconds after the trigger
switch is released. If the trigger switch remains depressed,
the worklight will remainon.
NOTE: The worklight is for lighting the immediate work
surface and is not intended to be used as aflashlight.
Variable Speed Control (Fig.H)
A speed control wheel
3
is located near the trigger of the
saw. The speed increases as the wheel is turned from a
low speed setting of 1(150SFPM) to a high speed setting
of5(380SFPM).
Variable Speed Trigger Switch (Fig.A, H)
Release switch lock-off button
1
by pressing button. Pull the
variable speed trigger switch
2
to turn the motor ON. The
variable speed trigger switch will give you added versatility.
The further the trigger is depressed the higher the speed of
thesaw.Releasing the trigger switch turns the motor OFF.
Releasing the trigger switch also automatically actuates
lock-offbutton.
WARNING: This tool has no provision to lock the
switch in the ON position, and should never be locked
ON by any othermeans.
Select the appropriate band saw blade according to the
material type, dimensions, and number of teeth. See
Bi‑Metal Band Saw Blade Descriptionchart.
The following table is intended as a general guide only.
Determine the type of material and dimension of the
workpiece and select the most appropriate band sawblade.
NOTICE: Never use the band saw to cut resin materials
which are subject to melting. Melting of resin material
caused by high heat generated during cutting may
cause the band saw blade to become bound to the
material, possibly resulting in overload and burn‑out
of themotor.
BIMETAL BAND SAW BLADE DESCRIPTION
Number of Teeth
Workpiece Thickness 24 18 14 14/18
1/8" (3.2 mm) and under X X
1/8"–1/4" (3.2–6.4 mm) X X