EasyManua.ls Logo

DeWalt DCS391B - User Manual

DeWalt DCS391B
19 pages
Print Icon
To Next Page IconTo Next Page
Loading...
1
English
1) WORK AREA SAFETY
a) Keep work area clean and well lit. Cluttered or dark areas
invite accidents.
b) Do not operate power tools in explosive atmospheres,
such as in the presence of flammable liquids, gases or
dust. Power tools create sparks which may ignite the dust or
fumes.
c) Keep children and bystanders away while operating a
power tool. Distractions can cause you to lose control.
2) ELECTRICAL SAFETY
a) Power tool plugs must match the outlet. Never modify
the plug in any way. Do not use any adapter plugs with
earthed (grounded) power tools. Unmodified plugs and
matching outlets will reduce risk of electric shock.
b) Avoid body contact with earthed or grounded surfaces
such as pipes, radiators, ranges and refrigerators. There
is an increased risk of electric shock if your body is earthed or
grounded.
c) Do not expose power tools to rain or wet conditions.
Water entering a power tool will increase the risk of electric
shock.
d) Do not abuse the cord. Never use the cord for carrying,
pulling or unplugging the power tool. Keep cord away
from heat, oil, sharp edges or moving parts. Damaged or
entangled cords increase the risk of electric shock.
e) When operating a power tool outdoors, use an extension
cord suitable for outdoor use. Use of a cord suitable for
outdoor use reduces the risk of electric shock.
f) If operating a power tool in a damp location is unavoidable,
use a ground fault circuit interrupter (GFCI) protected
supply. Use of a GFCI reduces the risk of electric shock.
Defi nitions: Safety Guidelines
The definitions below describe the level of severity for each
signal word. Please read the manual and pay attention to these
symbols.
DANGER: Indicates an imminently hazardous situation
which, if not avoided, will result in death or serious injury.
WARNING: Indicates a potentially hazardous situation
which, if not avoided, could result in death or serious injury.
CAUTION: Indicates a potentially hazardous situation which,
if not avoided, may result in minor or moderate injury.
NOTICE: Indicates a practice not related to personal injury
which, if not avoided, may result in property damage.
IF YOU HAVE ANY QUESTIONS OR COMMENTS ABOUT THIS OR
ANY D
EWALT TOOL, CALL US TOLL FREE AT: 1-800-4-DEWALT
(1-800-433-9258).
WARNING: To reduce the risk of injury, read the instruction
manual.
General Power Tool Safety Warnings
WARNING! Read all safety warnings and all instructions.
Failure to follow the warnings and instructions may result in
electric shock, fire and/or serious injury.
SAVE ALL WARNINGS AND INSTRUCTIONS
FOR FUTURE REFERENCE
The term “power tool” in the warnings refers to your mains-operated
(corded) power tool or battery-operated (cordless) power tool.
Question and Answer IconNeed help?

Do you have a question about the DeWalt DCS391B and is the answer not in the manual?

Summary

Safety Guidelines and Warnings

General Power Tool Safety

Essential safety warnings for work area, electrical hazards, and proper tool operation.

Electrical Safety Precautions

Precautions for safe electrical operation, including plugs, cords, and wet conditions.

Saw Specific Safety Instructions

Personal Safety Measures

Advice on staying alert, using PPE, and preventing unintentional starts.

General Saw Safety Precautions

Crucial safety measures for saws, including hand placement and workpiece support.

Circular Saw Specific Safety

Additional safety instructions for circular saws, including warnings.

Battery Pack Safety Information

Lithium-Ion Battery Safety

Specific safety instructions for Li-Ion battery packs, including damage and exposure.

Battery Charger Safety Instructions

General Charger Safety Rules

Critical safety instructions for DEWALT battery chargers, including warnings.

Storage, Use, and Operation

General Operation Safety

Safety precautions before operating the tool, such as turning it off and disconnecting power.

Changing Saw Blades

Procedure for installing and replacing saw blades correctly.

Lower Blade Guard Safety

Saw Blade Usage and Safety

Kickback Causes and Prevention

Comprehensive guide to understanding kickback and the conditions that cause it.

Blade Twist and Misalignment

Factors causing blade twist and misalignment during cuts.

Saw Operation and Stalling

Best practices for operating the saw, handling stalls, and restarting cuts.

Tool Maintenance and General Care

Product Warranty and Guarantees

Limited Warranty and Free Service

Details on DEWALT's three-year limited warranty and first-year free service.

Overview

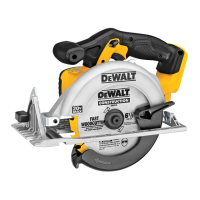
This document outlines the safety guidelines, operation, and maintenance for a DEWALT cordless circular saw, designed for professional wood cutting applications.

Function Description:

The DEWALT cordless circular saw is a heavy-duty power tool intended for cutting wood. It operates on a battery pack and is designed for portability and use in various work environments. The saw features a trigger switch for activation, a lower blade guard for safety, and mechanisms for adjusting cutting depth and bevel angle to suit different cutting requirements. It is equipped with a fuel gauge on some battery packs to indicate the remaining charge level.

Usage Features:

Safety Guidelines:

The manual emphasizes several critical safety guidelines to prevent injury and ensure proper operation. Users are warned about potential hazards such as electric shock, fire, and serious injury, categorized by signal words like DANGER, WARNING, and CAUTION.

  • Work Area Safety: Maintain a clean, well-lit work area free from flammable liquids, gases, or dust. Keep children and bystanders away to avoid distractions.
  • Electrical Safety: Ensure power tool plugs match outlets and avoid modifying them. Prevent body contact with earthed surfaces. Do not expose power tools to rain or wet conditions. The cord should not be abused or used for carrying the tool, and must be kept away from heat, oil, sharp edges, and moving parts. For outdoor use, an outdoor-suitable extension cord is required. In damp locations, a ground fault circuit interrupter (GFCI) protected supply should be used.
  • Personal Safety: Stay alert and use common sense. Avoid operating the tool when tired or under the influence of drugs, alcohol, or medication. Always wear eye protection and other personal protective equipment like dust masks, non-skid safety shoes, hard hats, or hearing protection. Prevent unintentional starting by ensuring the switch is off before connecting to power or battery pack. Remove adjusting keys or wrenches before turning the tool on. Maintain proper footing and balance, and avoid overreaching. Dress properly, keeping loose clothing, jewelry, and long hair away from moving parts. If dust extraction and collection facilities are provided, ensure they are connected and properly used.
  • Power Tool Use and Care: Do not force the power tool; use the correct tool for the application. If the switch does not turn the tool on and off, it must be repaired. Disconnect the plug or battery pack before making adjustments, changing accessories, or storing the tool. Store idle power tools out of reach of children and untrained users. Maintain power tools by checking for misalignment, binding, or breakage of parts. Keep cutting tools sharp and clean. Use the power tool, accessories, and tool bits according to instructions and working conditions.
  • Battery Tool Use and Care: Recharge only with the specified charger. Use power tools only with specifically designated battery packs. Keep battery packs away from other metal objects to prevent shorting. Avoid contact with liquid ejected from the battery under abusive conditions; if contact occurs, flush with water and seek medical help if it contacts eyes.
  • Service: Have the power tool serviced by a qualified repair person using identical replacement parts to maintain safety.

Safety Instructions for All Saws:

  • Keep hands away from the cutting area and blade, with the second hand on the auxiliary handle or motor housing.
  • Do not reach underneath the workpiece.
  • Adjust cutting depth to the workpiece thickness, with only half a tooth visible below the workpiece.
  • Secure the workpiece to a stable platform; never hold it in hands or across legs.
  • Hold the power tool by insulated gripping surfaces when cutting where the tool may contact hidden wiring.
  • Use a rip fence or straight edge guide for ripping to improve accuracy and reduce blade binding.
  • Use blades with correct size and shape arbor holes.
  • Never use damaged or incorrect blade washers or bolts.

Kickback Prevention:

Kickback is a sudden, uncontrolled reaction to a pinched, bound, or misaligned saw blade. To prevent kickback:

  • Maintain a firm grip with both hands and position arms to resist kickback forces. Position your body to either side of the blade, not in line with it.
  • Release the trigger and hold the saw motionless if the blade binds or if the cut is interrupted.
  • Center the saw blade in the kerf and ensure teeth are not engaged when restarting a cut in the workpiece.
  • Support large panels on both sides near the cut line to minimize pinching.
  • Avoid using dull or damaged blades.
  • Ensure blade depth and bevel adjusting locking levers are tight and secure.
  • Use extra caution during "plunge cuts" into existing walls or blind areas.

Lower Guard Safety Instructions:

  • Check the lower guard for proper closing before each use. Do not operate the saw if the guard does not move freely or close instantly. Never clamp or tie the guard open.
  • Check the operation of the lower guard spring.
  • Retract the lower guard manually only for special cuts like "plunge cuts" and "compound cuts." Release it as soon as the blade enters the material.
  • Ensure the lower guard covers the blade before placing the saw down.

Additional Specific Safety Instructions for Circular Saws:

  • Do not use abrasive wheels or blades or water feed attachments.
  • Use clamps or another practical way to secure the workpiece.
  • Keep your body positioned to either side of the blade.
  • Avoid air vents covering moving parts.

Blade Installation and Removal:

  • To install, place the inner clamp washer on the saw spindle with the large flat surface facing out. Retract the lower blade guard and place the blade on the spindle, ensuring the correct rotation direction. Place the outer clamp washer with the beveled side facing out. Thread the blade clamping screw (left-hand threads, turn counterclockwise to tighten) by hand. Depress the blade lock button while turning the spindle until the lock engages, then tighten the screw firmly with the blade wrench.
  • To remove, depress the blade lock button and turn the spindle with the blade wrench until the lock engages. Turn the blade clamping screw clockwise to loosen it. Remove the screw, outer clamp washer, and old blade. Clean sawdust from the guard and clamp washer area.

Cutting Depth and Bevel Angle Adjustment:

  • Cutting Depth: Loosen the depth adjustment knob, move the shoe to the desired depth (half a tooth projecting below the material for efficient cutting), and retighten the knob.
  • Bevel Angle: Loosen the bevel adjustment knob, tilt the shoe to the desired angle by aligning the pointer with the mark on the calibrated quadrant, and retighten the knob. For 90° cuts, adjust to 0° bevel, retract the lower guard, loosen the bevel adjustment knob, use a square against the blade and shoe, and turn the calibration screw to set the proper angle.

Kerf Indicator:

The saw shoe has a kerf indicator for vertical and bevel cutting, which helps guide the saw along cutting lines. The indicator lines up with the left (outer) side of the blade, ensuring the kerf falls into the waste material.

Workpiece Support:

Proper workpiece support is crucial to prevent loss of control and kickback. Support the board or panel near the cut. Place the work with its "good" side down, as the saw cuts upward, causing splintering on the top face. Clamp the work and avoid holding short pieces by hand.

Cutting Technique:

  • Ensure the saw is at full speed before the blade contacts the material.
  • Push the saw forward at a speed that allows the blade to cut without laboring.
  • If the cut goes off line, release the trigger, allow the blade to stop, withdraw the saw, and restart the cut slightly inside the wrong one.
  • Release the trigger and allow the blade to stop completely before lifting the saw from the work.
  • Use caution when cutting thin strips to prevent cutoff pieces from hanging up in the lower blade guard.

Ripping:

For ripping (cutting wider boards into narrower strips along the grain), a rip fence is recommended.

Pocket Cutting:

  • Adjust the saw shoe to the desired depth.
  • Tilt the saw forward, resting the front of the shoe on the material.
  • Retract the lower blade guard using the lever, then lower the rear of the shoe until the blade teeth almost touch the cutting line.
  • Release the lower blade guard (it will open freely due to contact with the work).
  • Firmly grip the auxiliary handle, positioning your body and arm to resist kickback.

Maintenance Features:

General Maintenance:

  • Cleaning: Turn off the tool and disconnect from the power source before any adjustments or maintenance. Blow dirt and dust out of air vents weekly with clean, dry air, always wearing ANSI Z87.1 approved eye protection. Do not use solvents or harsh chemicals on non-metallic parts; use a cloth dampened with water and mild soap. Never immerse the tool in liquid.
  • Lubrication: Self-lubricating ball and roller bearings are used, so relubrication is not required. However, an annual cleaning, inspection, and lubrication of the gear case by a certified service center is recommended.

Battery Charger Maintenance:

  • Cleaning: Disconnect the charger from the AC outlet before cleaning. Remove dirt and grease from the exterior with a cloth or soft non-metallic brush. Do not use water or cleaning solutions.
  • Repair: The charger and battery pack are not serviceable by the user. Repairs, maintenance, and adjustments should be performed by a DEWALT factory service center or authorized service personnel using identical replacement parts.

Battery Pack Care:

  • Charging: Charge battery packs only in designated DEWALT chargers. Do not force battery packs into incompatible chargers. Do not splash or immerse battery packs in water or other liquids.
  • Storage: Store battery packs in a cool, dry location, away from direct sunlight and excessive heat (above 105°F/40°C). For long storage, fully charged battery packs should be stored in a cool, dry place out of the charger. Do not store battery packs completely depleted. Do not store battery packs in a tool with the trigger switch locked on.
  • Handling Damaged Battery Packs: Never attempt to open a battery pack. If the case is cracked or damaged, do not insert it into the charger. Do not crush, drop, or damage the battery pack. Damaged battery packs should be returned to a service center for recycling.
  • Transporting Batteries: Do not store or carry battery packs where metal objects can contact exposed terminals, as this can cause fires. When transporting individual battery packs, ensure terminals are protected and insulated from materials that could cause a short circuit.
  • Disposal: Do not incinerate battery packs, even if severely damaged or worn out, as they can explode and release toxic fumes.
  • Lithium-Ion Specifics: If battery contents contact skin, wash with mild soap and water. If liquid contacts eyes, rinse for 15 minutes and seek medical attention. Contents of opened battery cells may cause respiratory irritation; provide fresh air and seek medical attention if symptoms persist.

Charger Operation and Indicators:

The charger detects problems indicated by a fast-flashing red light. If this occurs, re-insert the battery pack. If the problem persists, try a different battery pack. If the new pack charges correctly, the original pack is defective and should be returned for recycling. If the new pack also shows the same indication, both charger and battery pack should be tested at an authorized service center.

  • Hot/Cold Delay: The charger has a hot/cold delay feature that suspends charging until the battery cools down, indicated by a long then short red light flash. This ensures maximum battery life.
  • Leaving Battery Pack in Charger: The charger and battery pack can remain connected with the charge indicator showing "Pack Charged."
  • Weak/Faulty Battery Packs: Weak batteries will continue to function but with reduced performance. Faulty battery packs will not charge, indicated by no light or a "problem pack or charger" display.
  • Problem Power Line: Some chargers have a problem powerline indicator that flashes the red light with two fast blinks followed by a pause when used with portable power sources that are out of limits.

Accessories:

Only DEWALT recommended accessories should be used with this product. Use of other accessories may be hazardous.

Warranty and Service:

DEWALT offers a Three Year Limited Warranty covering defects in materials or workmanship, a 1 Year Free Service for worn parts, and 2 or 3 Years Free Service on DEWALT Battery Packs depending on the model. Product warranty is voided if the battery pack is tampered with. A 90 Day Money Back Guarantee is also provided. Users can register their product online for warranty service and proof of ownership. Free warning label replacements are available by calling DEWALT.

DeWalt DCS391B Specifications

General IconGeneral
BrandDeWalt
ModelDCS391B
CategorySaw
LanguageEnglish

Related product manuals