21
English
NOTE: The fuel gauge is only an indication of the
charge left on the battery pack. It does not indicate
tool functionality and is subject to variation based
on product components, temperature and end-user
application.
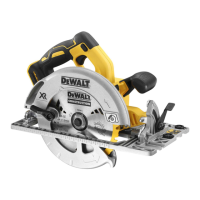
Changing Blades
TO INSTALL THE BLADE (FIG. 2–5)
1. Remove the battery.
2. Using the lower guard lever (M), retract the
lower blade guard (K) and place blade on saw
spindle against the inner clamp washer (U),
making sure that the blade will rotate in the
proper direction (the direction of the rotation
arrow on the saw blade and the teeth must
point in the same direction as the direction of
rotation arrow on the saw). Do not assume that
the printing on the blade will always be facing
you when properly installed. When retracting
the lower blade guard to install the blade, check
the condition and operation of the lower blade
guard to assure that it is working properly.
Make sure it moves freely and does not touch
the blade or any other part, in all angles and
depths of cut.
3. Place outer clamp washer (V) on saw spindle
with the beveled edge facing out. Make sure
the 30 mm diameter on the blade side of the
clamp fits into the 30 mm hole in the saw blade
to ensure centering of the blade.
4. Thread the blade clamping screw (L) onto the
saw spindle by hand (screw has right-hand
threads and must be turned clockwise to
tighten).
5. Depress the blade lock (D) while turning the
saw spindle with the blade wrench(W) stored
underneath the battery compartment, until
the blade lock engages and the blade stops
rotating.
6. Tighten the blade clamping screw firmly with
the blade wrench.
NOTICE: Never engage the blade lock
while saw is running, or engage in an
effort to stop the tool. Never turn the
saw on while the blade lock is engaged.
Serious damage to your saw will result.
TO REPLACE THE BLADE (FIG. 2–5)
1. Remove the battery.
2. To loosen the blade clamping screw (L),
depress the blade lock (D) and turn the saw
spindle with the blade wrench (W), stored
underneath the battery compartment, until
the blade lock engages and the blade stops
rotating. With the blade lock engaged, turn
the blade clamping screw counterclockwise
with the blade wrench (screw has right-hand
• Connect the blue lead to the neutral terminal.
WARNING: No connection is to be
made to the earth terminal.
Follow the fitting instructions supplied with good
quality plugs. Recommended fuse: 3 A.
Using an Extension Cable
An extension cord should not be used unless
absolutely necessary. Use an approved extension
cable suitable for the power input of your charger
(see Technical Data). The minimum conductor size
is 1 mm
2
; the maximum length is 30 m.
When using a cable reel, always unwind the cable
completely.
ASSEMBLY AND ADJUSTMENTS
WARNING: To reduce the risk of
serious personal injury, turn tool
off and disconnect battery pack
before making any adjustments or
removing/installing attachments or
accessories. An accidental start-up can
cause injury.
WARNING: Use only
battery
packs and chargers.
Inserting and Removing the
Battery Pack from the Tool (Fig. 1)
NOTE: Make sure your battery pack (O) is fully
charged.
TO INSTALL THE BATTERY PACK INTO THE TOOL HANDLE
1. Align the battery pack (O) with the rails inside
the tool’s handle (Fig. 1).
2. Slide it into the handle until the battery pack is
firmly seated in the tool and ensure that you
hear the lock snap into place.
TO REMOVE THE BATTERY PACK FROM THE TOOL
1. Press the release button (P) and firmly pull the
battery pack out of the tool handle.
2. Insert battery pack into the charger as
described in the charger section of this manual.
FUEL GAUGE BATTERY PACKS (FIG. 1)
Some