좋은 결과를 내려면, 원하는 두께로 만들기 위해서 작업 대상물의 양면을 대패질
하십시오. 예를 들어, 작업대상물에서
3.2mm(1/8”)
를 제거해야 한다면, 양면에
서 각각
1.6mm(1/16”)
를 깎아내십시오. 이는 작업대상물에 수분이 있더라도 건
조시켜주도록 하며, 또한, 미세하게 절단해줍니다.
경고: 느슨한 매듭이 없도록, 가능한 꽉 묶인 매듭이 적도록 이물질이 없는 상태의
목재만을 대패질 하십시오. 심하게 휘어있거나 뒤틀려있거나, 울퉁불퉁하거나 구부러져
있는 목재를 대패질 하지 마십시오.
경고:
모재를 공급하는 동안 자동대패의 뒷부분과 고정시켜 놓은 물체 사이에
있지 마십시오.
최소/최대 너비/높이/깊이
주의: 항상 결 방향으로 대패질을 하십시오. 언제나 작업대상물을 적당하게
지지하십시오. 너비
20mm(3/4”)
미만의 재료를 대패질하는 것은 권장하지 않습니다.
좁은 재료를 대패질해야 한다면, 몇 조각을 한번에 두고 가능한 너비로 만들어 대패
질 하십시오.
자동대패가 한 번 지나갈 때 자를 수 있는 최대 깊이는
3.2mm(1/8”)
입니다
(너비
150mm(1/6”)
미만). 절대 더 깊게 절삭하도록 평삭기를 변형하려 하지 마십시오.
좋은 결과를 위해서는 표 A에 권장하고 있는 깊이/너비를 따르십시오.
스나이프
지지하고 있지 않은 모재의 끝이 바닥으로 떨어졌을 때 반대편이 커터 헤드로 들어올려
작업대상물을 자동대패에 공급하여 수평을 이루도록 하고, 항상
자동대패의 뒷부분으로부터 작업대상물을 받거나 혹은
“
잡아
”
서
지게 되면서 만들어지는 함몰을 스나이프라고 합니다.
스나이프 만들지 않기
바닥 면에 대해 평평하게 하십시오.
대패질 작업을 하는 동안에 작업대상물을 수평하게 유지하십시오.
특히 긴 재료를 대패질 한다면, 추가의 지지대를 사용하기를 권장
합니다.
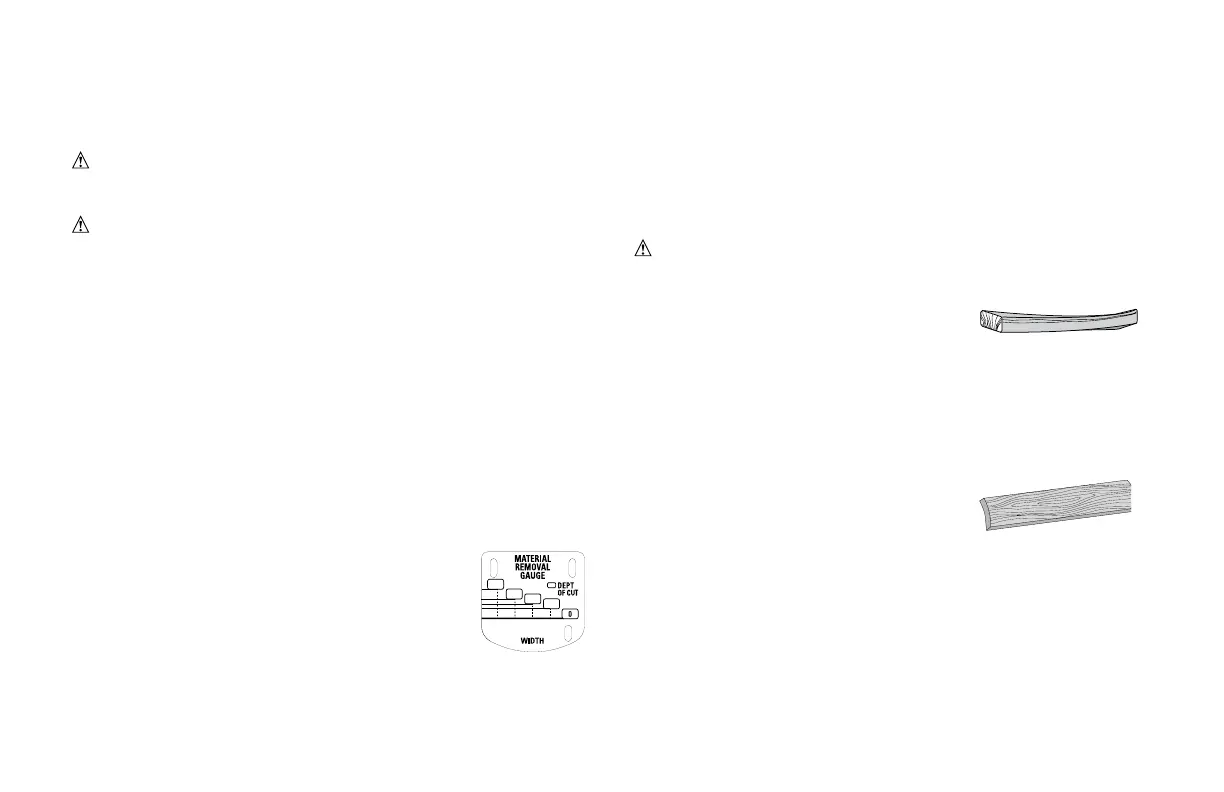
뒤틀리거나 가로방향으로 휘어지거나 굽은 모재
있다면, 자동대패로 원하는 결과를 낼 수 없을 것입니다. 이상적으로, 대패질을 하기
전에 최소한 재료의 한 면이 평평해야 합니다. 본 평삭기는 한쪽의 평평한 표면을
만드는데 긴 대패로 작업했던 재료에 가장 적절할 것입니다. 최소한 한 면이 평평하지
않거나 긴 대패가 없는 경우, 다음 사항을 참조하십시오.
재료의 양면이 너무 울퉁불퉁 하거나, 재료가 가로방향으로 휘어졌거나 굽거나 뒤틀려
뒤틀린 목재 대패질하기
경고: 뒤틀린 목재에 자동대패가 박힐 수 있습니다. 그런 상황이 발생하면,
모재가 약간 뒤틀려있다면:
전원을 끄고
전원공급장치에서 플러그를 뺀 뒤 커터 헤드에서 재료를 빼도록
왕복대를 올려주십시오.
원하는 두께가 될 때까지 양면을 번갈아가며 대패질하
십시오.
가로방향으로 휘어진 목재 대패질하기
가로방향으로 휘어진 목재로 가장 좋은 결과를 내려면:
재료의 가운데를 쪼개고 두 개의 조각처럼 대패질하십시오. 재료를 쪼개면 그 휘어진 정
도가 덜해지며, 이 공구로 더 좋은 결과를 낼 수 있습니다. 원하는 두께로 만들려면 일반
목재보다 가로방향으로 휘어진 목제에서 재료를 더 제거
해야 함을 유념하십시오.
재료를 쪼갤 수 없을 경우에는:
평평해질 때까지 목재의 한 면을 대패질하고 나서, 반대
쪽도 평평해질 때까지 대패질하십시오.
주: 일반적인 대패질 방법에서 권장했던 대로 대패질을 할 때마다 앞뒤로 목재를 가볍
게 치지 마십시오.
굽은 목재 대패질하기
자동대패의 공급롤러와 커터 헤드는 목재를 공급하는 대로 곡선을 밀어낼 것입니다.
그렇 지만, 목재가 자동대패를 빠져나갈 때, 롤러와 커터 헤드의 압력으로 목재는 다시
굽은 형 태가 될 것입니다. 그 곡선을 제대로 제거하려면, 긴 대패를 사용하십시오.
20
7
MACHINE.
For best results, plane both sides of the workpiece to reach a desired thickness. For
example, if you need to remove 3.2mm (1/8”) from your workpiece, remove 1.6mm
(1/16”) from each side. This not only allows the workpiece to dry with a even mois-
ture content, it also produces finer cuts.
WARNING: Plane only wood that is free from foreign objects, with no loose
knots and as few tight knots as possible. Do not plane wood that is severely warped,
twisted, knotted or bowed.
WARNING: Do not place your body between the rear of the planer and a station-
ary object while material is feeding. Serious injury could result.
MINIMUM/MAXIMUM WIDTH/HEIGHT/DEPTH
NOTE: Always plane in the direction of the grain. Support the workpiece adequately
at all times. Planing material less than 20mm (3/4”) wide is not recommended. If you
must plane narrow material, group several pieces together and plane them as one
wide workpiece whenever possible.
The maximum depth of cut your planer can take in one pass is 3.2mm(1/8”) (on
material less than 150 mm (6”) wide). Never attempt to modify your planer to take a
deeper cut. Follow the recommended depth/width of cut guidelines shown in Table A
for best results.
SNIPE
Snipe is a depression made when an unsupported end of your material drops toward
the floor, causing the opposite end to lift up into the cutter head.
TO AVOID SNIPE
Feed the workpiece into the planer so it is level and remains flat
against the base at all times.
Keep the workpiece level throughout planing operation by receiv-
ing or “catching” it from the rear of the planer. If you are planing
material that is especially long, the use of additional material
support is recommended.
TWISTED, CUPPED AND BOWED WOOD
If both sides of your material are very rough or if the material is cupped, bowed or
twisted, your planer may not produce the desired result. Ideally, you should have at
least one level face/surface on your material before you plane. Your thickness planer
will work best with material that has been run through a jointer to
produce one flat surface. If you do not have at least one flat surface or a jointer, see
the following recommendations.
TO PLANE TWISTED WOOD
WARNING: TWISTED WOOD MAY JAM YOUR THICKNESS PLANER. IF A JAM
OCCURS, TURN THE POWER OFF, DISCONNECT THE POWER SUPPLY AND RAISE
THE CARRIAGE TO RELEASE THE MATERIAL FROM THE CUTTER HEAD.
If your material is only slightly twisted:
Plane both sides alternating from one to the other until the
desired thickness is reached.
TO PLANE CUPPED WOOD
To obtain the best possible results with cupped wood:
Rip the material down the middle and plane it as two separate pieces.
Ripping the material reduces the severity of the cup and allows the machine to deliver
better results. Understand that you will have to remove more material on cupped
wood to achieve the desired thickness than you would on a normal board.
If ripping the material is not an option:
Plane one side of the material until flat, then plane the
opposite side until it is also flat .
NOTE: Do not flip the board back and forth between
each pass as recommended by the general planing
directions.
TO PLANE BOWED WOOD
The feed rollers and cutter head in your planer will push the bow out of the material
as it feeds. However, when the material exits the planer, the pressure of the rollers and
cutter head will release allowing the wood to spring back into a bowed formation. To
properly remove the bow, use a jointer.
3.0
2.0
1.5
1.0
75mm 150mm 230mm 330mm
TABLE A
3.0
2.0
1.5
1.0
75mm 150mm 230mm 330mm
 Loading...


