FIG. 2
FIG. 3
FIG. 4
R
FIG. 5
FIG. 6
T
FIG. 1
8
CHANGING THE PLANER KNIVES
WARNING: DISCONNECT THE PLANER
FROM THE POWER SOURCE BEFORE
ATTEMPTING TO CHANGE OR ACCESS THE
KNIVES.
TO CHANGE PLANER KNIVES
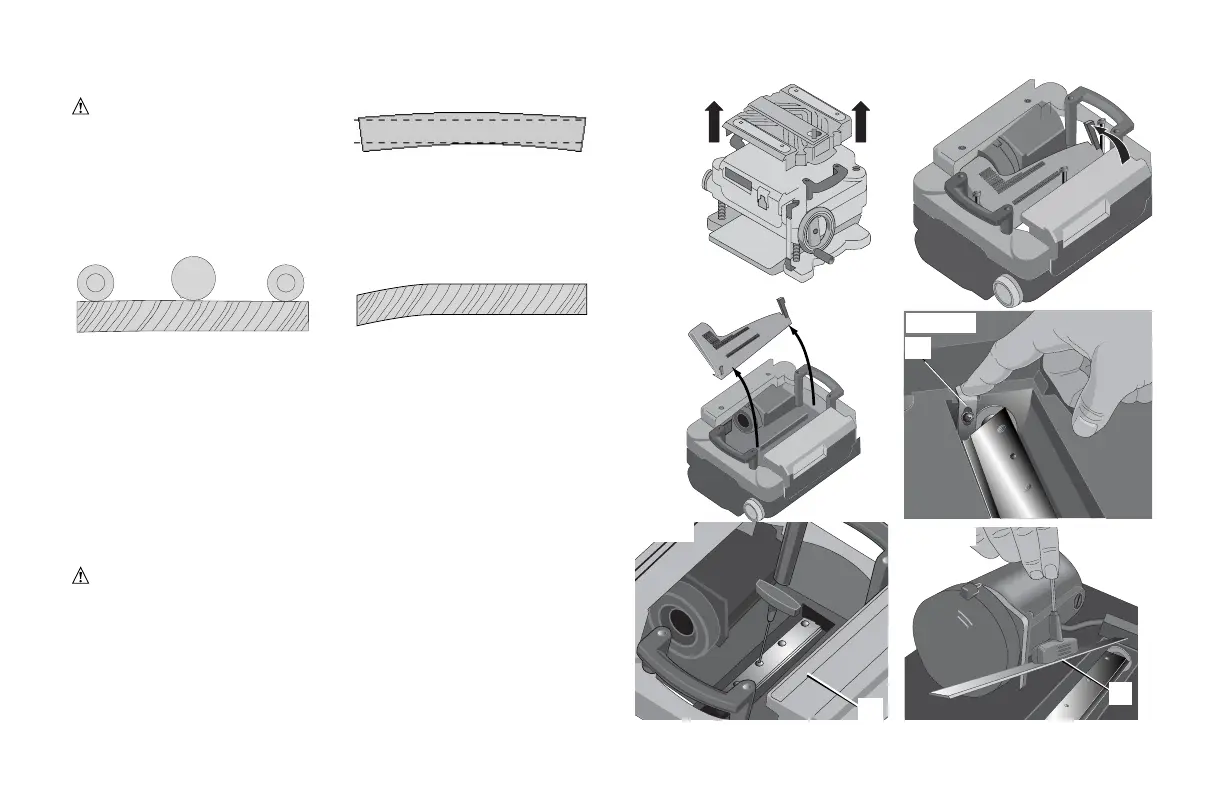
1. Use the T-wrench to remove the four screws in the top of the planer.
2. Lift the top off (Fig. 1) and place it aside.
3. Remove the three wing nuts that seal the dust shroud over the cutter head.
4. Rotate the dust shroud up so the round connection that locks onto the fan
housing is in the open position (Fig. 2).
5. Push the dust shroud to the left so it disengages from the fan housing.
6. Take the dust shroud out of the unit (Fig. 3) and set it aside.
7. The cutter head is now exposed.
If the eight screws in the cutter head clamp are not visible, use a piece of scrap
wood to carefully rotate the cutter head (Fig. 4) until the screws are accessible
and the cutter head lock lever (R) engages. This will prevent further rotation of
the cutter head as you change the knives.
WARNING: KEEP YOUR FINGERS AWAY FROM THE CUTTER HEAD AT ALL
TIMES. USE THE TOOL PROVIDED TO HANDLE THE KNIVES.
8. Use the T-wrench to remove the eight screws on the knife clamp and set
them in the small screws bin (S) on the front panel of the planer (Fig. 5).
9. Use the magnets on the top of the T-wrench to attract the knife clamp and lift
it off of the cutter head. One of the knives should now be exposed.
10. Use the magnet (T) on the top of the T-wrench (Fig. 6) to attract the knife. Avoid
BOWED WOOD WILL BE
FLATTENED BY FEED ROLLERS AND
CUTTER HEAD…
… BUT BOW WILL RETURN AFTER
WOOD IS PLANED
TOP FLAT
BOTTOM FLAT
뒤틀린 목재 대패질하기
경고: 날을 교체하거나 가까이 하기 전
에 전원공급장치에서 자동대패의 플러그를
빼 십시오.
자동대패 날 교체하기
1. 자동대패 윗부분의 4개의 나사를 빼는데 T형 렌치를 사용하십시오.
굽은 목재는 공급 롤러와 커터 헤드에 의해 평평
하게 될 것입니다. 그렇지만, 목재를 대패질 한 뒤에 그 곡선은 다시 나타날 것입니다. 에 마
지막으로 왕복하면서 미세하게 마감하는데 있어 이상적인 속도입니다.
2. 윗부분을 들어올려서(그림 1) 옆에 두십시오.
3. 커터 헤드 위의 먼지 덮개를 봉하고 있는 세 개의 나비너트를 빼십시오.
4. 먼지 덮개를 돌려서 올리면 팬 하우징에 고정되어 있는 둥근 이음새 부분이 열리게
됩니다(그림 2).
5. 먼지 덮개를 왼쪽으로 눌러 팬 하우징에서 분리시키십시오.
6. 먼지 덮개를 공구에서 꺼내서(그림 3) 옆에 두십시오.
7. 커터 헤드가 이제 보이게 됩니다.
커터 헤드 클램프에 있는 8개의 나사가 보이지 않는다면, 나사에 닿을 수 있을 때까지 조심스
럽게 커터 헤드를 돌리도록 나무 조각을 이용하십시오(그림 4). 그리고 커터 헤드 잠금 레버
(R)를 고정하십시오. 그래야 날을 갈아주면서 커터 헤드가 돌아가지 않습니다.
경고: 항상 손가락을 커터 헤드로부터 멀리 두십시오. 날을 다루는 도구를
이용하십시오.
8. T형 렌치를 사용하여 날 클램프의 8개 나사를 제거하고, 평삭기의 앞쪽 패널에 있는
작은 나사통(S)에 두십시오(그림 5).
9. 날 클램프를 끌어당기고 커터 헤드를 들어올리도록 T형 렌치 윗부분에 있는 자석을
이용하십시오. 날 중 하나가 이제 보여야 합니다.
10. 날을 끌어당기도록 T형 렌치 윗부분의 자석(T)을 이용하십시오(그림 6). 손으로 날을
만지지 마십시오.
21
FIG. 2
FIG. 3
FIG. 4
R
FIG. 5
S
FIG. 6
T
FIG. 1
8
CHANGING THE PLANER KNIVES
WARNING: DISCONNECT THE PLANER
FROM THE POWER SOURCE BEFORE
ATTEMPTING TO CHANGE OR ACCESS THE
KNIVES.
TO CHANGE PLANER KNIVES
1. Use the T-wrench to remove the four screws in the top of the planer.
2. Lift the top off (Fig. 1) and place it aside.
3. Remove the three wing nuts that seal the dust shroud over the cutter head.
4. Rotate the dust shroud up so the round connection that locks onto the fan
housing is in the open position (Fig. 2).
5. Push the dust shroud to the left so it disengages from the fan housing.
6. Take the dust shroud out of the unit (Fig. 3) and set it aside.
7. The cutter head is now exposed.
If the eight screws in the cutter head clamp are not visible, use a piece of scrap
wood to carefully rotate the cutter head (Fig. 4) until the screws are accessible
and the cutter head lock lever (R) engages. This will prevent further rotation of
the cutter head as you change the knives.
WARNING: KEEP YOUR FINGERS AWAY FROM THE CUTTER HEAD AT ALL
TIMES. USE THE TOOL PROVIDED TO HANDLE THE KNIVES.
8. Use the T-wrench to remove the eight screws on the knife clamp and set
them in the small screws bin (S) on the front panel of the planer (Fig. 5).
9. Use the magnets on the top of the T-wrench to attract the knife clamp and lift
it off of the cutter head. One of the knives should now be exposed.
10. Use the magnet (T) on the top of the T-wrench (Fig. 6) to attract the knife. Avoid
BOWED WOOD WILL BE
FLATTENED BY FEED ROLLERS AND
CUTTER HEAD…
… BUT BOW WILL RETURN AFTER
WOOD IS PLANED
TOP FLAT
BOTTOM FLAT
그림 1
그림 2
그림 4
그림 6
그림 5
그림 3
 Loading...


