날의 한쪽 면만이 닳았다면:
1. 날을 돌리면 날카롭고 사용하지 않은 가장자리가 재료를 자르는 커터 헤드의 끝
부분에 남아있게 됩니다. 커터 헤드에 맞는 핀에 날의 타원형 구멍이 맞춰졌는지
확인하십시오.
2. 날 위에 날 클램프를 다시 맞추십시오. 날의 날카로운 절단면과 클램프의 비스듬한
가장자리가 맞춰졌는지 확인하십시오. 제대로 맞지 않았다면, 클램프는 날을
제대로 고정하지 못할 것입니다.
3. 클램프에 나사를 끼우고 충분히 조여주십시오.
다른 두 개의 날 교체하기
1. 그림 4와 같이 커터 헤드 잠금 레버(R)를 누르십시오.
2. 다른 날 클램프가 드러나는 곳에 커터 헤드가 고정될 때까지 조심스럽게 돌려주도록
나무조각을 사용하십시오.
3. 상기의 날 교체 과정을 따르십시오.
4. 마지막의 무딘 날에 대해서도 이 과정을 반복하십시오.
새로운 날을 교체한 후
1. 팬 하우징에 먼지 덮개의 둥근 끝부분을 넣고 그 자리에 고정되도록 돌려주십시오.
2. 먼지 덮개에 3개의 나비너트를 끼우십시오.
3. 공구에 평삭기의 뚜껑을 덮고 나사로 조이십시오.
주: 뚜껑이 제대로 덮여 있지 않으면 평삭기가 작동하지 않습니다.
관리
브러시 교체
본 자동대패에는 모터의 외부에 있는 브러시
캡(U) 가 내장되어 있습니다. 브러시를 교체해야
한다면, DEWALT 서비스 센터나 DEWALT 제품
취급을 허가 받은 판매자로부터 새로운 브러시
세트를구하십시오. 동일한 DEWALT 브러시 만을
사용하십시오.
자동대패의 브러시를 교체하려면 전원을 끄고 플러그를 뽑으십시오.
1. 자동대패에서 뚜껑과 브러시 커버 스크린을 떼어내도록 T형 렌치를 사용하십시오.
2. 일자 드라이버로 공구의 우측 뒤편에 있는
브러시 캡(V)의 나사를 풀어주십시오.
3. 자동대패 커버 내부, 모터 쪽에 잇는 브러시
캡의 나사도 마찬가지로 풀어주십시오.
6. 자동대패를 사용하기 전에, 새로운 브러시를
4. 새로운 브러시를 브러시 홀더에 놓으십시오.
5. 브러시를 장치한 뒤에 뚜껑과 브러시 커버
스크린을 다시 덮으십시오.
고정시키도록 10분간 공구를 작동시키십시오.
주: 기존의 브러시를 교체할 필요가 없다면, 다시 장치할 때 똑같이 기능을 하
도록 확인하십시오.
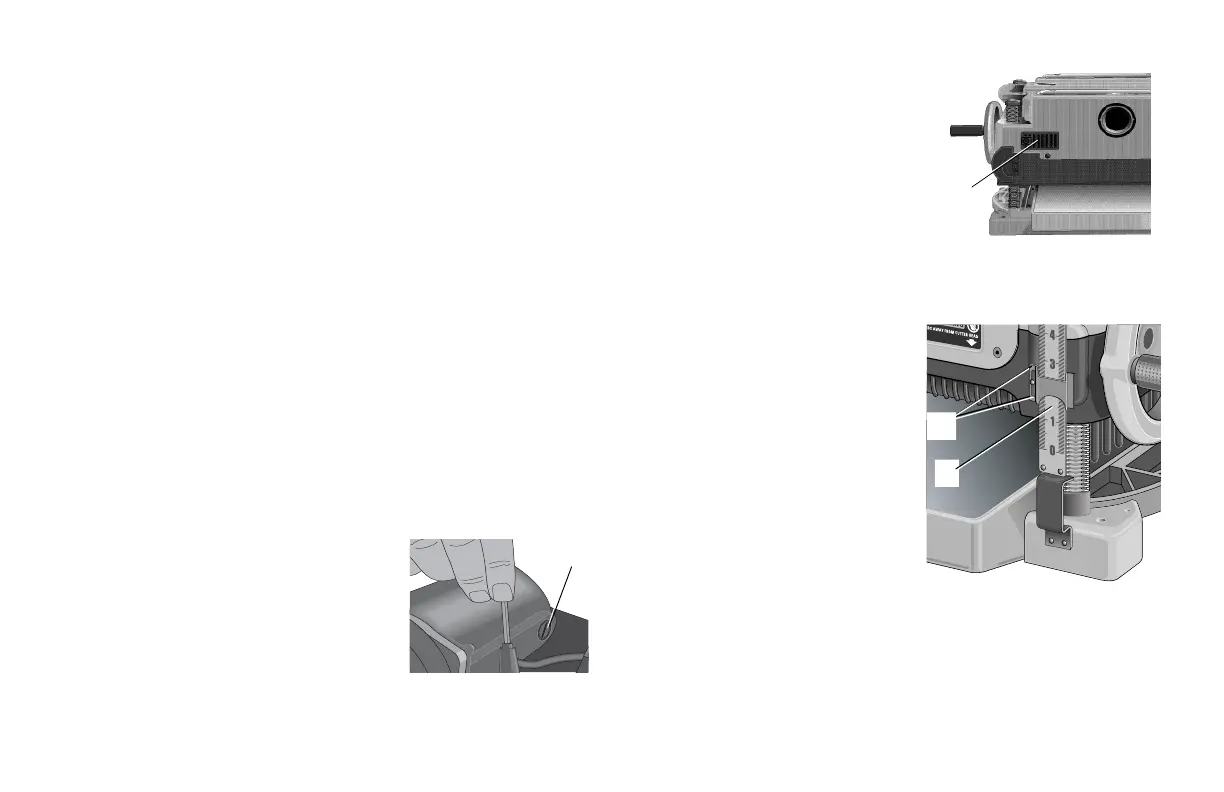
깊이 조정 눈금자 보정하기
본 자동대패의 깊이 조정 눈금자(N)는
공장에서 이미 설정했습니다. 그렇지만, 장기간
사용으로, 깊이 조정 눈금자가 잘못된 눈금을
보여줄 수도 있습니다. 깊이 조정 눈금자를
확인하기 위해, 나무조각을 대패질하여 측정값을
살펴보십시오. 작업 대상물의 최종 두께를 측정
하십시오. 두께가 깊이 조정 눈금자의 측정값과
일치하지 않는다면, 빨간색 지침에서 두 개의
나사(W)를 풀어주십시오. 그래서 작업대상물의
최종 두께와 맞을 때까지 지침을 위아래로 조정
하십시오. 나사를 확실히 다시 조이십시오.
바닥 관리
작업대에 기름이나 그리스, 역청 등이 없도록 깨
끗이 청소하십시오. 표면이 매끄럽도록 작업대
에 젤 왁스를 칠해주십시오.
회로 차단기 리셋 버튼
본 자동대패에는 9 amp 회로 차단기가 내장되어 있습니다. 자동대패가 과부하 되어
작동을 멈추게 되면, 평삭기의 전원을 끄고 2분간 내버려 둔 다음, 다시 작업을
시작하기 전에 리셋 버튼(X)을 누르십시오.
22
9
2. Use a flathead screwdriver to unscrew the
brush cap located in the right, rear of the unit
(V).
3. Do the same for the brush cap located on
the side of the motor, inside the planer cover.
4. Place the new brushes into the brush
holders.
5. After installing the brushes, replace the
top cover and brush cover screen.
6. Before using the planer, run the unit for
10 minutes to seat new brushes.
NOTE: If existing brushes do not need replacing, be sure to maintain the same orien-
tation when you reinstall them.
CALIBRATING THE DEPTH ADJUSTMENT SCALE
The depth adjustment scale (N) on your plan-
er is set at the factory. However, with extended
use, the depth adjustment scale could show
an incorrect measurement. To check the
depth adjustment scale, plane a piece of
scrap wood, noting the measurement on the
depth adjustment scale. Measure the finished
thickness of the workpiece. If the thickness of
the workpiece does not match the reading on
the depth adjustment scale, loosen the two
screws (W) on the red indicator. Adjust the
pointer up or down until its reading matches
the finished thickness of the workpiece.
Securely re-tighten the screws.
BASE MAINTENANCE
Keep the table clean and free from oil, grease, and pitch. Treat the table with paste
wax to help maintain its smooth finish.
CIRCUIT BREAKER RESET BUTTON
Your planer is equipped with an 9 amp circuit breaker. If your planer becomes over-
loaded and stops operating, turn off the planer, let the unit sit for 2 minutes and press
touching it with your fingers.
If only one side of the knife is worn:
1. Turn the knife around so that the sharp, unused edge hangs over the end of
the cutter head where it will cut the material. Be sure to set the oblong holes in
the knife over the pins machined on the cutter head.
2. Reset the knife clamp over the knife. Be sure to align the beveled edge on the
clamp with the sharp, cutting edge of the knife. If these are not aligned correctly,
the clamp will not secure the knife properly.
3. Install the screws into the clamp and tighten sufficiently.
To access the other two knives:
1. Depress the cutter head lock lever (R) as shown in Figure 4.
2. Use the piece of scrap wood to carefully turn the cutter head until it locks into
place revealing another knife clamp.
3. Follow the same knife change procedure indicated above.
4. Repeat the procedure for the last dull knife.
After installing new knives:
1. Insert the round end of the dust shroud into the fan housing and rotate it
down to lock it into place.
2. Place the three wing nuts back into the shroud.
3. Screw the top cover of the planer back onto the unit.
NOTE: THE PLANER WILL NOT OPERATE IF THE TOP COVER IS NOT PLACED
CORRECTLY.
MAINTENANCE
BRUSH CHANGE
Your planer is equipped with brush caps (U) that
are external to the motor. If your brushes need to be
replaced, begin by acquiring a new set from a D
EWALT
service center or a dealer authorized to service D
EWALT
products. Use only identical D
EWALT brushes.
TO REPLACE THE BRUSHES ON YOUR PLANER
TURN OFF THE PLANER AND UNPLUG IT FROM
THE POWER SOURCE.
1. Use the T-wrench to remove the top over and brush cover screen on the planer.
U
V
N
W
9
2. Use a flathead screwdriver to unscrew the
brush cap located in the right, rear of the unit
(V).
3. Do the same for the brush cap located on
the side of the motor, inside the planer cover.
4. Place the new brushes into the brush
holders.
5. After installing the brushes, replace the
top cover and brush cover screen.
6. Before using the planer, run the unit for
10 minutes to seat new brushes.
NOTE: If existing brushes do not need replacing, be sure to maintain the same orien-
tation when you reinstall them.
CALIBRATING THE DEPTH ADJUSTMENT SCALE
The depth adjustment scale (N) on your plan-
er is set at the factory. However, with extended
use, the depth adjustment scale could show
an incorrect measurement. To check the
depth adjustment scale, plane a piece of
scrap wood, noting the measurement on the
depth adjustment scale. Measure the finished
thickness of the workpiece. If the thickness of
the workpiece does not match the reading on
the depth adjustment scale, loosen the two
screws (W) on the red indicator. Adjust the
pointer up or down until its reading matches
the finished thickness of the workpiece.
Securely re-tighten the screws.
BASE MAINTENANCE
Keep the table clean and free from oil, grease, and pitch. Treat the table with paste
wax to help maintain its smooth finish.
CIRCUIT BREAKER RESET BUTTON
Your planer is equipped with an 9 amp circuit breaker. If your planer becomes over-
loaded and stops operating, turn off the planer, let the unit sit for 2 minutes and press
touching it with your fingers.
If only one side of the knife is worn:
1. Turn the knife around so that the sharp, unused edge hangs over the end of
the cutter head where it will cut the material. Be sure to set the oblong holes in
the knife over the pins machined on the cutter head.
2. Reset the knife clamp over the knife. Be sure to align the beveled edge on the
clamp with the sharp, cutting edge of the knife. If these are not aligned correctly,
the clamp will not secure the knife properly.
3. Install the screws into the clamp and tighten sufficiently.
To access the other two knives:
1. Depress the cutter head lock lever (R) as shown in Figure 4.
2. Use the piece of scrap wood to carefully turn the cutter head until it locks into
place revealing another knife clamp.
3. Follow the same knife change procedure indicated above.
4. Repeat the procedure for the last dull knife.
After installing new knives:
1. Insert the round end of the dust shroud into the fan housing and rotate it
down to lock it into place.
2. Place the three wing nuts back into the shroud.
3. Screw the top cover of the planer back onto the unit.
NOTE: THE PLANER WILL NOT OPERATE IF THE TOP COVER IS NOT PLACED
CORRECTLY.
MAINTENANCE
BRUSH CHANGE
Your planer is equipped with brush caps (U) that
are external to the motor. If your brushes need to be
replaced, begin by acquiring a new set from a D
EWALT
service center or a dealer authorized to service D
EWALT
products. Use only identical D
EWALT brushes.
TO REPLACE THE BRUSHES ON YOUR PLANER
TURN OFF THE PLANER AND UNPLUG IT FROM
THE POWER SOURCE.
1. Use the T-wrench to remove the top over and brush cover screen on the planer.
U
V
 Loading...


