28
ENGLISH
4. Check that the red marks
68
near the blade slot
52
are in line with the 0° position
69
on
the two scales (Fig. H).
5. If adjustment is required, loosen the screws
70
and bring the indicators in line. The 45°
position should now also be accurate. If this is not the case, the blade is not perpendicular
to the rotating table (see below).
Checking and Adjusting the Blade to the Table (Fig. I1, I2)
1. Loosen the bevel clamp knob
22
(Fig. I1).
2. Press the saw head to the right to ensure it is fully vertical and tighten the bevel
clamphandle.
3. Pull down the head until the blade just enters the sawkerf.
4. Place a set square
66
on the table and up against the blade
62
(Fig. I2). The angle should
be 90°.
WARNING: Do not touch the tips of the blade teeth with thesquare.
5. If adjustment is required, proceed as follows:
a. Loosen the bevel clamp knob
22
(Fig. I1) and turn the vertical position adjustment
stop screw
71
in or out until the blade is at 90° to the table as measured with the
square
66
(Fig. I2).
Checking and Adjusting the Mitre Angle (Fig. A1, A2, H)
The straight cross-cut and 45° mitre positions are pre-set.
1. Pull up the rotating table location plunger
8
and rotate it counterclockwise a quarter of a
turn (Fig. A1).
2. Loosen the rotating table clamp
3
. The handle allows a ratchet-type action when full
rotation of the handle is notpossible.
3. Grip the control handle
14
(Fig. A2), compress the guard release lever
13
and lower the
saw about halfway (Fig. A1).
4. Turn the sawhead with its rotating table to the requiredposition.
5. Tighten the rotating table clamp
3
. The rotating table location plunger
8
will engage
automatically (Fig. A1).
6. Using the red marks
68
, the mitre saw table
4
can be set to any mitre angle left or right
between 0° and 45° (Fig. H).
7. Proceed as for pre-set positions. The rotating table location plunger cannot be used for
intermediateangles.
WARNING: Always make a trial cut in a piece of waste wood, to check foraccuracy.
Adjusting the Fence (Fig. J1, J2)
The moveable part of the left side of the fence can be adjusted to provide maximum support
of the workpiece near the blade, while allowing the saw to bevel to a full 45° left. The sliding
distance is limited by stops in both directions. To adjust the fence
7
:
1. Lift the lever
72
to release the fence
7
.
2. Slide the fence to theleft.
3. Make a dry run with the saw switched off and check for clearance. Adjust the fence to
be as close to the blade as practical to provide maximum workpiece support, without
interfering with the up and down movement of thearm.
4. Push the lever
72
down to secure the fence inplace.
Checking and Adjusting the Bevel Angle (Fig. J1, K1, K2)
1. Slide the side fence to the left as far as it will go (Fig. J1).
2. Loosen the bevel clamp handle
22
and move the saw head to the left. This is the 45°
bevelposition.
3. If adjustment is required, proceed as follows:
a. Turn the stopscrew
73
in or out as necessary until the pointer
74
indicates45°.
Assembly for Bench Saw Mode
Changing from Mitre Saw to Bench Saw Mode
(Fig. A1–A3, E2, L1, L2)
1. Put the blade into 0° cross-cut position with the rotating table location plunger
8
correctly located and the rotating table clamp
3
secured (Fig. A1).
2. Slacken the riving knife clamp bolt
75
just enough to allow the riving knife to enter the
mounting slot (Fig. L1).
3. Take the riving knife
16
from its storage position against the saw head (Fig.A2).
4. Depress the guard release lever
13
to release the blade guard
12
, then raise the blade
guard as far as possible (Fig. A1).
5. Slide the riving knife bracket
76
fully into the mounting slot
77
(Fig. L1). Tighten the
clampbolt.
6. Gently release the lower guard until it is held in place behind the edge protruding from
the inside of the rivingknife.
7. Remove the under-tableguard.
8. Pull down the saw head and swing the height adjuster
23
until its U-shaped bracket
56
engages on the pin provided in the base (Fig. E2).
9. Turn the wheel
55
of the adjuster to make the blade and riving knife protrude from the
bench saw table
24
(Fig. A3) to provide maximum cutting depth in bench sawmode.
WARNING: The blade should not foul the lower bladeguard.
10. Pull the table release lever
2
to the left, lift the front edge of the table and flip it back
through 180° until the teeth of the table-locking device
20
automatically engage the saw
blade retention lever to secure it in the bench saw mode (Fig. L2).
WARNING: Be careful not to lose control over the movement of thetable.
Position of the Riving Knife (Fig. M)
Fit the riving knife
16
as described above. Once fitted, the riving knife does not require
furtheradjustment.
Fitting the Upper Blade Guard (Fig. N)
The upper blade guard
25
is designed to be quickly and easily attached, via a spring-loaded
plunger to the hole in the riving knife
16
once it has been positioned through the worktable
for bench sawmode.
Secure the upper blade guard
25
to the riving knife by pulling the knob
76
to allow the
plunger in the guard toengage.
WARNING: Never use your saw in bench saw mode without the upper guard
correctlyfitted.
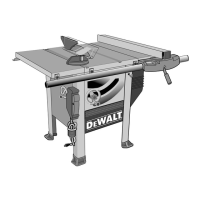
Mounting and Adjusting the Parallel Fence (Fig. O)
The dual height parallel fence
26
can be used in two positions (11 or 62 mm). The parallel
fence can be mounted on either side of theblade.
To mount the fence into the appropriate position, proceed as follows:
1. Loosen the knob
77
.
2. Slide the bracket on from the left or the right. The clamping plate
78
engages behind the
front edge of thetable.
3. Tighten the knob
77
.
4. Check that the fence is parallel to theblade.
5. If adjustment is required, proceed as follows:
a. Adjust the fence so that it is parallel to the blade by checking the distance between the
blade and the fence at the front and rear of the blade. To do so, turn the adjustment
screw in the fence support in or out asnecessary.
The default set-up of the fence is to the right-hand side of theblade.
To prepare the fence for use to the left-hand side of the blade, proceed as follows:
1. Loosen the knob
77
.
2. Pull out the bracket
79
and replace it in the otherend.
3. Fit the fence to thetable.
4. Tighten the knob
77
.
WARNING: Use the 11 mm profile for ripping low workpieces to allow access between the
blade and the fence for the push stick
17
.
WARNING: The rear end of the fence should be level with the front of the rivingknife.
Changing from Bench saw to Mitre Saw Mode (Fig. A3, D, E2, L1)
1. Remove the parallel fence
26
(Fig. A3).
2. Turn the wheel
55
of the height adjuster
23
to provide maximum cutting depth in mitre
saw mode (Fig. E2).
3. Proceed as described in the section Turning the Sawhead and TableOver.
4. Slacken the riving knife clamp bolt
75
and remove the riving knife
16
, while holding the
blade guard
12
(Fig. L1).
5. Lower the bladeguard.
6. Place the riving knife in its storage position against the sawhead.
7. Replace the under-table guard
50
(Fig. D).
Prior to Operation
• Install the appropriate saw blade. Do not use excessively worn blades. The maximum rotation
speed of the tool must not exceed that of the sawblade.
• Do not attempt to cut excessively smallpieces.
• Allow the blade to cut freely. Do notforce.
• Allow the motor to reach full speed beforecutting.
• Make sure all locking knobs and clamp handles aretight.
OPERATION
Instructions for Use
WARNING: Always observe the safety instructions and applicableregulations.
WARNING: To reduce the risk of serious personal injury, turn tool off and
disconnect tool from power source before making any adjustments or removing/
installing attachments oraccessories.
WARNING:
• The attention of UK users is drawn to the "woodworking machines regulations 1974"
and any subsequentamendments.
• Ensure the material to be sawn is firmly secured inplace.
• Apply only a gentle pressure to the tool and do not exert side pressure on the
sawblade.
• Avoidoverloading.
Ensure the machine is placed to satisfy your ergonomic conditions in terms of table height
and stability. The machine site shall be chosen so that the operator has a good overview and
enough free surrounding space around the machine that allows handling of the workpiece
without anyrestrictions.
To reduce effects of vibration make sure the environment temperature is not too cold,
machine and accessory is well maintained and the workpiece size is suitable for thismachine.
 Loading...