18
ENGLISH
• Take the time to thoroughly read and understand this manual
prior tooperation.
Markings on Tool
The following pictograms are shown on the tool:
Read instruction manual beforeuse.
Wear earprotection.
Wear eyeprotection.
Date Code Position (Fig. A)
The date code
6
, which also includes the year of manufacture,
is printed into thehousing.
Example:
2020 XX XX
Year of Manufacture
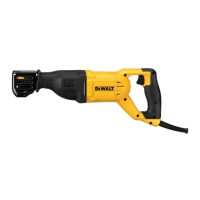
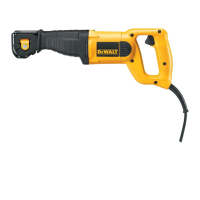
Description (Fig. A)
WARNING: Never modify the power tool or any part of it.
Damage or personal injury couldresult.
1
Variable speed switch
2
Blade clamp lever
3
Saw shoe
Intended Use
Your DWE305 reciprocating sabre saw has been designed for
professional sawing of wood, metal and plastic tubes on a
firm surface. The design permits cutting extremely close to the
edge of difficult areas. The saw blade recommendations are to
beobserved.
DO NOT use under wet conditions or in the presence of
flammable liquids orgases.
Your reciprocating sabre saws are professional powertools.
DO NOT let children come into contact with the tool.
Supervision is required when inexperienced operators use
thistool.
• Young children and the infirm. This appliance is not
intended for use by young children or infirm persons
withoutsupervision.
• This product is not intended for use by persons (including
children) suffering from diminished physical, sensory or
mental abilities; lack of experience, knowledge or skills
unless they are supervised by a person responsible for their
safety. Children should never be left alone with thisproduct.
ASSEMBLY AND ADJUSTMENTS
WARNING: To reduce the risk of serious personal
injury, turn tool off and disconnect tool from power
source before making any adjustments or removing/
installing attachments or accessories. Be sure the
trigger switch is in the OFF position. An accidental start-up
can causeinjury.
Mounting the Saw Blade (Fig.B)
1. Move the blade clamp lever
2
up to release the blade
clampingmechanism.
2. Insert the saw blade into the holder
4
until it engages. The
blade can be installed with the teeth pointing down or up,
or left orright.
3. Move the blade clamp lever
2
down to lock the blade
clampingmechanism.
4. To remove the saw blade, proceed in reverseorder.
Saw Blades
material recommended saw blade
ferrous metal fine-toothed
non ferrous metal coarse-toothed
wood coarse-toothed
plastic fine-toothed
masonry carbide-tipped
A wide variety of dedicated saw blades is available as anoption.
WARNING: Always select your saw blade with greatcare.
OPERATION
Instructions for Use
WARNING: Always observe the safety instructions and
applicableregulations.
WARNING: To reduce the risk of serious personal
injury, turn tool off and disconnect tool from power
source before making any adjustments or removing/
installing attachments or accessories. Be sure the
trigger switch is in the OFF position. An accidental start-up
can causeinjury.
WARNING:
• Ensure the material to be sawn is secured inplace.
• Apply only a gentle pressure to the tool and do not
exert side pressure on the saw blade. If possible, work
with the saw shoe pressed against the workpiece. This
prevents damage to the blade and stops the tool from
jerking andvibrating.
• When sawing in walls or doors be aware of the
location of pipework and wiring. Always hold the tool
by itshandle.
• Avoidoverloading.
• Let the blade run freely for a few seconds before
starting the cut. Never switch on the tool when the
saw blade is jammed in the workpiece or in contact
with thematerial.
Proper Hand Position (Fig.A,D)
WARNING: To reduce the risk of serious personal injury,
ALWAYS use proper hand position asshown.
 Loading...