13
ENGLISH
Motor Brush Inspection and Replacement
(Fig. T, U)
BE SURE TOOL IS UNPLUGGED BEFORE INSPECTING BRUSHES.
Brushes should be regularly inspected for wear. To inspect
brushes, use a screwdriver to remove brush caps
22
. Carefully
take out the brush. Brushes should slide freely in brush box. If
brushes are worn down to 6 mm as shown in Fig. U, they should
be replaced.
To reinstall each brush, carefully insert the brush and replace the
brush caps.
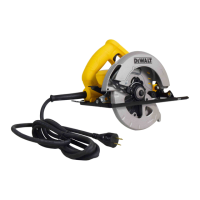
Blades
A dull blade will cause inefficient cutting, overload on the
saw motor, excessive splintering and increase the possibility
of kickback. Change blades when it is no longer easy to push
the saw through the cut, when the motor is straining, or when
excessive heat is built up in the blade. It is a good practice to
keep extra blades on hand so that sharp blades are available for
immediate use. Dull blades can be sharpened in mostareas.
Hardened gum on the blade can be removed with kerosene,
turpentine, or oven cleaner. Anti‑stick coated blades can be
used in applications where excessive build‑up is encountered,
such as pressure treated and greentimber.
Cleaning
WARNING: Blow dirt and dust out of the main housing
with dry air as often as dirt is seen collecting in and around
the air vents. Wear approved eye protection and approved
dust mask when performing thisprocedure.
WARNING: Never use solvents or other harsh chemicals
for cleaning the non‑metallic parts of the tool. These
chemicals may weaken the materials used in these parts.
Use a cloth dampened only with water and mild soap.
Never let any liquid get inside the tool; never immerse any
part of the tool into aliquid.
Lower Guard
The lower guard should always rotate and close freely from
a fully open to fully closed position. Always check for correct
operation before cutting by fully opening the guard and letting
it close. If the guard closes slowly or not completely, it will
need cleaning or servicing. Do not use the saw until it functions
correctly. To clean the guard, use dry air or a soft brush to
remove all accumulated sawdust or debris from the path of
the guard and from around the guard spring. Should this not
correct the problem, it will need to be serviced by an authorised
servicecentre.
C
Lubrication
Your power tool requires no additionallubrication.
installing attachments or accessories. An accidental
start‑up can causeinjury.
Dust Extraction (Fig. S)
WARNING: Risk of dust inhalation.To reduce the risk of
personal injury, ALWAYS wear an approved dustmask.
A dust extraction spout
21
is supplied with yourtool.
The dust extraction spout allows you to connect the tool
to an external dust extractor, either using the AirLock™
system(DWV9000‑XJ), or a standard 35mm dust
extractorfitment.
WARNING: ALWAYS use a vacuum extractor designed
in compliance with the applicable directives regarding
dust emission when sawing wood.Vacuum hoses of most
common vacuum cleaners will fit directly into the dust
extractionoutlet.
Pocket Cutting (Fig.P)
WARNING: Never tie the lower blade guard in a raised
position. Never move the saw backwards when pocket
cutting. This may cause the saw to raise up off the work
surface, which could causeinjury.
A pocket cut is one that is made in a floor, wall or other
flatsurface.
1. Adjust the saw shoe so the blade cuts at desireddepth.
2. Tilt the saw forward and rest front of the shoe on material
to becut.
3. Using the lower blade guard retracting lever, retract the
lower blade guard to an upward position. Lower the rear of
the shoe until the blade teeth almost touch the cuttingline.
4. Release the lower blade guard (its contact with the work
will keep it in position to open freely as you start the cut).
Remove your hand from the lower blade guard retracting
lever and firmly grip the auxiliary handle
4
, as shown in
FigureP. Position your body and arm to allow you to resist
kickback if itoccurs.
5. Make sure blade is not in contact with cutting surface before
startingsaw.
6. Start the motor and gradually lower the saw until its shoe
rests flat on the material to be cut. Advance saw along the
cutting line until cut iscompleted.
7. Release the trigger switch and allow the blade to stop
completely before withdrawing the blade from thematerial.
8. When starting each new cut, repeat the abovesteps.
Ripping (Fig.N)
Ripping is the process of cutting wider boards into narrower
strips – cutting grain lengthwise. Hand guiding is more difficult
for this type of sawing and the use of a DeWALT parallel fence
isrecommended.
MAINTENANCE
Your power tool has been designed to operate over a long
period of time with a minimum of maintenance. Continuous
satisfactory operation depends upon proper tool care and
regularcleaning.
WARNING: To reduce the risk of serious personal
injury, turn tool off and disconnect tool from power
source before making any adjustments or removing/