ENGLISH
30
• Only fit 13 Amperes BS1363A approved plugs
fitted with the correctly rated fuse (1).
• The cable wire colours, or a letter, will be
marked at the connection points of most good
quality plugs. Attach the wires to their respective
points in the plug (see below). Brown is for Live
(L) (2) and Blue is for Neutral (N) (4).
• Before replacing the top cover of the mains plug
ensure that the cable restraint (3) is holding the
outer sheath of the cable firmly and that the two
leads are correctly fixed at the terminals crews.
1
2
4
3
WARNING: NEVER use a light socket.
NEVER connect the live (L) or
neutral (N) wires to the earth
pin marked E or .
For 115 V units with a power rating exceeding
1500 W, we recommend to fit a plug to BS4343
standard.
WARNING: 115 V units have to
be operated via a fail-safe isolating
transformer with an earth screen
between the primary and secondary
winding.
Using an extension cable
If an extension cable is required, use an approved
extension cable suitable for the power input of this
tool (see technical data).
The minimum conductor size is 1.5 mm
2
. When
using a cable reel, always unwind the cable
completely. Also refer to the table below.
Conductor size (mm
2
) Cable rating (Amperes)
0.75 6
1.00 10
1.50 15
2.50 20
4.00 25
Cable length (m)
7.5 15 25 30 45 60
Voltage Amperes Cable rating (Amperes)
115 0 – 2.0 6 6 6 6 6 10
2.1 – 3.4 6 6 6 6 6 15
3.5 – 5.0 6 6 10 15 20 20
5.1 – 7.0 10 10 15 20 20 25
7.1 – 12.0 15 15 20 25 25 –
12.1 – 20.0 20 20 25 – – –
230 0 – 2.0 6 6 6 6 6 6
2.1 – 3.4 6 6 6 6 6 6
3.5 – 5.0 6 6 6 6 10 15
5.1 – 7.0 10 10 10 10 15 15
7.1 – 12.0 15 15 15 15 20 20
12.1 – 20.0 20 20 20 20 25 –
ASSEMBLY AND ADJUSTMENTS
WARNING: Prior to assembly and
adjustment, always unplug the tool.
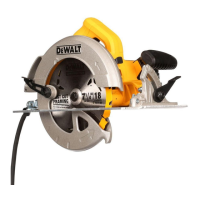
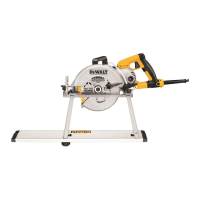
Bevel adjustment (fi g. 1)
The bevel angle can be adjusted between 0° and
47°.
1. Loosen the bevel adjustment knobs (e).
2. Set the bevel angle by tilting the saw shoe (d)
until the mark indicates the desired angle on
the depth scale (g).
3. Tighten the bevel adjustment knobs (e).
Changing the saw blade (fi g. 2, 3)
1. Press the lock button (l).
2. Press the plunge saw down to stop (blade
change position).
3. Turn the lock lever (m) clockwise until it stops.
4. Press the lock lever (m) down and rotate the
blade until the lock position is found.
NOTE: The blade (k) is now locked and cannot be
turned by hand.
5. Turn the blade clamping screw (n) anti-
clockwise to remove.
6. Remove the outer flange (o) and used blade (k).
Place the new blade on the inner flange (p).
7. Replace the outer flange (o) and blade clamping
screw (n). Turn the screw clockwise by hand.
NOTE: The direction of rotation of the saw blade
and the rotation of the plunge saw MUST be the
same.

 Loading...