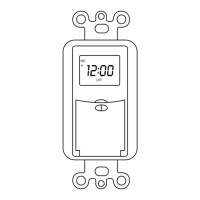
The Jewenwils In-wall Digital Timer, SKU: HIDT12W, is designed to provide automated control over electrical devices connected to it. This in-wall timer allows users to program specific ON/OFF times for connected loads, offering convenience and energy savings. Its primary function is to replace a standard wall switch, integrating seamlessly into existing electrical systems, provided a neutral wire is available in the wall outlet.
Function Description:
The core function of this device is to act as a programmable switch for electrical loads. Users can set multiple ON/OFF programs throughout the day or week, allowing for automated control of lights, fans, or other appliances. The timer features a digital display that shows the current time and status (ON/OFF), making it easy to monitor its operation. It supports up to seven ON/OFF program settings, offering flexibility for various scheduling needs.
Usage Features:
- Current Time Setting: Before programming ON/OFF events, the current time needs to be set. This involves pressing and holding the "CLOCK" button while using "DAY," "HOUR," and "MIN" buttons to adjust the date and time. A reset button is available to clear all settings if the display is blank or if a full reset is desired.
- ON/OFF Program Setting: The timer allows for the creation of up to seven distinct ON/OFF programs. To set a program, the user presses the "PROG" button, then uses the "DAY," "HOUR," and "MIN" buttons to define the desired ON or OFF time for specific days of the week. This enables users to customize schedules for different routines.
- Multiple Weekday Groups: For enhanced programming flexibility, the timer offers various weekday grouping options. When setting ON/OFF events, users can cycle through different day combinations (e.g., MO, TU, WE, TH, FR, SA, SU; MO; TU; WE; TH; FR; SA; SU; MO, TU, WE, TH, FR; SA, SU; MO, TU, WE, TH, FR, SA; MO, WE, FR; TU, TH, SA; MO, TU, WE; TH, FR, SA) by pressing the "DAY" button. This feature simplifies the process of applying the same schedule to multiple days without having to program each day individually.
- Manual Override: The timer includes a "MANUAL" button that allows users to instantly switch the connected load between ON and OFF states, regardless of the programmed schedule. This is useful for temporary adjustments without altering the established programs. The timer can also be operated like a standard light switch by pressing the cover directly. Even with manual intervention, the programmed settings remain active and the timer will revert to its scheduled operation at the next programmed event.
- Program Suspension: If the user wishes to temporarily disable the timer's automatic function, they can press the "PROG" button until "--:--" is displayed, then press the "MANUAL" button. This suspends all programmed events. To restore the timer function, the "PROG" button is pressed again to find "--:--", followed by pressing the "MANUAL" button.
- Random ON/OFF Setting: This feature adds a security element by turning the connected device ON or OFF within a random 2-30 minute window of the programmed times. This makes it appear as if someone is home, potentially deterring intruders. To activate or deactivate this function, the "DAY" and "HOUR" buttons are pressed simultaneously until "TIMER" flashes on the display.
- Daylight Savings Time Function: The timer includes a convenient feature to adjust for Daylight Savings Time. By pressing the "MIN" and "HOUR" buttons simultaneously, the current time can be advanced by one hour. Repeating this action will revert the time back by one hour.
- Power Back-up Feature: In the event of a power outage, the timer is equipped with a built-in battery that retains all programmed settings for up to 30 days, provided the battery is fully charged. This ensures that schedules are not lost during temporary power interruptions, eliminating the need for reprogramming.
Maintenance Features:
- Installation: The device is designed for in-wall installation, replacing an existing switch. It requires a neutral wire in the electrical box for proper operation. The installation process involves turning off power at the circuit breaker, removing the old switch, connecting wires according to the provided diagram (Figure 1), mounting the timer into the wall box, attaching the wall plate, and finally restoring power.
- Safety Warnings: The manual emphasizes several safety precautions, including not exceeding maximum ratings, avoiding use in high humidity areas, ensuring children do not operate it unsupervised, and not attempting to disassemble or repair the unit. It also stresses the importance of secure wire connections.
- Professional Assistance: For users who are unsure or uncomfortable with the installation process, the manual advises contacting a licensed electrician to ensure safe and correct setup.
- Warranty: The product comes with a One Year Limited Warranty covering materials and workmanship from the purchase date. This provides assurance of quality and support for potential manufacturing defects. However, the warranty does not cover damage caused by personal misuse or improper installation, highlighting the importance of following the instructions carefully.