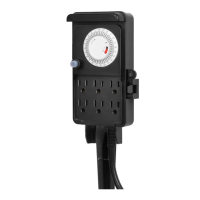
Dewenwils Outdoor Digital Box Timer
N.O. Contacts:
40A Resistive, 120~277VAC
1HP, 16A FLA, 96A LRA, 120 VAC
2HP, 10A FLA, 60A LRA, 277 VAC
30A Ballast, 120VAC
20A Ballast, 277VAC
15A Tungsten, 120VAC
30A Resistive, 28VDC
N.C. Contacts:
30A Resistive, 120~277VAC
1HP, 16A FLA, 96A LRA, 120 VAC
2HP, 12A FLA, 72A LRA, 240 VAC
2A Tungsten, 120VAC
10A Ballast, 120VAC
10A Ballast, 277VAC
20A Resistive, 28VDC
CAUTION!
For outdoor use. For installation, rain-tight or wet
location conduit hubs that comply with requirements of
UL 514B Conduit, Tubing, and Cable Fittings must be used.
Note: Installation should be made by a licensed electrician.
Turn power OFF at the circuit breaker before installation.
READ ALL INSTRUCTIONS before using the outdoor digital
!
box timer
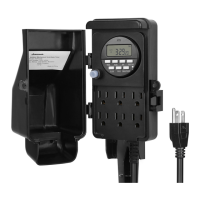
6
5
1
2
8
9
4
3
7
Operating Instruction
2. Set the DST
1. Set the Current Date
3. Set the Current Time
Button Layout
Before initial use, if the digital screen is blank, please wire it as the diagram
shows on the last paper to charge the internal battery for at least 30 minutes,
After the screen displays, the unit is ready for programming.
a. Press the “TIME” button to set the current year.
Press “+” or ”-” button to adjust the ashing number.
b. Press the “TIME” button again to set the month.
Press button “+” or “-” to adjust the number from 01 to 12.
c. Press the ”TIME” button again to set the date.
Press button “+” or “-” to adjust the number.
d.Press the “TIME” button again to set the Day
Light Savings Time (DST) function.
Press button ”+” or “-” to set AUTO, as shown in
the gure,
1. TIME – Setting the Clock.
2. RESUME – Erase Program.
3. MODE – Choose Different Mode.
4. (-) - Adjust DOWN.
5. (+) - Adjust UP.
6. PROGRAM - Setting Program.
7. RESET – Reset all the functions.
8. POWER – Power indicator light indicates if
the Digital Box Timer is turned ON or OFF.
9. STATUS – Status light indicates the output
ON.
e. Press the “TIME” button again to set the hour.
Press button “+” or “-” to adjust the number.
f. Press the “TIME” button again to set the
minutes.
Press button “+” or “-” to adjust the number
from 00 to 59.
4. Set the Astronomic Function
The map below will determine what zone the timer is being used
g. Press the “TIME” button again to set the Astronomic function.
Press button “+” or “-” to adjust three different areas to
your current location.
Once the zone is
determined, the timer
will automatically set
the sunrise and
sunset time
NO RTH
CENTRAL
SOUTH
NO RTH
CENTRAL
SOUTH
1. NORTH:
2. CENTRAL:
3. SOUTH:
h. Set the Sunrise Time
Press the “TIME” button again to adjust the Sunrise time.
Press “+” or “-” button to adjust ±2 hours,
Press “RESUME” back to current Sunrise time.
If AM twinkling it means that setting Sunrise time.
i. Set the Sunset Time
Press the “TIME” button again to adjust the Sunset time.
Press “+” or “-” button to adjust ±2 hours,
Press “RESUME” back to current Sunset time.
If PM twinkling it means that setting Sunset time.
5. Programming of Switching Times (On/Off)
Note: in the process, press the “RESUME” will clear the current
setting.
b. Press “TIME” button to set the rst On event. The setting
will begin from the begining of the week.
Press button “+” or “-” to adjust different week event:
- Every day (7 Days of the week).
- Weekday (Mon-Fri).
- Weekend (Sat-Sun).
c. Press “TIME” button to set the hours.
Press “+” or “-” to set hours. Hours setting mode:
- 12-hour clock AM/PM
- Sunrise/Sunset
Press “TIME” button to set the minutes.
Note: If you select Sunrise or Sunset as the event.
Please press “PROGRAM” button to select “ON” or “OFF”.
Press button “+” or “-” to adjust from 00-59.
Note: If you press button “RESUME” that will cancel the
setting.
d. Press “PROGRAM” button to turn the rst event OFF.
This setting is like the pervious step.There are 7 events you
can set in this timer. Once you nished the setting please
press the “PROGRAM” button back to standby status.
Note: If the timer is idle for 30 seconds. The time will automatically set to
current time.
a. Press the “PROGRAM” button to begin setting the event.