EasyManua.ls Logo

DHC BT101 - User Manual

DHC BT101
8 pages
Print Icon
To Next Page IconTo Next Page
Loading...
- GB.1-V1 -
BT101 BATTERY TESTER
BT201 BATTERY/CHARGING/STARTING
SYSTEM ANALYZER
TEST PROCEDURES / OPERATING INSTRUCTIONS
IMPORTANT:
1. For testing 12 volts batteries (BT101/BT201), and
for testing 12 volts charging/Starting system (BT201).
The capacity range:
SAE : 200~1200 CCA
DIN : 110~670 CCA
IEC : 130~790 CCA
EN : 185~1125 CCA
CA(MCA) : 240~1440 CA(MCA)
2. Suggested operation range 32(0) to 122(50) in ambient
temperature.
WARNING:
1. Working in the vicinity of a lead acid battery is dangerous.
Batteries generate explosive gases during normal battery operation.
For this reason, it is of utmost importance, if you have any doubt,
that each time before using your tester, you read these instructions
very carefully.
2. To reduce risk of battery explosion, follow these instructions and
those published by the battery manufacturer and manufacturer of
any equipment you intend to use in the vicinity of the battery.
Observe cautionary markings on these items.
3. Do not expose the tester to rain or snow.
Question and Answer IconNeed help?

Do you have a question about the DHC BT101 and is the answer not in the manual?

Summary

BT101;BT201 Tester: Important Guidelines

Operational Scope and Environment

Covers 12V battery testing compatibility, capacity ranges, and recommended operating temperatures.

Critical Safety Warnings

Highlights dangers of lead-acid batteries, explosive gases, and importance of reading instructions.

Usage and Environmental Restrictions

Prohibits exposure to rain/snow and warns against risky handling near batteries.

Personal Safety Precautions for Battery Testing

Workplace Safety and Assistance

Ensures assistance, safety gear, and first aid readiness for battery acid exposure.

Hazardous Material Handling

Addresses risks from sparks, tools, smoking, and metal jewelry near batteries.

Preparing for Battery Testing

Area and Battery Preparation

Covers ventilation, terminal cleaning, battery inspection, and adding distilled water.

Safe Battery Removal

Provides steps for safely removing the battery from a vehicle for testing.

Battery Testing Procedure (BT101;BT201)

Initial Setup and Connection

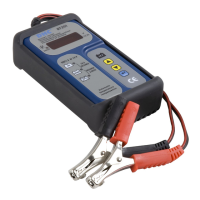
Guides on vehicle preparation, terminal cleaning, and clamp connection.

Tester Configuration and Input

Covers 9V battery, voltage display, selecting test type, and rating standard.

Entering Battery Capacity

Instructs to input the battery's CCA or CA (MCA) capacity using navigation keys.

Battery Testing Procedure (BT101;BT201) - Continued

Test Execution and Charge Status

Covers test timing, inputting charge status, and test completion.

Interpreting Test Results (LED Indicators)

Explains LED lights for battery condition (Good, Recharge, Discharged).

Battery Testing Procedure (BT101;BT201) - Continued

Advanced Result Interpretation and Exit

Details error messages, exiting test mode, and data memorization.

System Test Procedure (BT201)

Starter System Test Setup and Execution

Guides on selecting System Test, turning off accessories, starting engine, and reading voltage.

System Test Procedure (BT201) - Continued

Starter System Test Results Interpretation

Interprets LED indicators for starter system performance (OK, Weak, Problem).

Charging System Test Procedure

Charging System Test Setup and Execution

Covers transition to charging test, engine RPM, and testing with accessory loads.

Charging System Test Procedure - Continued

Charging System Test Results Interpretation

Explains LED indicators for charging system performance (OK, High Voltage, Low Voltage).

Troubleshooting Common Issues

Display Error and Voltage Issues

Troubleshoots 'HI', blank screen, and unstable voltage (----) indicators.

Warranty and Return Policy

Warranty Terms and Exclusions

Details warranty coverage, exclusions, and the sole remedy for defects.

Goods Return Procedures and Remarks

Provides instructions for packaging returned goods and remarking for smooth processing.

Overview

This document describes the BT101 Battery Tester and BT201 Battery/Charging/Starting System Analyzer, designed for testing 12-volt batteries and, for the BT201 model, also the charging and starting systems of vehicles.

Function Description:

The BT101 and BT201 devices are primarily used for evaluating the health and performance of 12-volt lead-acid batteries. The BT201 extends this capability to include comprehensive analysis of the vehicle's charging and starting systems. The battery test function assesses the battery's capacity to hold a charge and its overall condition, providing results such as "Good," "Good but needs to be charged," "Discharged," or indicating a need for replacement due to inability to hold a charge or a short-circuited cell. The system test functions of the BT201 evaluate the starter system by measuring the minimum voltage during cranking and the charging system by checking voltage levels at idle and under accessory loads.

Important Technical Specifications:

  • Battery Voltage: 12 volts (for both BT101 and BT201).
  • Capacity Range (CCA):
    • SAE: 200~1200 CCA
    • DIN: 110~670 CCA
    • IEC: 130~790 CCA
    • EN: 185~1125 CCA
    • CA (MCA): 240~1440 CA (MCA)
  • Operating Temperature Range: Suggested 32°F (0°C) to 122°F (50°C) ambient temperature.
  • Internal Power: Requires a 9V battery for operation. An "ibtL" (INTERNAL BATTERY LOW) message will appear if the 9V battery needs replacement.
  • Display: LED display shows voltage (e.g., XX.XX) and test results.
  • Indicators: Uses Green, Yellow, and Red LED lights to indicate battery and system status.

Usage Features:

Battery Testing (BT101/BT201):

  1. Preparation: Before testing, turn off ignition, all accessories, and loads. Ensure battery terminals are clean.
  2. Connection: Clamp the black lead to the negative terminal and the red lead to the positive terminal.
  3. Power On: The device requires an internal 9V battery. The LED display will show the battery voltage upon connection to the vehicle battery.
  4. Navigation: Use the ▲/▼ keys to select options and "ENTER" to confirm.
  5. Test Selection (BT201 only): For the BT201, select "bAtt" for battery test.
  6. Battery Type Selection: Choose between "SLI" (Standard SLI flooded batteries) or "SEAL" (VRLA/GEL/AGM sealed/MF batteries).
  7. Battery Rating Selection: Select the appropriate rating standard: SAE, DIN, IEC, EN, or CA (MCA).
  8. Capacity Input: Input the battery's CCA or CA (MCA) capacity within the specified ranges.
  9. Test Execution: Press "ENTER" to start the test, which completes within 1 second.
  10. Charge Inquiry: If "CHA-" appears, the tester may ask if the battery is charged. Select "yES" or "no."
  11. Results: The LED display shows the actual CCA value. LED lights indicate the battery's condition:
    • Green LED: Battery is good and holds a charge.
    • Green & Yellow LEDs: Battery is good but needs charging.
    • Yellow & Red LEDs: Battery is discharged; recharge and retest. If results are the same, replace the battery.
    • Red LED: Battery cannot hold a charge or has a short-circuited cell; replace immediately.
    • "Err" on screen & Second Red light: Clamps not connected properly, or battery CCA is beyond the tester's maximum capacity.
  12. Data Memorization: All selected data (battery type, CCA standard, capacity) are memorized after the test.

Starter System Test (BT201 only):

  1. Initial Voltage: The LED display shows the battery voltage.
  2. System Test Selection: Select "SySt" for system test.
  3. Preparation: Turn off all vehicle accessory loads.
  4. Cranking Voltage: The screen shows "CrAn." Press "ENTER" to read the minimum voltage during cranking.
  5. Engine Start: Start the engine and read the voltage after cranking.
  6. Results:
    • Green LED: Starting system OK.
    • Yellow LED: Starting system weak; check connections, wiring, and starter.
    • Red LED (or blank/voltage display): Starting system problem; check connections, wiring, and starter immediately.

Charging System Test (BT201 only):

  1. Live Voltage: After the starter test, press "ENTER" to go to the charging system test. The screen shows "CHAR," then press "ENTER" to read live voltage.
  2. Engine RPM: Run the engine at 1200~1500 rpm and read the voltage.
  3. Results (No Load):
    • Green LED: Charging system OK.
    • Red LED: Charging voltage high; check regulator.
    • Yellow LED: Charging voltage low; check connections, wiring, and alternator.
  4. Test with Loads: Continue the test with accessory loads (blower on high, high beam headlights, rear defogger). Avoid cyclical loads.
  5. Results (With Load):
    • Green LED: Charging system OK.
    • Red LED: Charging voltage high; check regulator.
    • Yellow LED: Charging voltage low; check connections, wiring, and alternator.
  6. End Test: Turn off the engine and remove clamps.

Troubleshooting:

  • "HI" on screen: Battery voltage is over 15.00V (too high for 12V battery). Re-check if the battery is 12 volts.
  • Voltage under 1.5V: Tester won't work. Recharge battery and retest. If still low, replace the battery.
  • "blank" on screen: Battery voltage too low to power the tester. Recharge and retest, or replace the battery. Also check if clamps are connected reversely.
  • "----" on screen / Screen flickers: Unstable voltage. Wait 15-30 minutes for voltage to stabilize, or eliminate factors causing instability.

Maintenance Features:

  • Battery Terminal Cleaning: Users are instructed to clean battery terminals before testing to ensure accurate readings and proper connection.
  • Battery Inspection: Inspect the battery for cracked or broken cases or covers. Do not use the tester on damaged batteries.
  • Fluid Level Check (Non-Sealed Batteries): For non-sealed maintenance-free batteries, add distilled water to each cell until the acid reaches the manufacturer's specified level.
  • Safety Precautions: Emphasizes safety measures such as wearing protective gear, having fresh water and soap nearby, avoiding sparks/flames, and removing personal metal items when working with lead-acid batteries.
  • Warranty: The device comes with a warranty covering defects in material or workmanship, subject to specific conditions and requiring proof of purchase. Damage due to accident, abuse, alteration, or failure to follow instructions is not covered.

DHC BT101 Specifications

General IconGeneral
BrandDHC
ModelBT101
CategoryAnalytical Instruments
LanguageEnglish