Page 32
2. Control (continued)
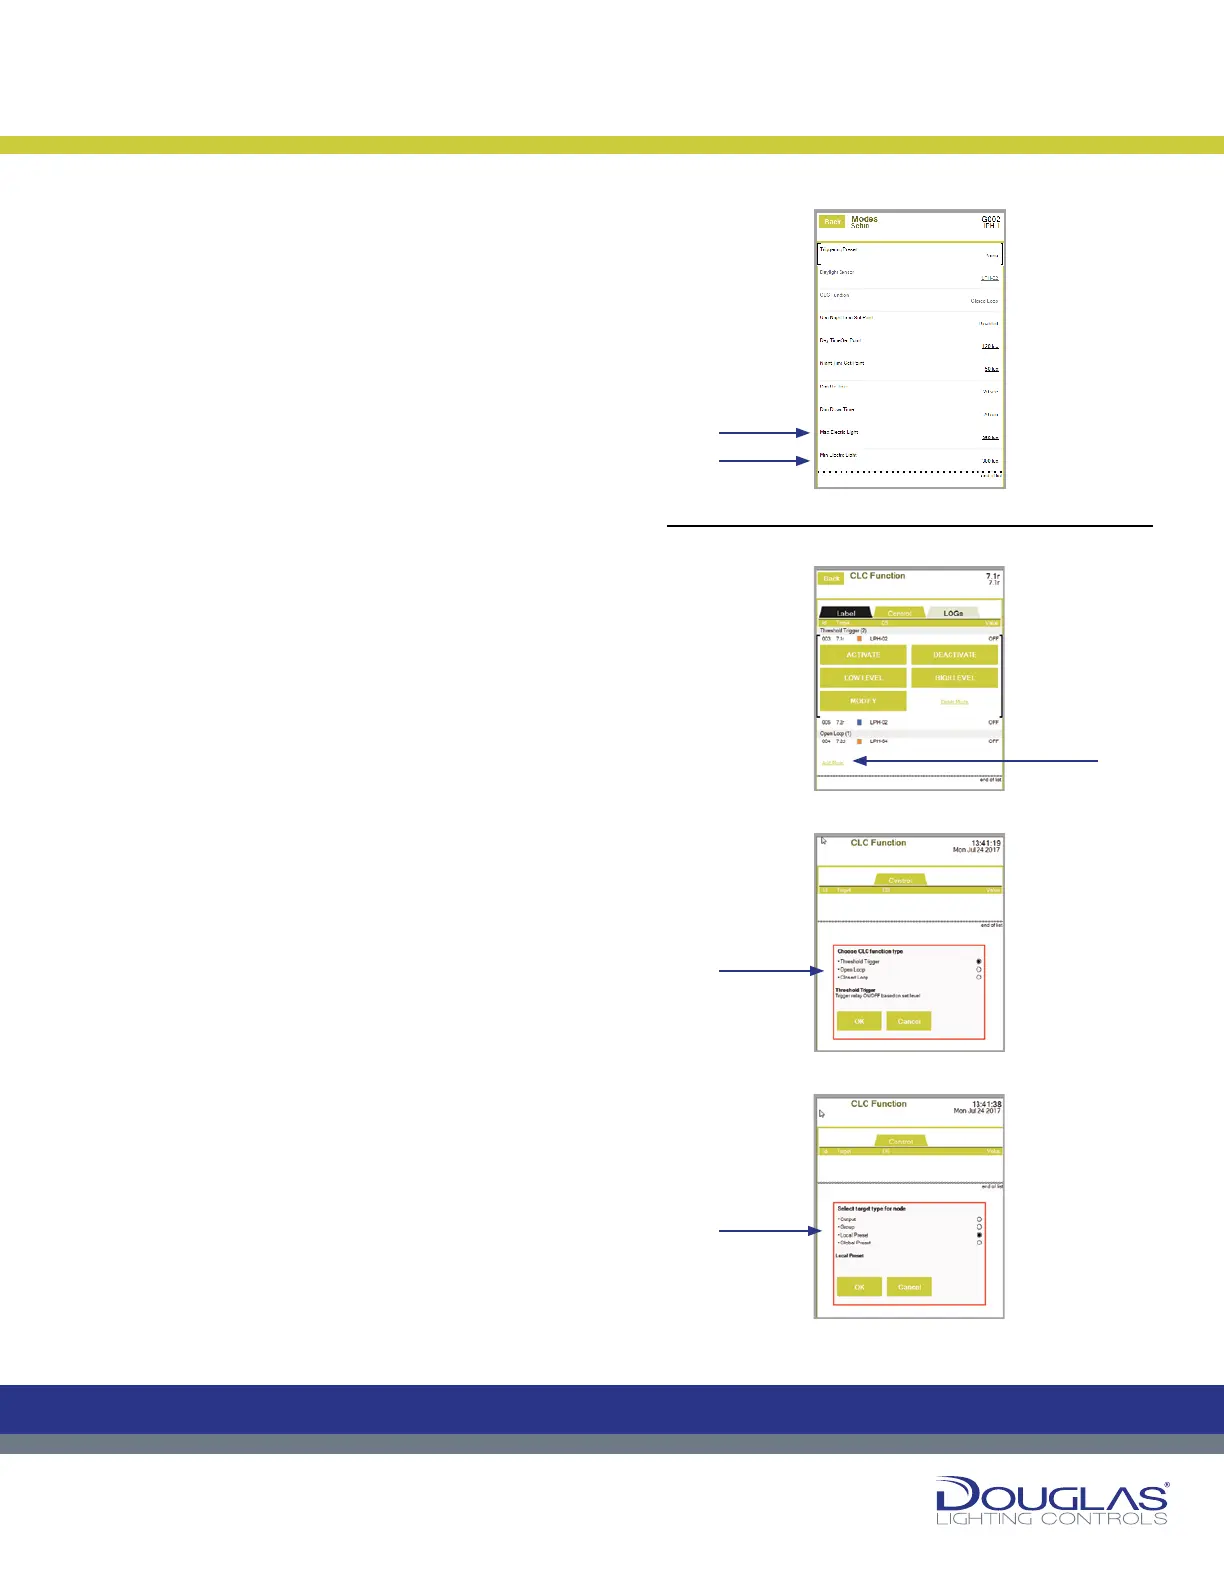
9. Max Electric Light - select the associated link to modify
the value, which is the brightness stable light level value in
the area controlled by the CLC. Use the slider to set the new
value and select the OK button.
10. Min Electric Light - select the associated link to modify the
value, which is the dimmest stable light level value in the
area controlled by the CLC. Use the slider to set the new
value and select the OK button.
3. LOGs
You can view the historical activity for a selected mode by
selecting the LOGs tab.
Constant Lighting Controller Menus
3. Presets
The Presets screen displays all presets controlled by a Constant
Lighting Controller (CLC) local sensor. The sensor has three types
of settings:
Threshold Trigger - triggers a preset (of only relays) to ON when
the measured light level goes below the Low Level Set Point
and triggers the output to OFF when the light level goes above
the High Level Set Point value.
Open Loop - constantly adjusts the dimming levels of each preset
in response to the measured light level coming into the room.
Closed Loop - constantly adjusts the dimming levels of each
output in response to the measured light level inside the room.
The presets are listed by type of CLC setting in the order of the
controlling sensor. Presets are assigned to sensors when a new
Preset Mode is created.
1. To create a new Preset Mode:
a) Select the Add Mode link. You may have to scroll to the end
of the list.
b) Select the CLC setting and select the OK button.
c) Select the Local Preset or Global Preset, as the output
type, and select the OK button.
d) Select the sensor controlling the output and select the OK
button.
e) The new preset mode is displayed. Use the buttons on the
screen to adjust the conguration.
Constant Lighting Controller
31
Dialog® Lighting Control System
2. Control (continued)
9. Max Electric Light - select the associated link to modify the value,
which is the brightness stable light level value in the area controlled by
the CLC. Use the slider to set the new value and select the OK button.
10.Min Electric Light - select the associated link to modify the value,
which is the dimmest stable light level value in the area controlled by the
CLC. Use the slider to set the new value and select the OK button.
3. LOGs
Y
ou can view the historical activity for a selected mode by selecting the
LOGs tab.
Constant Lighting Controller Menus
3. Presets
The Presets screen displays all presets controlled by a Constant Lighting
Controller (CLC) local sensor. The sensor has three types of settings:
Threshold Trigger - triggers a preset (of only relays) to ON when the
measured light level goes below the Low Level Set Point and triggers the
output to OFF when the light level goes above the High Level Set Point
value .
Open Loop
- constantly adjusts the dimming levels of each preset in
response to the measured light level coming into the room.
Closed Loop - constantly adjusts the dimming levels of each output in
response to the measured light level inside the room.
The presets are listed by type of CLC setting in the order of the controlling
sensor. Presets are assigned to sensors when a new Preset Mode is created.
1. To create a new Preset Mode:
a) Select the Add Mode link. You may have to scroll to the end of the list.
b) Select the CLC setting and select the OK button.
c) Select the Local Preset or Global Preset, as the output type, and select
the OK button.
d) Select the sensor controlling the output and select the OK button.
e) The new preset mode is displayed. Use the buttons on the screen to adjust
the conguration.
Constant Lighting Controller
C
M
Y
CM
MY
CY
CMY
K
31
Dialog® Lighting Control System
2. Control (continued)
9. Max Electric Light - select the associated link to modify the value,
which is the brightness stable light level value in the area controlled by
the CLC. Use the slider to set the new value and select the OK button.
10.Min Electric Light - select the associated link to modify the value,
which is the dimmest stable light level value in the area controlled by the
CLC. Use the slider to set the new value and select the OK button.
3. LOGs
You can view the historical activity for a selected mode by selecting the
LOGs tab.
Constant Lighting Controller Menus
3. Presets
The Presets screen displays all presets controlled by a Constant Lighting
Controller (CLC) local sensor. The sensor has three types of settings:
Threshold Trigger - triggers a preset (of only relays) to ON when the
measured light level goes below the Low Level Set Point and triggers the
output to OFF when the light level goes above the High Level Set Point
value .
Open Loop - constantly adjusts the dimming levels of each preset in
response to the measured light level coming into the room.
Closed Loop - constantly adjusts the dimming levels of each output in
response to the measured light level inside the room.
The presets are listed by type of CLC setting in the order of the controlling
sensor. Presets are assigned to sensors when a new Preset Mode is created.
1. To create a new Preset Mode:
a) Select the Add Mode link. You may have to scroll to the end of the list.
b) Select the CLC setting and select the OK button.
c) Select the Local Preset or Global Preset, as the output type, and select
the OK button.
d) Select the sensor controlling the output and select the OK button.
e) The new preset mode is displayed. Use the buttons on the screen to adjust
the conguration.
Constant Lighting Controller
C
M
Y
CM
MY
CY
CMY
K
Control:
9.
b)
c)
10.
a)
To create a new Preset Mode:
 Loading...