Page 8
7
Dialog® Lighting Control System
Groups
The Groups screen has four tabs:
1. Label
To modify a label name:
a) Select a group and select its label.
b) Enter the new label name and select the OK button.
2. Control
To override the control group settings:
a) Turn a relay group on or o by selecting the ON or
OFF button.
b) Adjust the dimmer levels to percentage of
brightness by using the slider.
3. LOGs
You can view the historical activity for a selected group
by selecting the LOGs tab.
4. Setup
a) Select a group to access the conguration options.
b) Select the Output Lists button to change the
conguration options for all outputs included in
the group. To select an individual output, select
on the check box next to the output. You can select
multiple outputs. To select all outputs, select on the
ALL button.
The Groups menu has two submenus—Groups and Headers:
1. Selecting on the Groups button opens the properties all lighting control
groups.
2. Selecting on the Headers button allows you to set the header details for the
groups.
1. Groups > Groups
The Groups screen displays all of the relay lighting control groups you have
set up. The following describes each column:
id - G001-G127, which are listed in the order the groups were created)
Label - descriptive name, which is assigned in this submenu group
Total - number of outputs in the group
Rel - number of relays in the group
D - number of dimmers in the group
Groups Menu
C
M
Y
CM
MY
CY
CMY
K
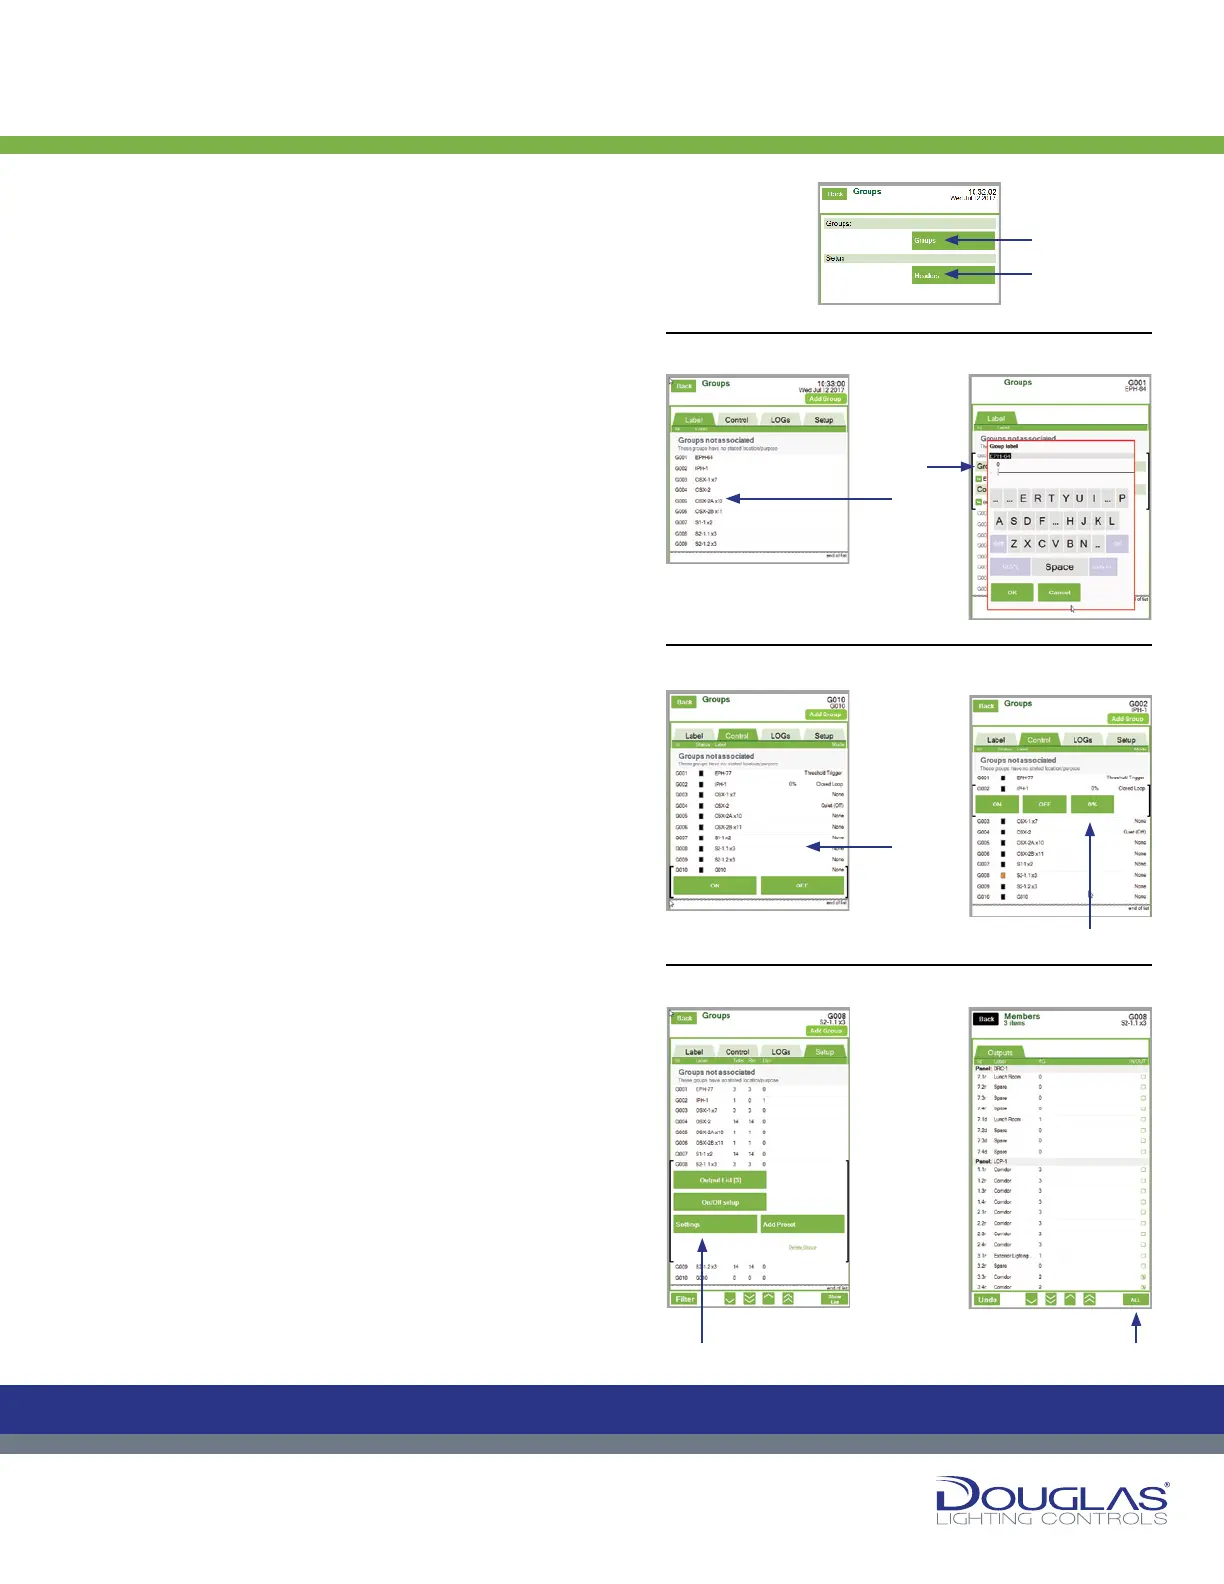
Groups Menu
The Groups menu has two submenus—Groups and Headers:
1. Selecting on the Groups button opens the properties all
lighting control groups.
2. Selecting on the Headers button allows you to set the
header details for the groups.
1. Groups > Groups
The Groups screen displays all of the relay lighting control groups
you have set up. The following describes each column:
id - G001-G127, which are listed in the order the groups were
created)
Label - descriptive name, which is assigned in this submenu
group
Total - number of outputs in the group
Rel - number of relays in the group
D - number of dimmers in the group
The Groups screen has four tabs:
1. Label
To modify a label name:
a) Select a group and select its label.
b) Enter the new label name and select the OK button.
2. Control
To override the control group settings:
a) Turn a relay group on or off by selecting the ON or OFF
button.
b) Adjust the dimmer levels to percentage of brightness by
using the slider.
3. LOGs
You can view the historical activity for a selected group by
selecting the LOGs tab.
4. Setup
a) Select a group to access the conguration options.
b) Select the Output Lists button to change the conguration
options for all outputs included in the group. To select an
individual output, select on the check box next to the output.
You can select multiple outputs. To select all outputs, select
on the ALL button.
Groups
7
Dialog® Lighting Control System
Groups
The Groups screen has four tabs:
1. Label
To modify a label name:
a) Select a group and select its label.
b) Enter the new label name and select the OK button.
2. Control
To override the control group settings:
a) Turn a relay group on or o by selecting the ON or
OFF button.
b) Adjust the dimmer levels to percentage of
brightness by using the slider.
3. LOGs
You can view the historical activity for a selected group
by selecting the LOGs tab.
4. Setup
a) Select a group to access the conguration options.
b) Select the Output Lists button to change the
conguration options for all outputs included in
the group. To select an individual output, select
on the check box next to the output. You can select
multiple outputs. To select all outputs, select on the
ALL button.
The Groups menu has two submenus—Groups and Headers:
1. Selecting on the Groups button opens the properties all lighting control
groups.
2. Selecting on the Headers button allows you to set the header details for the
groups.
1. Groups > Groups
The Groups screen displays all of the relay lighting control groups you have
set up. The following describes each column:
id - G001-G127, which are listed in the order the groups were created)
Label - descriptive name, which is assigned in this submenu group
Total - number of outputs in the group
Rel - number of relays in the group
D - number of dimmers in the group
Groups Menu
C
M
Y
CM
MY
CY
CMY
K
1. To modify a label name:
2. To override the control group settings:
4. Setup:
a)
a)
b)
b)
b) b)
1.
2.
 Loading...