Page 6
Output Menu
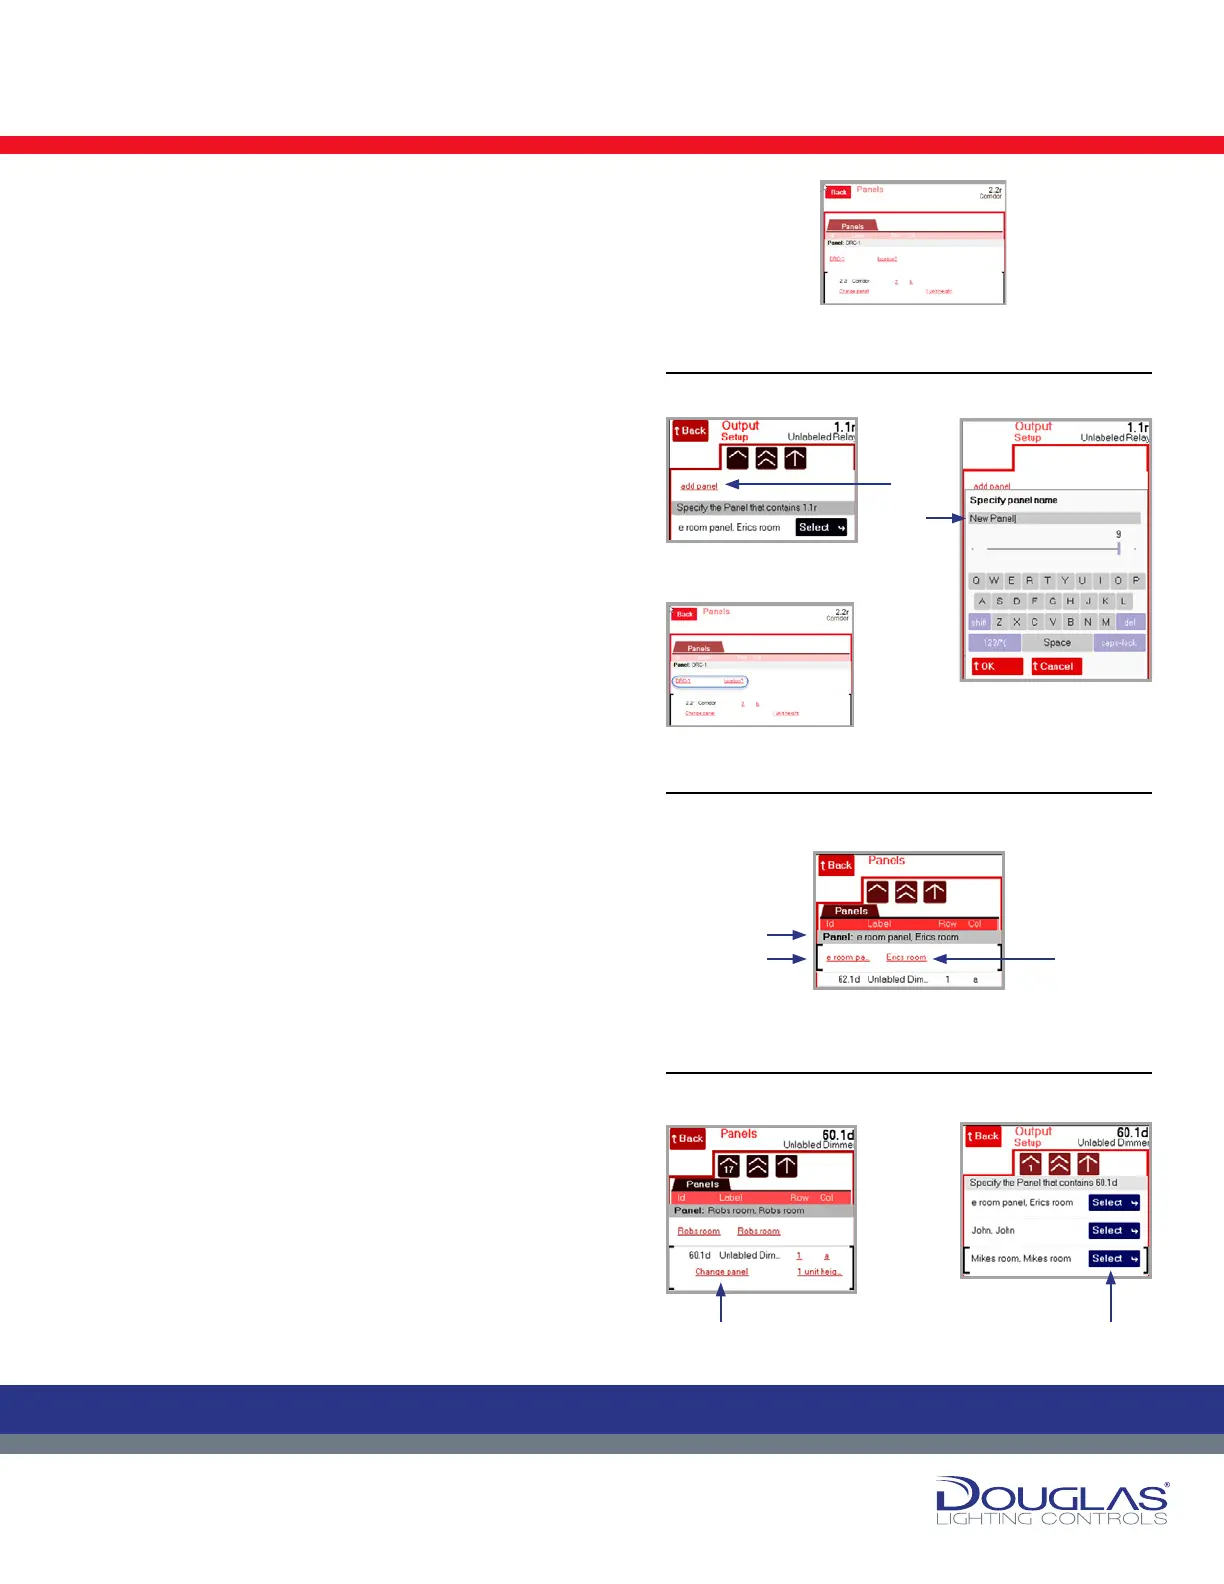
2. Setup > Panels
The Panels screen displays all of the installed panels and the
outputs. The following describes each column:
id - address, channel (r indicates a relay and d indicates a
dimmer)
Label - descriptive name, which is assigned in this submenu
group
Row - lists the row where it is located
Col - list s the column where it is located
This screen allows you to list new panels installed after initialization
of the system, edit panel labels, and assign relay outputs to panels.
1. To add a new panel:
a) Scroll through the panel list to the unlabeled relays and
select the relay. Select Add Panel.
b) Enter the new panel name and select the OK button.
c) Enter the location for the panel and select the OK button.
2. To edit a panel:
a) Scroll through the list of panels and select the panel you are
editing.
b) Select the panel link, enter the new panel name, and select
the OK button.
c) Select the location link, enter the location for the panel and
select the OK button.
3. To assign a relay to a panel:
a) Scroll through the panel list to the panel you are assigning
the relay to and select it. This can be a panel a relay is
already assigned to or an unassigned panel.
b) Select the Change panel link (for an assigned panel) or the
Specify panel link (for an unassigned panel).
c) Select the panel where the relay is to be assigned and select
the Select button.
Outputs
6
Dialog® Lighting Control System
Outputs
Output Menu
1. To add a new panel:
a) Scroll through the panel list to the unlabeled relays
and select the relay. Select Add Panel.
b) Enter the new panel name and select the OK button.
c) Enter the location for the panel and select the OK
button.
2. To edit a panel:
a) Scroll through the list of panels and select the panel
you are editing.
b) Select the panel link, enter the new panel name, and
select the OK button.
c) Select the location link, enter the location for the
panel and select the OK button.
3. To assign a relay to a panel:
a) Scroll through the panel list to the panel you are
assigning the relay to and select it. This can
be a panel a relay is already assigned to or an
unassigned panel.
b) Select the Change panel link (for an assigned panel)
or the Specify panel link (for an unassigned panel).
c) Select the panel where the relay is to be assigned
and select the Select button.
2. Setup > Panels
The Panels screen displays all of the installed panels and the outputs. The
following describes each column:
id - address, channel (r indicates a relay and d indicates a dimmer)
Label - descriptive name, which is assigned in this submenu group
Row - lists the row where it is located
Col - list s the column where it is located
This screen allows you to list new panels installed after initialization of the
system, edit panel labels, and assign relay outputs to panels.
6
Dialog® Lighting Control System
Outputs
Output Menu
1. To add a new panel:
a) Scroll through the panel list to the unlabeled relays
and select the relay. Select Add Panel.
b) Enter the new panel name and select the OK button.
c) Enter the location for the panel and select the OK
button.
2. To edit a panel:
a) Scroll through the list of panels and select the panel
you are editing.
b) Select the panel link, enter the new panel name, and
select the OK button.
c) Select the location link, enter the location for the
panel and select the OK button.
3.
To assign a relay to a panel:
a) Scroll through the panel list to the panel you are
assigning the relay to and select it. This can
be a panel a relay is already assigned to or an
unassigned panel.
b) Select the Change panel link (for an assigned panel)
or the Specify panel link (for an unassigned panel).
c) Select the panel where the relay is to be assigned
and select the Select button.
2. Setup > Panels
The Panels screen displays all of the installed panels and the outputs. The
following describes each column:
id - address, channel (r indicates a relay and d indicates a dimmer)
Label - descriptive name, which is assigned in this submenu group
Row - lists the row where it is located
Col - list s the column where it is located
This screen allows you to list new panels installed after initialization of the
system, edit panel labels, and assign relay outputs to panels.
6
Dialog® Lighting Control System
Outputs
Output Menu
1. To add a new panel:
a) Scroll through the panel list to the unlabeled relays
and select the relay. Select Add Panel.
b) Enter the new panel name and select the OK button.
c) Enter the location for the panel and select the OK
button.
2.
To edit a panel:
a) Scroll through the list of panels and select the panel
you are editing.
b) Select the panel link, enter the new panel name, and
select the OK button.
c) Select the location link, enter the location for the
panel and select the OK button.
3. To assign
a relay to a panel:
a) Scroll through the panel list to the panel you are
assigning the relay to and select it. This can
be a panel a relay is already assigned to or an
unassigned panel.
b) Select the Change panel link (for an assigned panel)
or the Specify panel link (for an unassigned panel).
c) Select the panel where the relay is to be assigned
and select the Select button.
2. Setup > Panels
The Panels screen displays all of the installed panels and the outputs. The
following describes each column:
id - address, channel (r indicates a relay and d indicates a dimmer)
Label - descriptive name, which is assigned in this submenu group
Row - lists the row where it is located
Col - list s the column where it is located
This screen allows you to list new panels installed after initialization of the
system, edit panel labels, and assign relay outputs to panels.
6
Dialog® Lighting Control System
Outputs
Output Menu
1. To add a new panel:
a) Scroll through the panel list to the unlabeled relays
and select the relay. Select Add Panel.
b) Enter the new panel name and select the OK button.
c) Enter the location for the panel and select the OK
button.
2. To edit a panel:
a) Scroll through the list of panels and select the panel
you are editing.
b) Select the panel link, enter the new panel name, and
select the OK button.
c) Select the location link, enter the location for the
panel and select the OK button.
3. To assign a relay to a panel:
a) Scroll through the panel list to the panel you are
assigning the relay to and select it. This can
be a panel a relay is already assigned to or an
unassigned panel.
b) Select the Change panel link (for an assigned panel)
or the Specify panel link (for an unassigned panel).
c) Select the panel where the relay is to be assigned
and select the Select button.
2. Setup > Panels
The Panels screen displays all of the installed panels and the outputs. The
following describes each column:
id - address, channel (r indicates a relay and d indicates a dimmer)
Label - descriptive name, which is assigned in this submenu group
Row - lists the row where it is located
Col - list s the column where it is located
This screen allows you to list new panels installed after initialization of the
system, edit panel labels, and assign relay outputs to panels.
6
Dialog® Lighting Control System
Outputs
Output Menu
1. To add a new panel:
a) Scroll through the panel list to the unlabeled relays
and select the relay. Select Add Panel.
b) Enter the new panel name and select the OK button.
c) Enter the location for the panel and select the OK
button.
2. To edit a panel:
a) Scroll through the list of panels and select the panel
you are editing.
b) Select the panel link, enter the new panel name, and
select the OK button.
c) Select the location link, enter the location for the
panel and select the OK button.
3.
To assign a relay to a panel:
a) Scroll through the panel list to the panel you are
assigning the relay to and select it. This can
be a panel a relay is already assigned to or an
unassigned panel.
b) Select the Change panel link (for an assigned panel)
or the Specify panel link (for an unassigned panel).
c) Select the panel where the relay is to be assigned
and select the Select button.
2. Setup > Panels
The Panels screen displays all of the installed panels and the outputs. The
following describes each column:
id - address, channel (r indicates a relay and d indicates a dimmer)
Label - descriptive name, which is assigned in this submenu group
Row - lists the row where it is located
Col - list s the column where it is located
This screen allows you to list new panels installed after initialization of the
system, edit panel labels, and assign relay outputs to panels.
6
Dialog® Lighting Control System
Outputs
Output Menu
1. To add a new panel:
a) Scroll through the panel list to the unlabeled relays
and select the relay. Select Add Panel.
b) Enter the new panel name and select the OK button.
c) Enter the location for the panel and select the OK
button.
2. To edit a panel:
a) Scroll through the list of panels and select the panel
you are editing.
b) Select the panel link, enter the new panel name, and
select the OK button.
c) Select the location link, enter the location for the
panel and select the OK button.
3.
To assign a relay to a panel:
a) Scroll through the panel list to the panel you are
assigning the relay to and select it. This can
be a panel a relay is already assigned to or an
unassigned panel.
b) Select the Change panel link (for an assigned panel)
or the Specify panel link (for an unassigned panel).
c) Select the panel where the relay is to be assigned
and select the Select button.
2. Setup > Panels
The Panels screen displays all of the installed panels and the outputs. The
following describes each column:
id - address, channel (r indicates a relay and d indicates a dimmer)
Label - descriptive name, which is assigned in this submenu group
Row - lists the row where it is located
Col - list s the column where it is located
This screen allows you to list new panels installed after initialization of the
system, edit panel labels, and assign relay outputs to panels.
2. To edit a panel:
3. To assign a relay to a panel:
1. To add a new panel:
a)a)
b)
a)
b)
b) c)
b)
 Loading...