EasyManua.ls Logo

Disaster Area Designs SMARTClock Gen3 - User Manual

Disaster Area Designs SMARTClock Gen3
9 pages
Print Icon
To Next Page IconTo Next Page
Loading...
!
SMARTClock
Gen3
User Manual
Question and Answer IconNeed help?

Do you have a question about the Disaster Area Designs SMARTClock Gen3 and is the answer not in the manual?

Summary

SMARTClock Gen3 Quick Start Guide

Setting the Tempo

Learn how to set the device's master clock tempo using tap tempo or the Edit Knob.

Changing Subdivisions

Adjust tempo subdivisions for each output, selecting from Quarter, Dotted 8th, 8th, or Triplet.

Sending MIDI Programs

Configure and send MIDI program change messages to connected MIDI devices.

Saving and Loading Presets

Instructions for saving current settings to presets and recalling them later.

Tempo Display

Understand how the SMARTClock displays the current tempo in Beats Per Minute.

Connecting Your Devices

Tap Tempo Outputs

Connect devices using mono patch cables to the tap tempo input jacks.

MIDI Output Connection

Connect the SMARTClock's MIDI output to your pedal's MIDI input for synchronization.

MultiJack MIDI Connection

Utilize MultiJacks for MIDI connections with compatible pedals via 1/4" jacks.

Remote Switching Setup

Configure outputs for remote switching, controlling amp channels or footswitch functions.

Controls and Connections Overview

Main Controls and Indicators

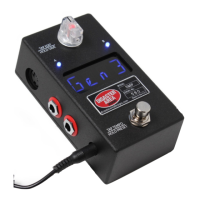
Details on the Edit Knob, Footswitch, Status LED, and USB MIDI functionality.

MIDI and Power Ports

Description of MIDI Input/Output ports and the DC 9V power connection.

Output Jacks Explained

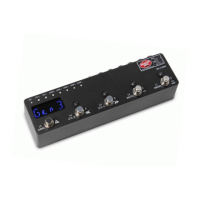
Information on Main Outputs A & B and MultiJacks C & D for tap tempo and MIDI.

Setting Up the SMARTClock Gen3

Setup Menu Configuration

Guide to navigating and configuring various settings within the Setup menu.

Advanced MultiJack and DIP Switch Settings

MultiJack Configuration Options

Setting MultiJacks for tap tempo, remote switching, or MIDI output functionality.

DIP Switch Functions

Details on hardware DIP switches for pull-up functions and MultiJack setup.

MIDI Operations and Interface Modes

External MIDI Clock and Messages

How the SMARTClock handles external MIDI clocks and responds to MIDI messages.

USB MIDI Interface Mode

Activating the SMARTClock as a USB MIDI interface for computer connectivity.

Overview

The Disaster Area Designs SMARTClock Gen3 is a compact pedalboard clock source and MIDI controller designed to synchronize multiple time-based effects on a pedalboard.

Function Description:

At its core, the SMARTClock Gen3 features a master clock capable of operating at any tempo from 30 to 300 beats per minute. This master clock sends out its clock source over MIDI and generates tap tempo signals to interface with non-MIDI pedals. The device is capable of controlling most pedals and rack units that have a tap tempo input jack. It can also function as a USB MIDI interface, allowing access to external MIDI gear from a computer. In this interface mode, all internal functions of the SMARTClock are disabled, dedicating its processing power to interface duty.

Important Technical Specifications:

  • Tempo Range: 30 to 300 beats per minute (BPM).
  • Power: Standard DC power supply input, 9V center negative, requiring approximately 80mA.
  • Outputs:
    • Main Outputs A & B (Red Connectors): Two electrically isolated outputs for tap tempo devices. Configurable as normally-open (N-O), normally-closed (N-C) for Boss devices, or toggle switch (TOGG) outputs for amplifier/pedal footswitch functions. These outputs have an optional pull-up function.
    • MultiJacks C & D (White Connectors): Versatile MultiJacks configurable as tap tempo (N-O, N-C), toggle switch (TOGG), MIDI output, nCLK MIDI output (program changes only, no clock), or dual footswitch inputs (FTAP for tap tempo/clock start/stop, FPRE for preset advance/decrease).
    • MIDI Output: Standard 5-pin MIDI output for connecting to the first MIDI pedal input.
    • USB MIDI: Functions as a MIDI interface for compatible PC, Mac, or iPad (using Apple Camera Connection Kit), receiving and sending MIDI messages over USB for device control.
  • Inputs:
    • MIDI Input: Standard 5-pin MIDI input for connecting to a MIDI controller. It accepts incoming MIDI messages and merges them with its own data stream. Messages are passed downstream unless the MIDI Thru option is set to one of the Filter modes.
    • Footswitch: For tap tempo input and preset navigation.
  • Display: LED display showing BPM or preset name.
  • Controls:
    • Edit Knob (Clear Knob): Main control interface. Rotate to change settings (tempo, subdivisions, MIDI program), tap to move to the next setting, hold to save presets.
    • Status Indicator LED: Blinks to indicate normal operation and blinks slower in boot loader mode during firmware updates.
  • Internal DIP Switches: Three banks of DIP switches for configuring MultiJacks and enabling pull-up functions for each jack (labeled A, B, C, D).
    • MultiJack for tap tempo/remote switching: OFF-OFF-OFF-ON.
    • MultiJack for MIDI output: ON-ON-ON-OFF.
    • Pull-up DIP switch: ON for Strymon EXP ports with TRS cable, OFF for Strymon pedals modified with a tap tempo input using a TRS cable.

Usage Features:

  • Setting Tempo: Tap the footswitch in time with music (at least twice) or turn the Edit Knob to specify BPM (30-300).
  • Changing Subdivisions: Tap the Edit Knob once to cycle through outputs, then turn the knob to select subdivision (Quarter Note, Dotted 8th, 8th Note, Triplet).
  • Sending MIDI Programs: Tap the Edit Knob after the last output to enter MIDI Program Output mode. Turn the Edit Knob to select a MIDI program (0-127) to send to connected MIDI devices.
  • Saving Presets: Hold the Edit Knob down. If names are enabled, the display flashes the current name; tap the Edit Knob to choose a letter, rotate to change, hold to save.
  • Loading Presets: Hold the footswitch down to load the next preset.
  • Re-syncing Devices: Tap the footswitch once and wait two seconds for the SMARTClock to re-send tap tempo messages. Useful for devices that "drift."
  • Remote Switching: Configure outputs as TOGGLE to control amplifier channels or pedal favorite switch functions with presets using a mono cable. For TRS/stereo jack function switching, use a stereo y-cable.
  • MIDI Clock and Program Change: Generates MIDI clock and program change messages. Responds to MIDI Program Change (0-127 for presets), Continuous Controller 93 (Tap Tempo), MIDI Beat Clock (disables internal clock), MIDI Stop (disables internal clock), and MIDI Continue (re-sends tap tempo pulses).
  • External MIDI Clock: If receiving external MIDI clock, the internal clock is disabled, and the display shows "E" in addition to the BPM. If the external signal is lost, the internal clock restarts with the last received BPM.
  • Setup Menu: Accessed by holding the Edit Knob during power-up when "DISASTER AREA" scrolls.
    • PRST: Sets maximum tempo presets (0-127).
    • P CH: Sets MIDI channel for external MIDI device control (OFF or 1-16).
    • TAPA/TAPB: Configures tap outputs A/B (N-O, N-C, TOGG).
    • MJ C/MJ D: Configures MultiJacks C/D (N-O, N-C, TOGG, MIDI output, nCLK MIDI output, FTAP, FPRE).
    • T DP: Sets BPM control resolution (1.0 or 0.5 BPM).
    • TLEN: Sets tap output active time (0-6).
    • D BRT: Sets display/LED brightness (0-9).
    • InCH: Sets MIDI input channel (OFF or 1-16).
    • NAME: Enables preset names (OFF, FOUR, SCRL, SCR4).
    • PROT: Enables memory protection to prevent accidental preset overwrites.
    • DUMP: Allows configuration/preset dump via MIDI Sysex (currently unsupported).
    • FACT: Factory reset (CFG, PRST, NAME, ALL).

Maintenance Features:

  • Firmware Updates: The status indicator LED blinks slower when the pedal is in boot loader mode during a firmware update.
  • Saving Settings: Settings configured in the Setup menu are remembered when powered off after saving.
  • Factory Reset: The FACT option in the Setup menu allows resetting configuration, presets, or names to factory defaults.

Disaster Area Designs SMARTClock Gen3 Specifications

General IconGeneral
BrandDisaster Area Designs
ModelSMARTClock Gen3
CategoryController
LanguageEnglish

Related product manuals