Do you have a question about the dji OM 5 and is the answer not in the manual?
Explains icons and symbols used in the manual for clarity.
Lists essential documents to read before operating the DJI OM 5 for the first time.
Provides instructions on how to download and install the DJI Mimo mobile application.
Provides a general overview of the DJI OM 5, its features, and capabilities.
Details the process for charging the DJI OM 5 battery using a USB adapter.
Explains the steps to attach a mobile phone to the DJI OM 5 gimbal.
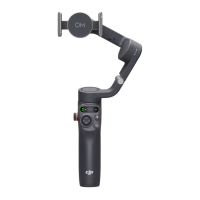
Details the function of each button and port on the DJI OM 5 for user operation.
Explains the different operational modes like Upright, Underslung, Side Grip, and Low Position.
Guides users on how to connect the DJI OM 5 to the DJI Mimo mobile app.
Describes the interface and elements visible within the DJI Mimo app's camera view.
Provides step-by-step instructions for updating the DJI OM 5 firmware using the DJI Mimo app.
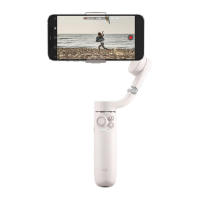
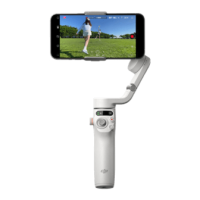
The DJI OM 5 is a lightweight, 3-axis stabilized gimbal designed to unlock the full potential of your mobile phone. It features a built-in extension rod and a magnetic foldable design, making it easy to set up, transport, and store. The device supports both portrait and landscape orientations, and offers various operating modes such as upright, underslung, side grip, and low position to help users capture diverse shots.
The DJI OM 5 provides 3-axis stabilization to ensure smooth and steady footage, counteracting natural vibrations and unwanted movements. It connects to your mobile phone via Bluetooth and works in conjunction with the DJI Mimo app, which offers a live HD video feed and a suite of intelligent shooting modes. These modes include ActiveTrack™ 4.0, Hyperlapse, Timelapse, DynamicZoom, and Pano, allowing users to create professional-looking content with ease. The ShotGuides feature provides step-by-step tutorials tailored to different scenarios, helping users generate shareable videos for social media.
To begin, unfold the gimbal from its packaged state. Attach the magnetic phone clamp to the center of your phone, ensuring the camera mark on the clamp points towards the phone's camera. The clamp is stretchable to accommodate various phone sizes. Align the marks on the phone clamp and the phone clamp mounting plate, then attach your mobile phone to the DJI OM 5. Power on the device by pressing and holding the M button for two seconds. The built-in extension rod can be extended up to 215 mm and its angle adjusted from 0 to 90 degrees, offering greater flexibility for shooting. For optimal performance, ensure the phone clamp is centered and vertical. If your phone is less than 7.5 mm thick or weighs less than 170g, use the provided riser pad. Always mount the mobile phone before powering on the DJI OM 5; if no phone is detected, the gimbal will vibrate and enter standby mode, which can be exited by pressing any button after mounting the phone.
The DJI Mimo app is central to the OM 5 experience. After powering on the gimbal and enabling Bluetooth on your phone, connect to the device with an "OM 5" prefix name in the app. The app will guide you through activation, which requires an internet connection.
The DJI OM 5 features LED indicators that show the battery level:
Specific blinking patterns correspond to battery levels:
Charge the DJI OM 5 by connecting a USB adapter (not included) to the charging port using the provided power cable. The battery is fully charged when the battery level indicators turn off. Charging time is approximately 1.5 hours with a 10W charger at 25°C. Max runtime is about 6 hours with the gimbal balanced and held steadily.
If the DJI OM 5 cannot connect or be found via Bluetooth, simultaneously press the switch button, shutter/record button, and trigger to reset the Bluetooth connection. The system status indicator will turn from green to yellow upon successful reset. Then, search for DJI OM 5 and reconnect.
This feature helps reduce drift caused by magnetic interference or human error. Before calibrating, place the DJI OM 5 on a flat surface using a tripod and avoid touching the gimbal during the process.
Ensure the magnetic phone clamp is level before adjusting the gimbal horizontally.
Firmware updates are performed via the DJI Mimo app and take approximately three minutes. Before updating, ensure the battery level is at least 15% (at least two battery level indicators illuminated). Connect the DJI OM 5 to your mobile device and launch DJI Mimo. If an update is available, follow the on-screen instructions. Do not exit the app during the update. The system status indicator will blink green and red alternatively, then turn solid green upon successful completion. If an update fails, restart the DJI OM 5 and DJI Mimo, reconnect Bluetooth, and retry.
The DJI OM 5 is designed to be folded for easy storage and transportation. After powering off, fully retract the built-in extension rod. Rotate the pan and tilt axes as shown in the manual and fold the gimbal. The mark of the axis arm should slot into the hole on the handle. The device will automatically power off after three minutes of inactivity in standby mode.
| Bluetooth | Yes |
|---|---|
| Bluetooth version | 5.0 |
| Type | Smartphone camera stabilizer |
| Material | - |
| Mounting | 1/4\ |
| Product color | Gray |
| Maximum device depth | 10 mm |
| Maximum device width | 84 mm |
| Minimum device depth | 6.9 mm |
| Minimum device width | 67 mm |
| Charging time | 1.5 h |
| Operating time | 6.4 h |
| Battery voltage | 8.8 V |
| Battery capacity | 1000 mAh |
| Operating temperature (T-T) | 0 - 40 °C |
| Mechanical pan range | -161.12 - 172.08 ° |
| Mechanical roll range | -127.05 - 208.95 ° |
| Mechanical tilt range | -101.46 - 229.54 ° |
| Depth | 92.3 mm |
|---|---|
| Width | 111.1 mm |
| Height | 264.5 mm |
| Weight | 292 g |
| Dimensions folded (WxDxH) | 74.6 x 37 x 174.7 mm |