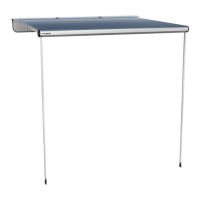
This document describes the Dometic 9100 Power Channel Awning with an LED Tube Awning, designed for recreational vehicles (RVs) with straight sides. It covers the operation, features, and maintenance of the awning system, emphasizing safety precautions throughout.
Function Description
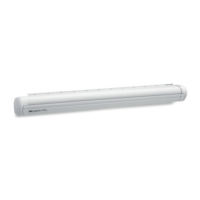
The Dometic 9100 Power Channel Awning is an electrically operated retractable awning system for RVs. Its primary function is to provide shade and shelter from light rain, enhancing the outdoor living space of an RV. The awning extends and retracts via an electric motor, controlled by a switch, offering convenience and ease of use. It incorporates a "Power Channel" feature, which allows for the attachment and powering of various accessories, expanding its utility beyond simple shade. Additionally, the awning includes an LED tube light strip, providing illumination for the area beneath the awning, and some models may also feature a rail LED light strip. The system is designed with a pitch adjustment mechanism, enabling users to set the slope of the awning to facilitate water runoff, particularly important during light rain conditions. In the event of a power failure, the awning can be manually closed using auxiliary power or a pull strap method, ensuring it can be stowed for travel even without electrical power.
Usage Features
The awning's operation is straightforward, primarily controlled by an awning switch with "extend" and "retract" toggles.
- Opening the Awning: To open, the user presses and holds the "extend" toggle until the awning reaches its fully extended position. The valance rope should be at the top of the roller tube in the correct position. If over-extended, a brief press of the "retract" toggle will adjust it.
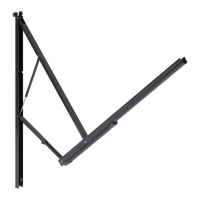
- Adjusting Awning Pitch (Optional): The awning's pitch, or slope, can be adjusted to improve water runoff. This involves loosening an adjustable knob on the bottom arm assembly, pressing a spring-loaded button, and pulling down the top arm assembly to lower the fabric roller tube assembly (FRTA) to the desired height. The adjustable knob is then tightened to secure the pitch. It's crucial to lower one side of the hardware into a water shed position to prevent water pooling. The arm farthest from the entry door should be lowered more than the other, creating a minimum slope of 10° or 9" from the RV's awning rail.
- Preparing Awning to Shed Water: This involves ensuring one arm assembly is fully extended and its adjustable knob tightened, while the other arm assembly (farthest from the entry door) has its adjustable knob loosened and is lowered to create a slope for water runoff. This prevents water accumulation on the fabric.
- Operating LED Light Strips: The awning features an LED tube light strip and, in some models, a rail LED light strip. These are controlled by separate switches. The tube LED light strip should not be used when the awning is closed. The rail LED light strip, however, can be used whether the awning is open or closed.
- Operating the Power Channel: The Power Channel, when equipped, provides power to compatible accessories. It is activated by a dedicated switch. The Power Channel should not be used when the awning is closed.
- Attaching Accessories to the Power Channel: Accessories with a power bayonet are aligned with the power channel slot and inserted fully, pushing on the accessory base. The alignment indicator on the accessory base should point upward after installation to ensure proper function and prevent damage.
- Closing the Awning: To close, all accessories must first be removed from the Power Channel. Adjustable knobs on both arm assemblies are loosened to allow the awning to reset to its original position, then lightly tightened to prevent rattling during travel. The power channel and LED light strip switches should be in the "OFF" position. The "retract" toggle on the awning switch is then pressed and held until the awning is fully closed.
- Preparing Awning for Travel: Before travel, it's essential to verify the ignition interlock system is functioning correctly (for motorhomes) to prevent accidental opening. If the interlock fails, the awning must be disabled (e.g., by removing a fuse or disconnecting the motor connector) and serviced by a qualified technician. All LED light strips should be turned off, and the awning should be visually checked for security and stability.
- Manual Closing (Power Failure): In a power failure, the awning can be closed manually. The primary method is the Auxiliary Power Method, which involves supplying 12 Vdc power from an external source (like an automobile battery) directly to the awning motor. If this fails, the Pull Strap Method can be used, requiring a 5/32" hex key and assistance from another person. This involves inserting a pull strap into the FRTA's utility slot, removing screws from the RH top casting while holding the strap firmly (due to spring tension), and carefully allowing the awning to roll up.
Maintenance Features
Regular maintenance helps ensure the longevity and proper functioning of the awning.
- Hardware Maintenance: Awning hardware should be cleaned as needed with a mild surface cleaner. Strong chemicals or abrasives should be avoided to prevent damage to protective surfaces. Silicone spray lubricant should be applied to the fabric roller tube assembly's moving parts and all sliding surfaces of the arm assemblies to ensure smooth operation. Silicone sprays should not be used near labels, as they can weaken adhesive bonds.
- Fabric Maintenance: The vinyl fabric is durable and water-resistant. Wrinkling is a normal characteristic, especially when retracted or after prolonged storage. Leaving the awning open in warm weather can minimize wrinkling.
- Cleaning the Fabric: A cleaning solution of 1/4 cup dish soap and 1/4 cup bleach mixed with 5 gallons of fresh water should be used. The open awning fabric should be liberally drenched with this solution, then closed for 5 minutes to soak, and then opened again. Abrasive or corrosive cleaners, mildew removers, or hard bristle brushes should not be used. It is crucial to thoroughly hose off both the top and bottom of the fabric with clean water to remove all solution, as bleach not completely rinsed off can degrade the fabric.
- Drying the Fabric: The awning should NEVER be closed for storage when wet, as this can lead to mildew, discoloration, and stains. It must be allowed to dry thoroughly before rolling up. If temporarily rolled up while wet, it should be unrolled and allowed to dry as soon as conditions permit.
- Preventing Debris Accumulation: Dirt, leaves, or other debris should not be allowed to accumulate on the awning, as this can cause abrasion, stains, mildew, and odors.
- Pinhole Repair: Small pinholes or flaked coating spots on the vinyl fabric can be repaired using VLP (Vinyl Liquid Patch). A small dab applied with a cotton swab will melt the coating and blend with the vinyl. The awning should not be closed while the patch is wet to prevent damage.
- General Precautions: Insecticides or other sprays should not be used near the fabric, as they can cause stains and affect water repellency. The awning should not be exposed to adverse environmental conditions or corrosive agents. The corner of the entry door should not contact the awning fabric to prevent premature wear or tearing.
- Professional Service: If malfunctions occur that cannot be resolved by following the instructions, a qualified service technician should be contacted. A slight "travel line" where the door roller contacts the fabric is considered normal and does not affect the fabric's integrity.