5
4. While holding top arm assembly in place, tighten
adjustable knob to set pitch (slope). See (FIG. 3)
& (FIG. 4).
5. IMPACT OR CRUSH HAZARD.
ALWAYS lower one side of hardware into wa-
ter shed position when adjusting awning [pitch
/ slope]. Otherwise, water could pool on awning
fabric. Failure to obey this warning could result
in death or serious injury.
Repeat steps (1) through (4) for opposite side.
Make sure the top arm assembly that’s far-
thest from entry door is lowered more than
the other. See subsection, “B. Prepare
Awning To Shed Water” on page (5).
B. Prepare Awning To Shed Water
IMPACT OR CRUSH HAZARD. Do
NOT allow water to pool or snow to accumulate
on awning fabric. The awning will become unsta-
ble, and could bend or collapse. Whenever heavy
rain or snow is expected, place awning in stowed
(closed) position. Failure to obey this warning could
result in death or serious injury.
Lowering one arm assembly into water shed posi-
tion (to create a slope from other arm assembly) will
allow water run-off during light rain.
1. With awning fully extended, verify top arm as-
sembly nearest entry door is fully extended, and
that adjustable knob is tightened. See (FIG. 3).
2. IMPACT OR CRUSH HAZARD.
NEVER disengage adjustable knob during
windy conditions, or with water pooled or snow
accumulated on awning fabric. This could cause
the awning to move unpredictably, become un-
stable, and bend or collapse. Failure to obey this
warning could result in death or serious injury.
Do NOT allow corner of entry
door to contact awning fabric. Otherwise, pre-
mature wear or tearing of awning fabric could
occur.
Loosen adjustable knob on adjustable pitch arm
assembly (bottom arm) that’s farthest from entry
door. See (FIG. 3).
Lowering the arm assembly that’s nearest
entry door could allow door to contact fab-
ric. If awning pitch was previously adjust-
ed lower, raising arm nearest entry door
will provide more fabric clearance.
3. Press in on spring loaded button on right side of
adjustable pitch arm assembly to allow adjust-
ment. See (FIG. 3) & (FIG. 4).
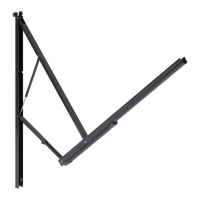
FIG. 3
Adjustable
Pitch Arm
Assembly
Front Channel
Adjustable Knob
Spring Loaded Button
3. PINCH HAZARD. Keep CLEAR
of openings around adjustable pitch arm assem-
bly while adjusting awning pitch (slope). Adjust-
able pitch arm assembly (bottom arm) will tele-
scope. Failure to obey this caution could result
in injury.
Do NOT allow corner of entry
door to contact awning fabric. Otherwise, pre-
mature wear or tearing of awning fabric could
occur.
Pull top arm assembly down to lower FRTA to
desired height. See (FIG. 4).
FIG. 4
Adjustable
Pitch Arm
Assembly
Top Arm
Assembly
Spring Loaded
Button
SET AWNING POSITION