68
PERIODICAL INSPECTI ON AND MAINT ENANCE.
7/72
(2) Draining of the oil/water separator
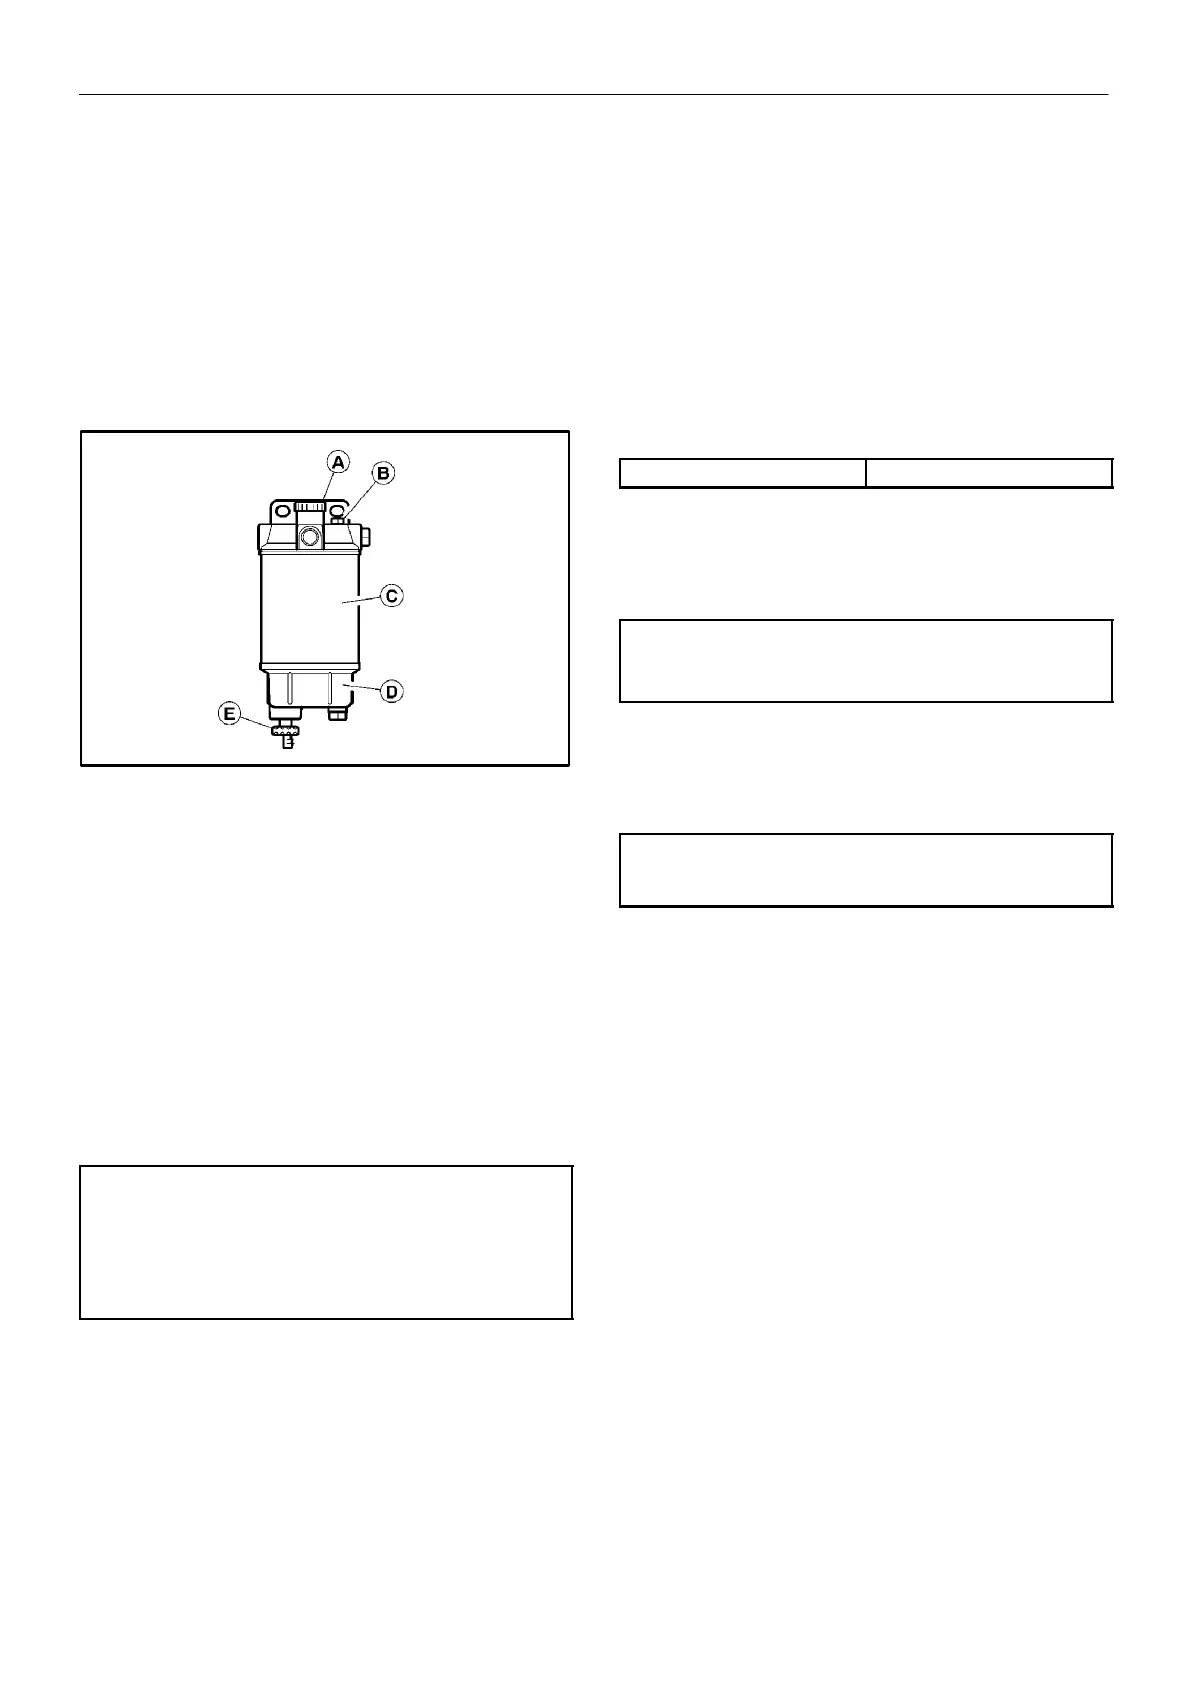
Draining Water from Fuel Filter/separator .
The fuel filter/separator is provided to allow water to be drained from the
fuel system. Water is heavier than fuel so any water contained in the
system will collect in the bottom of the bowl.
The clear bowl ‘D’ should be checked on a daily basis and if water is
present, it should be drained from the separator .
Place a suitable container under the separator to prevent any spillage
inside the machine.
Slacken the drain valve ‘E’ until water drains from the vent tube.
When all the water has been evacuated, tighten the drain valve ‘E’ and
follow the “fuel system air bleeding” procedure below .
Fuel System Air Bleeding
The entry of air into the fuel system will cause difficult engine starting
or engine malfunction.
When carrying out service procedures such as emptying the fuel tank,
draining the filter/separator, and changing the fuel filter element be sure
to bleed air from the fuel system.
To activate the “automatic air--bleeding system”, turn the key switch to
the “ON” position and energize the electromagnetic pump” to bleed the
air.
Air bleeding method:
When the “starter switch” is set to the “ON” position to activate the
electromagnetic pump, fuel is forced to the fuel valve of each injection
pump and then to the leak--off pipe of each injector nozzle, so that any
air in the fuel system bleeds off automatically to the fuel tank.
NOTE:
Although the fuel system can bleed air automatically when the key
switch is in the “ON” position, air can also be manually bled by use of
the primer pump facility in the filter/separator assembly .
By unscrewing the plastic primer pump head ‘A’ and stroking it up and
down, any air bubbles in the system will be purgedback tothe fuel tank.
When this has been completed, the pump head must be screwed back
into the filter/separator assembly.
Start the engine and visually check the fuel system for leaks.
Replacing fuel filter
Replace the fuel filter at specified intervals before it is clogged with dust
to adversely affect the fuel flow . Also, replace the fuel filter after the
engine has fully been cooled.
1) Remove the fuel filter using a filter wrench (customer procured).
When removing the fuel filter, hold the bottom of the fuel filter with a
piece of rag to prevent the fuel oil from dropping. If you spill fuel, wipe
such spillage carefully.
2) Clean the filter mounting surface and slightly apply fuel oil to the
gasket of the new fuel filter.
3) Install the: new fuel filter manually turning until it comes into contact
with the mounting surface, and tighten it further to 1/2 at a turn, using
a filter wrench. Tightening torque: 1 1.8μ15.6NSm(1.2μ1.6kgfSm).
Applicable fuel filter Part No. CCN 16539462
4) Bleed the fuel system. Refer to Inspection at 50 hours.
IMPORTANT:
Be sure to use genuine Doosan part (super fine mesh filter). Otherwise,
it results in engine damage, uneven engine performance and shorter
engine life.
Changing oil/water separator element.
NOTE:
The cartridge and bowl contain fuel. Take care not to spill it during
disassembly and reassembly.
The fuel filter/separator also provides primary filtration and the element
‘C’ should be changed every 500 operating hours or 6 months,
whichever comes first.
Change procedure:
Unscrew the element ‘C’ from the head taking care not to spill fuel inside
the machine. Drain any fuel within into a suitable container, then
unscrew the clear bowl ‘D’ from the element.
Discard the old element into a suitable container.
Remove the old ‘O’ ring from the bowl ‘D’ and install the new one
supplied with the element. Apply a light coat of clean engine oil to the
‘O’ ring and screw the bowl ‘D’ onto the new element ‘C’.
Using a clean cloth, wipe the sealing face of the filter/separator head
to ensure correct seating of the sealing ring.
Fill the element/bowl assembly with clean fuel oil then apply a light coat
of clean engine oil to the new element seal ring.
Screw the new element onto the head firmly by hand.
Follow the “fuel system air bleeding” procedure.