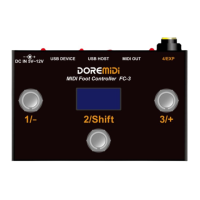
The DOREMIDI MIDI Foot Controller FC-3 is a versatile MIDI controller designed for foot control, offering a range of MIDI output interfaces for connectivity with computers, USB MIDI instruments, and MIDI DIN devices. It features three programmable switch pedals and one expression pedal interface, all of which can be customized with MIDI messages. The FC-3 can be configured with up to 16 groups of MIDI messages, and each pedal can be played clearly, showing the MIDI messages currently being used.
Technical Specifications:
- Model: FC-3
- Size (L x W x H): 115 x 82 x 53 mm
- Weight: 240g
- Consumption: 30mA@5V, 20mA@9V
- USB HOST Output Power: Maximum 2A@5V, depends on the input power of DC IN
- USB HOST Compatibility: Compatible with USB class compliant MIDI devices, compatible with some known non-USB class compliant MIDI devices
- MIDI Compatibility: Compatible with all musical instruments with MIDI standard interface, compatible with all MIDI type messages
- USB DEVICE Interface: USB class compliant, plug and play
- DC In Interface: Powered by DC interface, 5V-12VDC
Function Description:
The FC-3 serves as a MIDI foot controller, allowing musicians and users to control various MIDI-compatible devices with their feet. It features three switch pedals (labeled 1/-, 2/Shift, 3/+) and one expression pedal input (4/EXP). The device includes a DC IN port for power supply, a USB DEVICE port for connecting to a computer, a USB HOST port for connecting to USB MIDI instruments, and a MIDI OUT port for connecting to MIDI DIN devices. An OLED display provides visual feedback on the working content of the FC-3.
Usage Features:
- Power Supply: The FC-3 requires a 5V-12V DC power supply. Connect the power supply to the product through the "DC IN" port. The indicator lights will illuminate once power is supplied.
- Configuring Pedal MIDI Messages: Connect the device to a computer via the USB DEVICE interface to configure the MIDI messages of the pedals. Refer to the configuration method in section 4, "MIDI message configuration." If not configured, default parameters are used.
- MIDI Device/Computer Connection: Connect an external MIDI device/computer via the USB DEVICE/USB HOST/MIDI OUT ports as needed.
- Expression Pedal Connection: Connect an analog expression pedal via the 6.35 TRS cable.
- Output MIDI Messages: Pressing the footswitch/expression pedal will output the configured MIDI messages.
- Independent MIDI Message Groups: The FC-3 can be configured with up to 16 sets of independent MIDI messages. Hold down "Shift" and click "1/-" or "3/+" to switch between different MIDI message numbers.
- Screen Display: The OLED display shows the current working content.
Configuration Software:
The FC-3 uses a dedicated configuration software (Pedal Config Tool V2.0) for Windows 7 and above, and macOS.
- Connection: Select the appropriate serial port number ("COMxx") and click "Connect."
- Pedal Settings: Click "CHECK" to get the current pedal settings.
- Pedal Number: The number of the current pedal (1-3 for switch pedals, 4 for the expression pedal).
- Message Number: The FC-3 can be configured with 1-16 independent MIDI message groups. Each group can be configured with 3 switch pedals and 1 expression pedal.
- Pedal Type: Pedal type can be Expression (Expression), Switch (switch type), or Hi-Hat. If the pedal is not connected, you can also directly select the pedal type to set. (Note: FC-3 temporarily does not support connecting Hi-Hat pedals).
- MIDI Channel: Set the channel of MIDI messages (1-16 MIDI channels).
- STATUS: Set the MIDI status of the pedal. The MIDI status of different pedals is shown in the figure.
- DATA1/DATA2 Range: Set the range of pedal MIDI messages. When the pedal is pressed, FC-3 will send MIDI messages within the range.
- Gain: Set the gain of MIDI messages, which can be set to OFF, 1-100. After setting, the MIDI messages will increase in multiples of 1-100%, and the value is still within the range of DATA1/DATA2 Range. (Note: Gain value is generally used for the expression pedal. After setting the gain, the pedal can reach the maximum value without stepping pedal down to the end).
- MODE: Set the trigger mode of the switch pedal, with Single, Toggle, Reset, Increase, Decrease five trigger modes.
Trigger Modes for Switch Pedals:
- MODE: Description
- Single: Each time the pedal is pressed and released, the value of DATA1/DATA2 is sent only once.
- Toggle: Each time the pedal is pressed and released, the values of the DATA1/DATA2 Range are sent alternately.
- Reset: Press the pedal to send the value of the first data frame of DATA1/DATA2, release the value of the second data frame of DATA1/DATA2.
- Increase: Each time the pedal is pressed and released, the value will increment in the DATA1/DATA2 Range.
- Decrease: Each time the pedal is pressed and released, the value will decrease in the DATA1/DATA2 Range.
Saving and Loading Configurations:
- Set: After setting the parameters, click "Set" to set the FC-3.
- Save File: Save the current pedal configuration content.
- Open File: Load the configuration content of the pedal.
- Pedal MIDI Data: MIDI message display box. After triggering the pedal, the pedal's MIDI message will be displayed in the display box. STATUS is displayed in hexadecimal notation, and CHAN, DATA1, DATA2 is displayed in decimal notation.
Example of Pedal Setting:
- Single Switch Type Pedal: Set the No. 2 pedal as sustain pedal, channel 1, the CC controller is 64, and the CC controller value is 127, MODE = Reset.
- Expression Pedal: Set the No. 4 pedal as an expression pedal, channel 1, and the CC controller is 21.
- Control PC: Set pedal 1 and pedal 3 to control PC. If the switch pedal 1 is set to PC, MODE = Decrease, and the switch pedal 3 is set to PC, MODE = Increase; then the two pedals will share a PC value, and the range of the PC value is based on the DATA1 Range of pedal 1.
Types of Expression Pedal Supported:
The FC-3 supports 6.35mm TRS plug, which can be connected to a positive-polarity or a reverse-polarity expression pedal.
- Expression Pedal (Positive Polarity): The tip is connected to the potentiometer, the ring to power, and the sleeve to ground.
- Expression Pedal (Reverse Polarity): The tip is connected to the potentiometer, the ring to ground, and the sleeve to power.
Maintenance Features / Precautions:
- This product contains a circuit board.
- Rain or immersion in water will cause the product to malfunction.
- Do not heat, press, or damage internal components.
- Non-professional maintenance personnel shall not disassemble the product.
- If the product is disassembled or damaged by improper use, the warranty is not available.
Questions & Answers:
- Incorrect pedal type detected on configuration software:
- Answer: Please make sure that the pedal has been connected to the FC-3 normally; if it is an expression pedal, please try to place the pedal in the middle range, and then click "CHECK" to detect.
- USB cannot connect to the computer:
- Answer: After confirming the connection, whether the USB indicator is on; confirm whether the computer has a MIDI driver. Generally speaking, the computer comes with a MIDI driver. If it is found that the computer does not have a MIDI driver, you need to install the MIDI driver. Installation method: https://windowsreport.com/install-midi-drivers-pc/
- Can the USB HOST interface supply power to USB MIDI instruments?
- Answer: It can supply power, but pay attention to whether the power input power of "DC IN" can meet the working requirements of USB MIDI instruments.
- The USB HOST interface does not work:
- Answer: Please follow the steps below:
- Make sure the power indicator of "DC IN" is on.
- Confirm that the instrument can work normally and that the USB interface of the instrument has MIDI function (for example, the connection can recognize the MIDI device).
- Try to supply power to the product through "DC IN" first, and then connect to the instrument through "USB HOST" to see if the indicator light of "USB HOST" lights up; If the "USB HOST" indicator is still not on, or the MIDI message cannot be transmitted after it is on, please contact customer service to solve it.
- The MIDI OUT connector does not work:
- Answer: Please follow the steps below:
- Make sure that the "MIDI OUT" of the product is connected to the "MIDI IN" of the instrument.
- When MIDI OUT has MIDI message output, the indicator light will flash.
- If the problem is not resolved, please contact customer service.