Press the (+) or (-) button to display the current Power Setting.
Press (+) or (-) button again within 5 seconds to increase or decrease the Power Setting.
To save setting immediately press the (Go) button. If button is not pressed within 5 seconds, setting will
automatically be saved.
After the Power Setting is saved, the front LEDs will illuminate Pink to display the units battery level. Each LED
represents 20% charge ( eg: 5 LEDs represents a full charge, 1 LED represents 20% battery life) Pink flashing
lights indicate the battery contains less than 10% charge. Under this condition, The SWITCH must be charged
before next use.
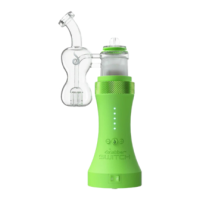
Using Oil Mode
Fill the Glass Percolator Attachment while removed from the unit with a few ounces of water (test the
attachment before putting it back on the unit to ensure water does not splash into the mouthpiece).
Secure the Glass Percolator Attachment onto the SWITCH glass top.
Be sure the Power Switch is on the oil setting (OIL).
Set to the desired Power Setting by using the (+) or (-) buttons. 1 YELLOW LED is calibrated for maximum
flavor profile and 5 YELLOW LEDs is calibrated for optimal vapor density.
Place the Ceramic Induction Cup into the glass top. It is also possible to pre-load the Ceramic Induction Cup
prior to placing in the glass top.
Prepare your product on the loading tool.
Press the (Go) Button.
The SWITCH LEDs will escalate Red when heating then turn Green when the unit has reached temperature.
Once the lights turn green, you may use the device.In standard mode the device will hold the heat profile for 15
seconds which is then followed by a cooldown mode indicated by cascading Blue LEDs.
Press the (Go) button at any time to cancel the heating cycle.
When the unit returns to standby mode, it is ready for the next heating cycle.