EasyManua.ls Logo

DVB COMP Series User Manual

DVB COMP Series
20 pages
To Next Page IconTo Next Page
Page #1 background imageLoading...
Page #1 background image
6400 SYCAMORE CANYON BLVD.
RIVERSIDE, CALIFORNIA 92507
855-680-9595
WWW.DV8OFFROAD.COM
855-680-9595
NEED HELP?
PRODUCT
INSTALLATION MANUAL
COMP SERIES REAR BUMPER
2021+ Bronco
RBBR-04
TOOLS REQUIRED
SKILL LEVEL TIME REQUIRED
-13mm,16mm,18mm Socket
-10, 16mm Wrench
-Lug Nut Tool
-4mm Allen Bit
-Philips Head Screw Driver
-Electrical Crimping Tool
-Scissors or Snips
-Trim Piece Removal Tool
Before you install this kit — Read and understand all
instructions, warnings, cautions, and notes contained in
this installation instruction guide. Consult your vehicle
owner’s manual for proper disconnection of electrical and
lifting of vehicle if required for installation of this product.
This install may require some technical skills and
knowledge of basic mechanical work. If you do not feel that
you are capable of performing this install please take this
product to a trained professional.
After reading this guide please contact us with any
questions or concerns before installing product.
Customer Service: 855-680-9595
DV8 Offroad is not responsible for any bodily injury or harm to you
or your vehicle as a result of an improper install.
Proper installation of this kit required knowledge of the factory
recommended procedures for removal and installation of original
equipment components. We recommend that the factory shop manual
and any special tools needed to service your vehicle be on hand during
the installation. Installation of this kit without proper knowledge of the
factory recommended procedures may affect the performance of these
components and the safety of the vehicle
• Always wear eye protection when operating power tools
Inspect all contents of this package to make sure product is not damaged
and all installation hardware has been included. If parts are missing from
kit, please be prepared to provide the following information
1. Name of purchase location
2. Bar Code on side of box
3. Date above bar code
4. Date inside box cover
- Novice/Intermediate
- 1 to 2 People
Little skill level required, you can
easily assemble this by yourself,
however will need assistance for
installation--minor wiring required.
- Approximately 4 Hours
Time to install this should
take about 4 hours
WARNINGS/CAUTIONS BEFORE STARTING INSTALLATION
Question and Answer IconNeed help?

Do you have a question about the DVB COMP Series and is the answer not in the manual?

DVB COMP Series Specifications

General IconGeneral
BrandDVB
ModelCOMP Series
CategoryAutomobile Accessories
LanguageEnglish

Summary

Comp Series Rear Bumper Installation Guide

Installation Overview and Safety

Provides an overview of tools, skill level, time required, and essential safety precautions before installation.

Factory Bumper Removal Procedures

Steps 1-3: Disconnect and Remove Bumper

Unplug electrical connections, remove side supports, and detach lower bumper bolts.

Steps 4-6: Detach Lights and Harness

Unclip license plate light, remove center bracket bolts, and disconnect wire harness.

Steps 7-10: Remove Sensors and Bezels

Remove all sensors and their bezels from the factory bumper.

New Bumper Assembly and Mounting

Steps 1-2: Prepare New Bumper and Harness

Inspect hardware, prepare the new bumper, and route the wire harness.

Steps 3-6: Install Sensors and Bezels

Install sensor bezels, trim as needed, and secure sensors into place.

Steps 7-10: Secure Sensors and Attach Clips

Secure outer sensors, manage center wiring, install auxiliary lights, and attach mounting clips.

Steps 11-13: Mount and Align Bumper

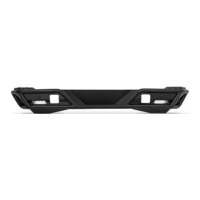
Attach bumper mounts, lift and secure the bumper to the vehicle, and align.

Step 14: Final Bumper Installation Check

Confirm bumper fitment and secure all hardware.

License Plate Bracket and Wiring Integration

Steps 15-19: Install License Plate and Light

Mount license plate to bracket, install light, and connect wiring.

Steps 20-23: Route Wiring via Tire Carrier

Remove spare tire, detach carrier bolts, install bracket, and create wire clearance.

Steps 24-28: Manage Tailgate and Interior Wiring

Remove tailgate trim, feed wire, and run along interior sidewall and bottom.

Steps 29-30: Splice, Secure, and Reconnect

Splice wiring, secure bracket bolts, and reconnect the battery.

Step 31: Final Check and Completion

Double-check fitment and hardware security. Installation is complete.

Related product manuals