8
ASSEMBLY INSTRUCTIONS
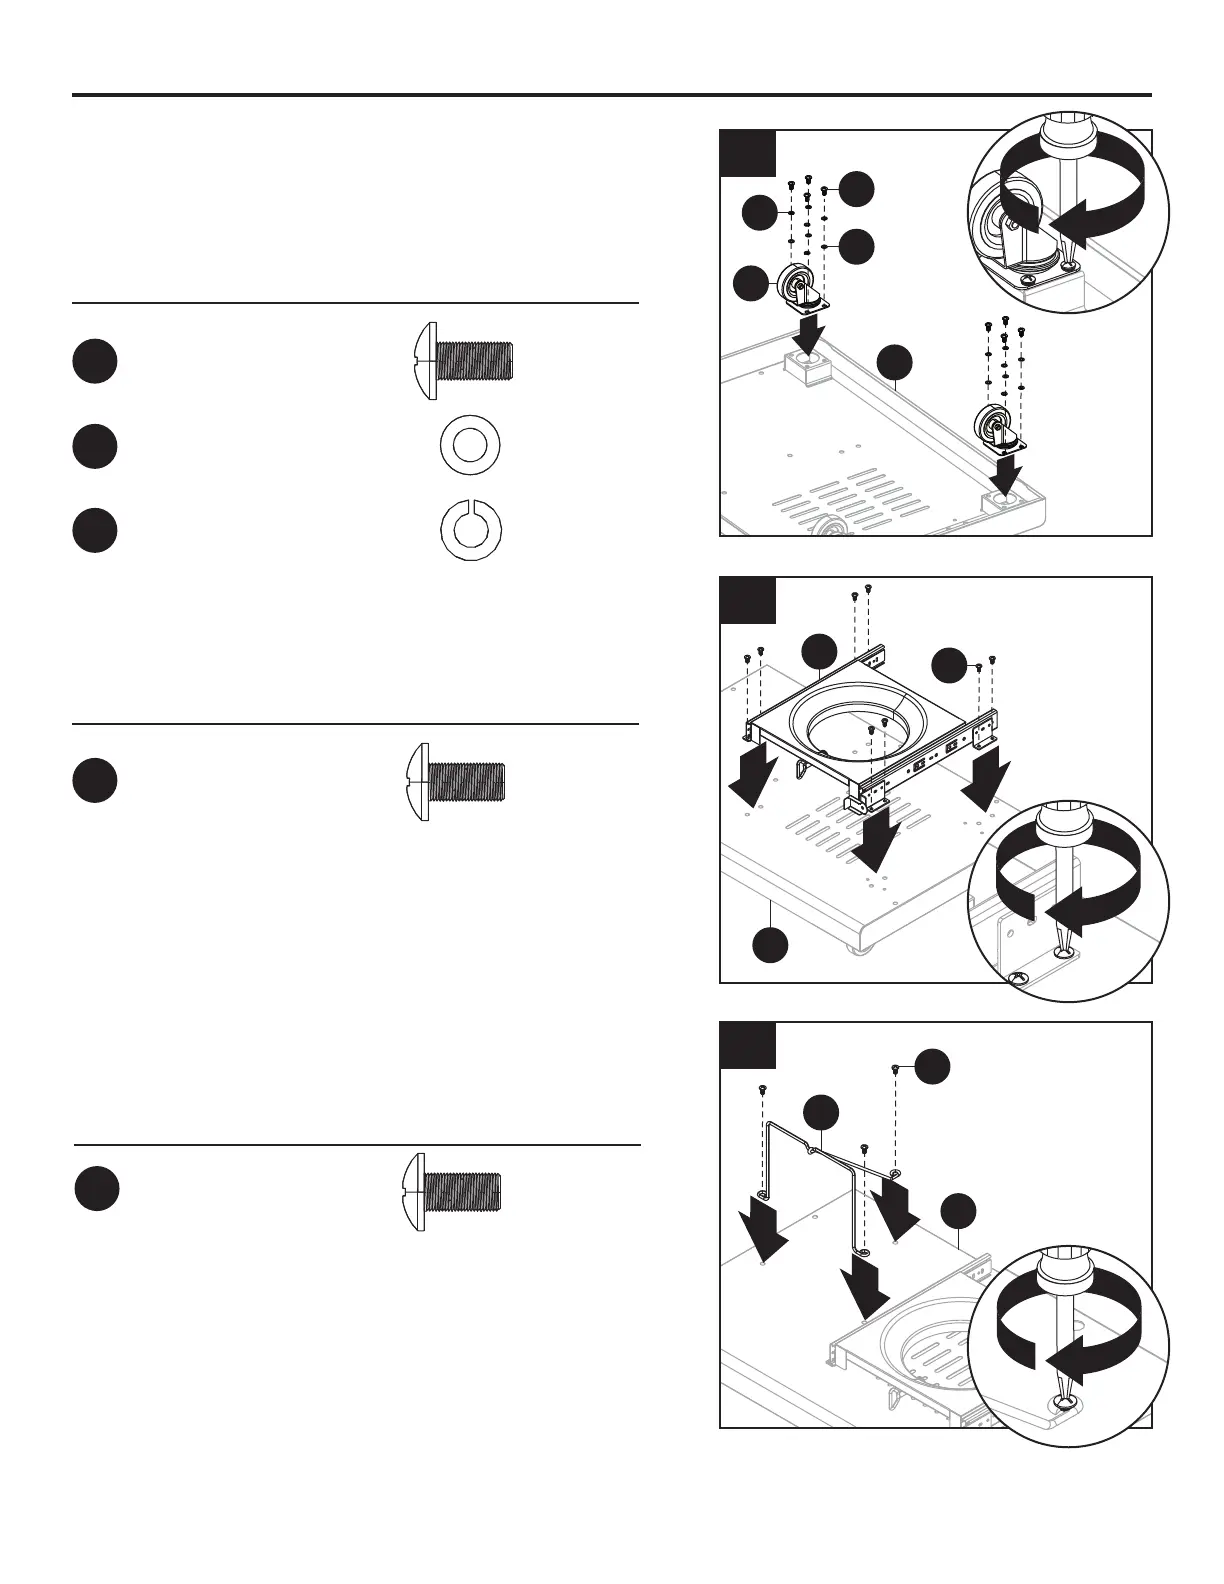
3. Turn over bottom shelf (A) and attach tank shelf
(Z)usingeightM6x12screws(AA).
2. Attach two casters (C) to the front of the
bottom shelf (A) and secure using four plain
washers (BB), four spring washers (CC), and
fourM6x12screws(AA)foreachcaster(C).
1
1
1
AA
Z
A
3
1
1
CC
C
AA
BB
A
2
Hardware Used
Hardware Used
M6x12Screw
M6x12Screw
Plain washer
Spring washer
x8
x8
x8
x8
AA
AA
BB
CC
M6x12 Screw
Qty. 40
M4x10 Screw
Qty. 12
M6x20 Screw
Qty. 4
M4x10 Screw
Qty. 4
NOTE:
Preassembled
with door handle.
Plain Washer
Qty. 16
Spring Washer
Qty. 16
M6x25 Screw
Qty. 2
NOTE:
Preassembled
with lid handle.
AA
BB CC
FF
EE
GG
HH
M6x16 Screw
Qty. 10
DD
M6x12 Screw
Qty. 40
M4x10 Screw
Qty. 12
M6x20 Screw
Qty. 4
M4x10 Screw
Qty. 4
NOTE: Preassembled
with door handle.
Plain Washer
Qty. 16
Spring Washer
Qty. 16
M6x25 Screw
Qty. 2
NOTE: Preassembled
with lid handle.
AA
DD
EE
GG
HH
BB
CC
M6x16 Screw
Qty. 10
FF
M6x12 Screw
Qty. 40
M4x10 Screw
Qty. 12
M6x20 Screw
Qty. 4
M4x10 Screw
Qty. 4
NOTE:
Preassembled
with door handle.
Plain Washer
Qty. 16
Spring Washer
Qty. 16
M6x25 Screw
Qty. 2
NOTE:
Preassembled
with lid handle.
AA
BB CC
FF
EE
GG
HH
M6x16 Screw
Qty. 10
DD
M6x12 Screw
Qty. 40
M4x10 Screw
Qty. 12
M6x20 Screw
Qty. 4
M4x10 Screw
Qty. 4
NOTE:
Preassembled
with door handle.
Plain Washer
Qty. 16
Spring Washer
Qty. 16
M6x25 Screw
Qty. 2
NOTE:
Preassembled
with lid handle.
AA
BB CC
FF
EE
GG
HH
M6x16 Screw
Qty. 10
DD
4.Securecylinderexclusion(A1)tobottomshelf
(A)usingthreeM6x12screws(AA).
1
1
1
1
1
AA
A1
A
4
Hardware Used
M6x12Screw
x3
AA
M6x12 Screw
Qty. 40
M4x10 Screw
Qty. 12
M6x20 Screw
Qty. 4
M4x10 Screw
Qty. 4
NOTE: Preassembled
with door handle.
Plain Washer
Qty. 16
Spring Washer
Qty. 16
M6x25 Screw
Qty. 2
NOTE: Preassembled
with lid handle.
AA
DD
EE
GG
HH
BB
CC
M6x16 Screw
Qty. 10
FF
 Loading...