MENU
-
PAGE 5 _________________
is in the manual mode. To turn
Automatic
on, press
the AUTO
key again,
ADJUST CHART SURFACE
CLARITY
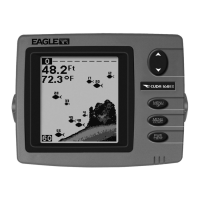
The
markings extending
down-
ward from the zero line on
the
chart are called "surface clut-
ter." These
markings
are
caused
by
wave
action,
boat
wakes,
temperature inversion,
and other natural causes.
ADJUST CHART
SURFACE
CLARITY
MED HIGH
r*ojusT
NOISE_REJECTION
IIJU
PIG_____
PJRE ::.
The Surface
Clarity
Control
(5CC)
reduces or eliminates surface clutter
signals
from the
display.
SCC varies the
sensitivity
of the
receiver,
decreasing
it near the surface and
gradually increasing
it as the
depth
increases. The maximum
depth
that 5CC will affect is 75% of the selected
depth range.
For
example,
on a 0-60 foot
range
with maximum
5CC,
surface clutter will be reduced down
to 45 feet.
There are three levels of
SCC available on the Ultra II:
low, medium,
and
high.
When it's turned on
forthefirsttime,
the SCC level is low. To
change
it, press
the MENU
key
five
times,
then
press
the
key adjacent
to the
"ADJUST
CHARTSURFACE CLARITY" label until the black box is on the
desired 5CC level.
Press the
key
next to the "EXIT" label when
you're
finished.
ASP
(Advanced Signal Processing)
The ASP feature is a noise
rejection system
built into the Ultra II
that
constantly
evaluates the effects of boat
speed,
water
conditions,
and
interference. This automatic feature
gives you
the best
display possible
under most conditions.
The ASP feature is an effective tool in
combating
noise. In sonar
terms,
noise is
any
undesired
signal.
It is caused
by
electrical and
mechanical
sources such as
bilge pumps, engine ignition systems
and
wiring,
air
bubbles
passing
over the face of the
transducer,
even vibration from the
engine.
In all
cases,
noise can
produce
unwanted marks on the
display.
The ASP feature has two levels
-
Normal and
High.
If
you
have
high
noise
levels,
try using the"High"
ASP
setting. However,
if
you
are
having
trouble
with
noise,
we
suggest
that
you
take
steps
to find
the interference source
and fix
it,
rather than
continually using
the unit with the
high
ASP
setting.
26
then
press
the
right
arrow
key.
SENSITIVITY
The
sensitivity key
on the Ultra II controls the
ability
of
the unit to
pick
up
echoes.
A low
sensitivity
level excludes much of the bottom
information,
fish
signals,
and other
target
information.
High sensitivity
levels enables
you
to see this
detail,
but itcan also
clutterthe
screen
with
many
undesired
signals. Typically,
the best
sensitivity
level shows a
good
solid bottom
signal
with
Grayline
and some surface clutter.
When the Ultra II is in the Automatic
mode,
the
sensitivity
is
automatically
adjusted
to
keep
a solid bottom
signal displayed, plus
a little more. This
gives
it the
capability
to show fish and other detail.
However,
situations occur where it becomes
necessary
to increase or
decrease the
sensitivity.
This
typically happens
when
you
wish to see
more
detail,
so an increase in
sensitivity
is indicated. The
procedure
to
adjust
it is the same whether the unit is in the automatic or manual mode.
To
adjust
the
sensitivity, press
the SEWS
key.
The
sensitivity adjust
menu
appears
at the bottom of the screen.
The
sensitivity
menu has left
and
right
arrows,
plus
a hori-
zontal bar
graph.
The
graph
gives
a visual indication of the
sensitivity
level. The number
above the INC arrow also
shows the
percentage
of sen-
sitivity
in use.
To increase the
sensitivity
level,
press
the
right
arrow
key.
As
you press
the
key,
the menu's
bar
graph
will
grow
wider and
the
percentage
will increase in value. You can also see the difference on
the chart record as it scrolls. When the
sensitivity
is at the desired
level,
release the
key.
To decrease the
sensitivity level, press
the
key adjacent
to the left arrow.
The bar
graph
and
percentage
will decrease. When the
sensitivity
is atthe
desired
level,
release the
key.
When
you
reach either the maximum or minimum
limit,
a tone sounds.
11
PDF compression, OCR, web-optimization with CVISION's PdfCompressor
 Loading...