I.B. 17555C
Effective November 1999
Page 11
2-1.6 COMMUNICATIONS
An important function of the Digitrip 3000 Protective
Relay is communications and control via the Cutler-
Hammer PowerNet Protocol. It allows the combining of
electrical distribution and control products with personal
computers into a comprehensive communications and
control network.
The Digitrip 3000’s communications chip permits the
interrogation of relay data, remote tripping and closing of
breaker, the Reset of the relay after a trip, and download-
ing of set points from a remote master computer. Note:
Dip Switch #5 must be in the “Off” position to initiate
a “Communications Close” command. Communica-
tions is accomplished from the relay to the master com-
puter via a 115.2 KHz. frequency carrier signal over a
shielded twisted pair of conductors. The receiving termi-
nal is a remote mounted master computer (IBM compati-
ble). Refer to Figure 2-1 for a typical communications
wiring diagram.
Ground shielding should be provided at one place
only, with the computer end being the recommended
location.
2-2 PROTECTIVE RELAY HARDWARE
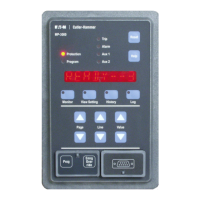
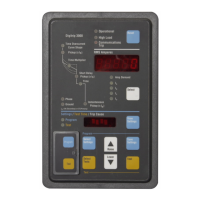
2-2.1 FRONT OPERATIONS PANEL
The operations panel, which is normally accessible from
the outside of the switchgear panel door, provides a
means to program, monitor and test the unit (Figure 1-1).
For the purpose of familiarization, the panel is divided
into three sub-sections:
1. Pushbuttons
2. LEDs
3. Display Windows
Pushbuttons: The front operations panel supports
eleven membrane pushbuttons. Pushbuttons are color
coded (red, white, blue, yellow) by their function to be
operational friendly. For example, blue pushbuttons are
associated with actual program functions, yellow push-
buttons with integral testing functions, and white pushbut-
tons are common to both operations or are independent.
White pushbuttons accomplish their function when
depressed. They can be held down and not released to
accelerate their function. Blue and Yellow pushbuttons
accomplish their function after having been pressed and
released.
Reset Pushbutton (Blue)
The Reset pushbutton is used to reset any of the follow-
ing: the trip relays (overcurrent and instantaneous), the
trip alarm relay, the trip LEDs, and the ampere demand
current. Reset applies to both normal operations and
integral testing. If the unit is in the auto-reset mode, as
set by DIP switch #9 on the back of the unit, the trip
relays and the trip alarm relay will automatically reset
when the circuit breaker is opened after a trip.
Program Mode Pushbutton (Blue)
The Program Mode pushbutton, which is accessed by
opening the sealable, hinged access cover, is used to
enter and exit the program mode. When this pushbutton
is pressed and released, the program LED flashes and
setpoints can be altered. DIP Switch S2 establishes
when the Program Mode can be entered. With S2 set to
“off,” the Program Mode can only be entered when the
breaker is open. With S2 set to “on,” the Program Mode
can be entered with the breaker open or closed. Any
selections made in the program mode are only saved
when the Save Settings pushbutton, which is described
later, is depressed. When programming is concluded, the
Program Mode pushbutton should be pressed to exit the
program mode. Note that if the Save Settings pushbutton
is not depressed prior to exiting the program mode, the
previous settings will be retained. The program mode is
also exited if the Reset pushbutton is pressed or if there
is no programming activity for approximately 2-1/2 min-
utes.
Note: Each Digitrip 3000 is shipped from the factory
with nominal protection settings. The relay should be
programmed by the user before being put into
service, as these nominal values may not give
optimum system protection or coordination. Remove
tag from security door to access the “Program
Mode” pushbutton.
Test Mode Pushbutton (Yellow)
Also located behind the sealable hinged access cover is
the Test Mode pushbutton. This pushbutton is used to
enter and exit the test mode. When the pushbutton is
pressed and released, the word TEST will appear in the
Settings/Test Time/Trip Cause display window. If there is
more than 0.1 times (I
n
) current flowing in either the
phase or the ground circuit, the Test Mode cannot be initi-
ated and the error message “ERR” will appear in the dis-
play window. The test mode will also automatically be
exited if there is no activity for 2-1/2 minutes.
Select Test Pushbutton (Yellow)
The Select Test pushbutton is used, after the test mode
has been entered, to select the type of test. There are
phase and ground tests to trip or not trip the breaker.
(See Section 3-3.4).
 Loading...