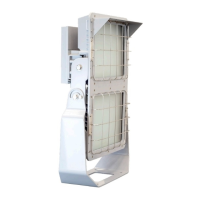
7
Observe the correct ceiling cut-out!
1. For recessed ceiling installation threads are
at the rear side of the enclosure
M8 x 18 mm depth.
2. For recessed ceiling installation into
sufficient capable ceilings use mounting
lugs of the mounting frame with sufficient
screws. (option)
3. A mounting bracket can be used for fixing
at the front/back end of the enclosure
(option) Fig. 12.
Do not use too long screws!
Accessories for mounting: See CCH/CEAG
catalogue.
5.2 Mains connection
- Dismount the cover plane from the hinges.
- unscrew the four fixing screws approx. 3
turns at the reflector's (fig. 5, 6).
- Push the reflector rightwards out of the
fixing screw and take it out (fig. 7).
- Disconnect the protective earth connection
from the terminal or enclosure.
Observe the correct position of the
toothed disk (screw head - cable lug -
toothed disk).
- Introduce the cable through the Ex cable
entry, see fig. 5.
Use
sealing inserts 1,2 and 3
for cables from 8 to 10 mm Ø,
sealing inserts 1 and 2
for cables from 10 to 13 mm Ø
and sealing insert 1
for cables from 13.5 to 17.5 mm Ø.
Pay attention to the proper fit of the re-
maining sealing insert in the cable gland.
- Connect the conductors to the terminals
PE, N, L (fig. 10) in accordance with the
terminal marking (fig. 11)
- Connect protective earth to the enclosure
(fig 8, 9)
- Insert the reflector into the 4 fixing screws
(fig. 7)
- While closing the reflector protect wires
from squeezing in.
- Also tighten the 4 screws.
- Now tighten the cable entry.
- Insert the cover plane into the hinges.
- Insert the lamp into the lamp 3a).
The lamp must be secure fixed in the lamp
holder.
Check the correct position by slightly
pulling the lamp. (fig. 3b)
- Close the cover plane using the locking
screws (fig.1).
Attention
In case of unused cable entries, remove their
protective cover and close the entries with a
blanking plug (torque of 2,6 Nm).
When closing the gland with a blanking plug,
always use both sealing inserts!
When metal cable entriesare used, the
protective caps of the unused entries are to be
removed and the entries to be closed with
certified Ex blanking plugs!
(min. IP 66) Fitting the lamps.
5.3
Fitting the lamps
Only use such lamps that have been
certified for these light fittings, see Technical
data and type label!
T12-lamps (Ø 38 mm) will be detected as faulty
and will be cut off by the EOL-circuit
Observe the safety instructions of the
lamp manufacturer!
Bi-pin lamp (G13)
The lamp is to be inserted to its stop into both
holders, (fig.3a) so that both pins on either side
of the lamp engage in the holder.
Check the correct position by slightly pulling the
lamp. (fig. 3b)
6. Taking into operation
Prior to operation, check the light fitting for its
proper functioning and installation in compliance
with these operating instructions and other
applicable regulations!
Only carry out insulation measurements
between PE and the external conductor L1 (L,
L2, L3) as well as between PE and N.
– measuring voltage: max. 1 kV AC/DC
– measuring current: max. 10 mA
7. Maintenance
Observe the national regulations applica-
ble to the maintenance, servicing and test of
apparatus for explosive atmospheres e.g
IEC/EN 60079-17 as well as the general rules
of engineering!
7.1 Servicing
When servicing, in particular those components
that affect the explosion protection, will have to
be checked, e. g.:
- Housing and cover pane for any cracks or
damages.
- Gaskets for their perfect condition.
- Terminals and blanking plugs for their firm
fit.
7.2 Lamp replacement
- Lamp replacement: Keep replacement
intervals as specified by the lamp manufac-
turer!
- Lamp replacement can be done without
cut off the luminaire from mains supply,
because an all pole switch will isolate the
lamp holders while opening the protective
bowl.
Notice: Observe national standards or directions
for use which can be divergent to this!
8. Repair
Prior to replacing or removing any
components, observe the following:
Only genuine Cooper Crouse-Hinds (CCH) /
EATON spare parts may be used for replace-
ment!
Repairs that affect the explosion protection
(see national standard), may only be carried
out by CCH / EATON or a qualified “electri-
cian”!
Cut t
he apparatus off the voltage before opening
it or carrying out repairs!
Only use certified genuine CCH / EATON spare
parts! (See CCH / EATON spare parts list).
9. Disposal/Recycling
When the apparatus is disposed of, the
respective national regulations on waste disposal
will have to be observed.
In case of disposal you can obtain additional
information from your Cooper Crouse-Hinds /
EATON branch.
Subject to mod
ifications or supplement of the
product range.
 Loading...