Page 2
Table of Contents
Installing the Siren 2
Quick Reference 4
Connections to Other Control Units 5
Connection Details 6
TR 6
ENG (Installer Mode) 6
STR and BELL 6
F-F and F-R and RST 6
TF 7
PCB Jumper Details 7
SCB/SAB 7
Trig Mon 7
Tone Slct 7
Time 7
LED En 7
Tmp Feed 8
Fault and Tamper Monitoring 8
Summary of Strobe Operation 8
Maintenance 8
Cable Recommendations 9
Specifications 9
Installing the Siren
Step 1 – Choose a Location for the Siren
Choose a location that is:
Out of reach of intruders and vandals.
Easily visible for maximum deterrence.
Within the allowable cable distance
(see Cable Recommendations on page
9).
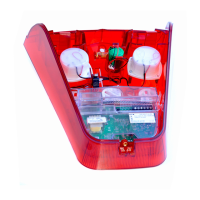
Step 2 – Open the Lid of the Siren
1. With the siren not yet fixed to the wall,
open the hinged cover that gives
access to the lid-retaining screw (see
Figure 2).
2. Loosen the screw and open the lid.
Step 3 – Configure the Siren Jumpers
1. Remove the link/terminal cover (see
Figure 2) by pushing the two retaining
tabs to the side of the unit while lifting
the cover.
2. Set all jumpers in the siren to the
required positions (see Quick
Reference on page 4).
Step 4 – Disconnect all Power
Make sure that all power to the control unit
is disconnected, including the backup
battery. Also make sure that the battery in
the siren is not connected.
Step 5 – Install Cabling
Install all cabling between the control
unit/expander and siren (see Cable
Recommendations on page 9). Connect the
cabling at the control unit/expander end, but
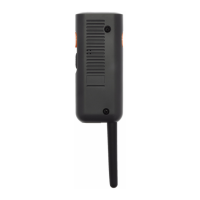
leave the siren unconnected for now. Note:
To prevent water ingress, cables must enter
the cable-entry hole at the siren (see Figure
2) from below.
Step 6 – Attach the Siren to the Wall
1. Position the siren against the wall using
the built-in spirit level to assist levelling,
and mark all four fixing points.
2. Drill and plug the fixing points using the
screws and plugs provided.
3. Pass wiring through the cable-entry
hole.
4. Screw the siren to the wall. Use the
spirit level and revolving guides to
correct any misalignment.
Step 7 – Connect the Siren Wiring,
Power Up and Close the Lid
Note: The sounder should not activate
during the following process. However, be
prepared in the event that it does
activate; make sure that any very loud
noise produced cannot cause a fall.
1. Connect all wiring to the siren (see
Quick Reference on page 4).
2. Connect the siren battery (see Figure
1).