24
Instruction Book IB182923EN September 2018 www.eaton.com
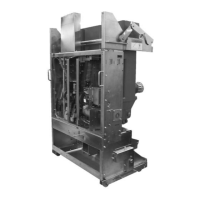
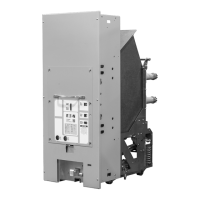
AMH-4.76-VR
+
VR-Series
+
Replacement Circuit Breaker
SECTION 6: INSPECTION & MAINTENANCE
m DANGER
DO NOT WORK ON A CIRCUIT BREAKER IN THE ‘CONNECT’ POSITION.
DO NOT WORK ON A CIRCUIT BREAKER WITH SECONDARY
DISCONNECTS ENGAGED.
DO NOT WORK ON A CIRCUIT BREAKER WITH SPRINGS CHARGED OR
CONTACTS CLOSED.
DO NOT DEFEAT ANY SAFETY INTERLOCKS.
DO NOT LEAVE MAINTENANCE TOOL IN THE SOCKET AFTER CHARGING
THE CLOSING SPRINGS.
STAND AT LEAST ONE METER AWAY FROM THE CIRCUIT BREAKER WHEN
TESTING FOR VACUUM INTEGRITY.
m DANGER
FAILURE TO FOLLOW ANY OF THESE INSTRUCTIONS MAY CAUSE DEATH,
SEVERE PERSONAL INJURY, EQUIPMENT DAMAGE AND/OR IMPROPER
OPERATION. SEE SECTION 2 - SAFE PRACTICES FOR MORE INFORMATION.
6.1 INSPECTION FREQUENCY
The scheduled maintenance interval for the VR-Series
+
circuit
breaker is once every ten years or ten thousand operations,
whichever comes first when applied in normal applications as
defined by IEEE C37.04-1999. However, if the circuit breaker is
operating in a high level of natural elements or in a corrosive
environment, inspection should be performed twice each year. The
circuit breaker should also be inspected and a vacuum interrupter
integrity test performed (Section 6.3) any time the circuit breaker is
transported to another physical location or switchgear assembly. In
addition, the circuit breaker should have a full inspection if the circuit
breaker interrupts a fault current.
ote:N Refer to the table below for maintenance and inspection check
points.
6.2 INSPECTION AND MAINTENANCE PROCEDURES
NO. / SECTION INSPECTION ITEM CRITERIA INSPECTION METHOD CORRECTIVE ACTION IF NECESSARY
1. Insulation Stand Off Insulators, Operating Rods,
Tie-Bars and Barriers
No dirt Visual check Clean with lint-free cloth
No cracking Visual check Replace cracked unit
Vacuum Integrity Between main circuit with
terminals ungrounded
Withstand
27kV 60Hz for 1 Minute
Hi-pot Tester Clean and retest or replace
Insulation Integrity Main circuit to ground Withstand
15kV, 60Hz for 1 Minute
(5kV Rating)
27kV, 60Hz for 1 Minute
(8.25kV and 15kV Ratings)
Hi-pot Tester Clean and retest or replace
Control circuit to ground
(Charging Motor disconnected)
Withstand
1125V, 60Hz for 1 Minute
Hi-pot Tester Clean and retest or replace
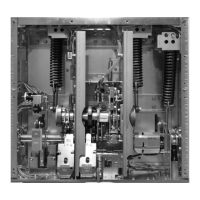
2. Power Element Vacuum Interrupter Assembly Contact erosion visibility Visual - Close the circuit breaker
and look for “T” cutout on Vacuum
Interrupter Assembly
(See Figure 6.1 and 6.2)
If cutout is not visible, replace Vacuum
Interrupter Assembly
Contact wipe visible Visual (Figure 6.1 and 6.2) Replace Vacuum Interrupter Assembly
Adequate vacuum See Section 6.3 Replace Vacuum Interrupter Assembly
If vacuum is not adequate
Dirt on ceramic body Visual check Clean with dry lint-free cloth
Primary Disconnects No burning or damage Visual check Replace if burned, damaged or eroded
3. Control Circuit Parts Closing and tripping devices
including disconnects
Smooth and correct operation by
control power
Test closing and tripping of the circuit
breaker twice
Replace any defective device -
Identify per Trouble-Shooting Chart
Wiring Securely tied in proper place Visual check Repair or tie as necessary
Terminals Tight Visual check Tighten or replace if necessary
Motor Smooth and correct operation by
control power
Test closing and tripping of the circuit
breaker twice
Replace brushes or motor
Tightness of hardware No loose or missing parts Visual and tightening with appropri-
ate tools
Tighten or reinstate if necessary
4. Operating Mechanism Dust or foreign matter No dust or foreign matter Visual check Clean as necessary
Deformation or excessive wear No excessive deformation or wear Visual and operational Remove cause and replace parts
Manual operation Smooth operation Manual charging closing
and tripping
Correct per Trouble-Shooting Chart
if necessary
CloSure
™
Test > 0.6 inch over travel CloSure
™
Test 6.8.1 If < 0.6 Contact the PBC
at 1-877-276-9379
ote:N Contact Eaton for any mechanism maintenance other than adjustment or replacement of control components.
BOLT SIZE 8 - 32 10 - 32 .25 - 20 .31 - 18 .38 - 16 .50 - 13
TORQUE Lbs. In. 24 36 72 144 300 540
 Loading...