Do you have a question about the EBA 430 E and is the answer not in the manual?
Ensure the machine is installed on a sturdy, dry, and level floor for stable operation.
Avoid outdoor placement and use away from flammable liquids or gases.
Machine designed and intended for operation by a single person.
Disconnect power before servicing. Ensure main switch is off for blade work.
Movable guard (A) and two-handed control system (B) safeguard against cutting hazards.
Verify safety guard auto-cut-off, main switch, and control panel after blade replacement.
Switch the main switch to '0' when the machine is not in use for extended periods.
Screw on the backgauge crank (A) and operating handle (B) using the provided tool set.
Connect the machine's power cord to a suitable electrical socket.
Turn main switch to 'I', insert key, move to right (B), and open safety guard (C).
For EBA 430 EP, press the Start button (D) to initiate operation.
Features a back side-lay scale (A) with fine adjustment via calibration ring (B) in millimeters.
Displays measurements in inches or centimeters (C) on the control device.
Align paper using back gauge (A) and side-lay (B); use stacking angle (C) for multiple sheets.
Ensure the safety guard is closed before proceeding with any cutting operations.
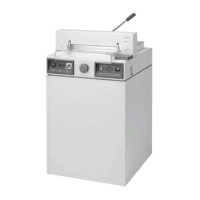
Diagram and list of all operational elements including switches, buttons, display, and keypads.
Operate the eject function to move the backgauge to preset measurements for paper unloading.
Follow safety warnings for cutting: advance backgauge, avoid interrupting blade, check LED 'S'.
Instructions for setting and storing dimensions for the automatic paper eject function.
Guide to creating, cancelling programs, and deleting individual program steps.
Change display units between centimeters and inches using the dedicated button.
Procedure to modify the programmed eject dimension value.
Turn the blade depth adjustment screw fully to the left using the provided screwdriver.
Press both cutting buttons, maintain pressure on one, and turn off the main switch.
Unscrew the two blade screws (1.) and then fit the blade changing tool (2.).
Remove remaining screws, loosen tool grips, and carefully pull the blade downwards.
Attach the new blade to the changing tool, ensuring correct spacing (4-5 mm) and coverage.
Place the blade assembly into the carrier, push upwards, and secure using the grips.
Screw eccentrics down until the paper is cut cleanly along the entire blade length.
Turn main switch on for blade return, then firmly tighten the blade screws.
Apply non-resinous oil to the backgauge control weekly.
Grease 14 specific parts twice yearly; turn off power and tilt machine for access.
Remove cover (C) and lower panel (D) for greasing and checking components.
Ensure the machine is plugged in, the main switch is ON ('I'), and the control system is activated.
Rotate the cutting stick (A) or adjust the blade using knob (B) if the last sheet is not cut.
Replace the blade (C) if cutting is of poor quality or the blade gets stuck in the paper stack.
Verify the safety guard is correctly closed or re-closed to allow cutting.
Check LED 'S', press Start, hold for <9cm measurements, or check pressing lever.
If backgauge doesn't move and 'CUT' is displayed, contact authorized service personnel.
List of essential spare parts including blades (Nr. 9000 120) and cutting sticks (Nr. 9000 220).
Includes blade changing tool (Nr. 9000 515), paper knock-up block (Nr. 9000 520), cabinet (Nr. 42618001), and stand (Nr. 43051100).
Confirms compliance with EC regulations, ISO 9001, and lists applied technical standards and sound level information.
| Cutting Length | 430 mm |
|---|---|
| Cutting Height | 40 mm |
| Narrow Cut | 35 mm |
| Table Depth | 435 mm |
| Cutting Width | 430 mm |