Page 1 of 6 Rev. 10/012001 Edelbrock Corporation
©
Performer Q-Jet Carburetors for Thermo-Quad Applications
Catalog #1905
for non-computer controlled 1972-1985 Chrysler 360, 400 & 440 V8s
INSTALLATION INSTRUCTIONS
PLEASE study these instructions carefully before installing your new carburetor. If you have any questions or problems,
please call our Carburetor Technical Hotline at: (800) 416-8628 or e-mail us at edelbrock@edelbrock.com.
DESCRIPTION
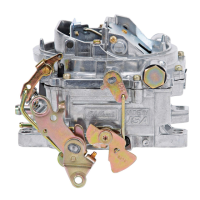
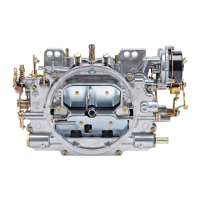
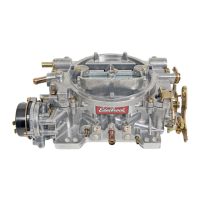
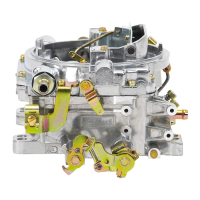
The Edelbrock Performer Q-Jet Carburetor for Thermo-Quad applications is a high quality, all new carburetor designed to
replace the original equipment Thermo-Quad that came stock on 360, 400 and 440 Chrysler engines in trucks and
motorhomes from 1972 to 1985. This Edelbrock carburetor features all-metal construction for no leaks and no hassles. It
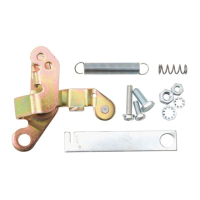
includes an electric choke along with a 3/4" 4-hole spacer, throttle lever adapter and fuel line adapter for an easy
installation. These carburetors are street legal parts when used on the applications for which they are listed.
Edelbrock Performer Q-Jet Carburetors for Thermo-Quad applications are compatible with all OEM linkage and components
for the years listed, and will fit stock intake manifolds. For best performance, they may be used with the matching
Performer or Performer EGR intake manifold for those who wish to use a new stock replacement carburetor.
Caution: Check hood clearance due to additional carburetor spacer height.
IMPORTANT NOTES
Before installation of your new carburetor, you must do the following:
1. Replace fuel filter. Dirt found in carburetor voids warranty.
2. Check and replace the air filter if necessary.
3. Check PCV valve and replace if clogged.
4. Check all hoses for leaks or cracks and replace if necessary.
5. Check fuel pump for proper operation and replace if necessary.
6. Check the intake manifold and cylinder head gaskets for leaks and replace if necessary.
7. Check the ignition system: clean and gap or replace spark plugs, plug wires, and adjust ignition timing.
8. Check the vacuum line routing from your original carburetor to determine if each line is “timed vacuum”
or “manifold vacuum”. Consult factory manual or underhood vacuum diagram if necessary to determine
vacuum line routing on new carburetor.
9. Suggested Procedure: With engine fully warmed up, remove vacuum lines from carburetor one at a time
and place your finger over port to feel for vacuum. Timed vacuum ports have little or no vacuum at idle;
manifold vacuum ports have full vacuum at idle.
Note that while this carburetor does not appear identical to your old carburetor, it will perform properly on the models it
was cataloged to replace. Main Jet: .073; Metering Rods: Primary-50M, Secondary-DR.
CARBURETOR REMOVAL
1. Prior to carburetor removal, make sure that engine is cool.
2. Disconnect negative battery cable from battery.
3. Remove air cleaner. Be sure to carefully disconnect any hoses from the air cleaner and note their location
for re-installation. You may want to mark them with masking tape for easy reference.
4. Disconnect throttle linkage, kickdown linkage (certain automatic transmission applications only), cruise
control (if equipped) and any return springs if present. NOTE: Check carefully for the precise location of all
these linkages and return springs. You may want to mark them with masking tape for easy reference.
5. Disconnect all wires, tubes and hoses from carburetor and note their location. NOTE: There should be a
maximum of one wire to the electric choke and one to the idle compensator solenoid. Any other electrical
wiring attached to your carburetor indicates a computer controlled engine, and Edelbrock Q-Jet carburetors
for Thermo-Quad applications will not function correctly on computer controlled applications.
6. Carefully remove fuel line from carburetor or fuel filter. Take extreme care not to spill any excess fuel. Place
a rag underneath the fuel line to absorb any spillage that may occur. Certain models require two wrenches
to remove the fuel line; one to hold the fitting on the carburetor and the second to turn the fitting on the
fuel line. Use a tubing wrench to avoid rounding the tube fitting nut.