6TFUIFOBSSPXOP[[MFPGBWBDVVNDMFBOFSUPSFNPWFGMVGGBOEPUIFSDPOUBNJOBUJPO
GSPNUIFDPWFSTMPUTBOEHBTFOUSZIPMFT
Caution: Do not paint the CO Alarm.
3FNPWFUIF$0"MBSNXIFOEFDPSBUJOH%POPUBMMPXXBUFSPSEVTUUPDPOUBNJOBUF
UIF"MBSN
Warning:%P OPUPQFO PS UBNQFSXJUI UIF$0 "MBSN 5IFSFBSF OPVTFS TFSWJDFBCMF
QBSUTJOTJEFBOEUIJTDBOEBNBHFUIF"MBSN
Battery Replacement'PS&J.PEFMT0OMZ
$IFDLUIFA3FQMBDFCZMBCFMPOUIFTJEFXBMMJGJU
IBT CFFO FYDFFEFE SFQMBDF UIF FOUJSF VOJU *G UIF
3FQMBDF CZ MBCFM PO UIF TJEF XBMM IBT OPU CFFO
FYDFFEFE SFNPWF UIF "MBSN GSPN UIF NPVOUJOH
QMBUF SFNPWF UIF CBUUFSZ DPWFS TFF GJHVSF
BOE SFQMBDFUIF CBUUFSJFT 6TF only UIF GPMMPXJOH
"MLBMJOF """ TJ[F CBUUFSJFT %VSBDFMM 1BOBTPOJD
PS&OFSHJ[FS
*OTFSUUIFOFXCBUUFSJFTXJUIUIFPSJFOUBUJPOTIPXO
POUIFCBTF3FQMBDFUIFCBUUFSZDPWFSBOESFQMBDF
UIF "MBSN CBDLPO JUTNPVOUJOH QMBUFUIJT BDUJPO
BVUPNBUJDBMMZ TXJUDIFT PO UIF CBUUFSJFT #VUUPO
UFTU UIF "MBSN BGUFS TFDPOET UP DIFDL UIF
CBUUFSJFT BSF JOTUBMMFE DPSSFDUMZ BOE UIBU UIFZ BSF
OPUEFQMFUFE
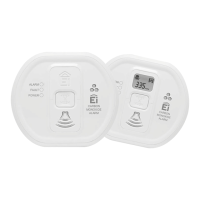
Figure 8