9
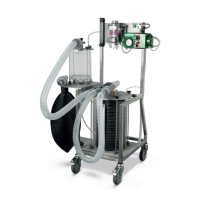
USER MANUAL LAVC
-
2000
-
D ANAESTHETIC MACHINE
T +49 7461 96 580 0 | F + 49 7461 96 580 90 | export@eickemeyer.com | www.eickemeyer.com
6. LEAK AND PRESSURE CHECK INSTRUCTIONS
Checking the anesthesia ventilator for leaks is an important part of any anesthetic procedure setup. The machine should be
checked for leaks prior to every use to insure proper functioning of the machine. The most effi cient way to check the ventilator
for leaks is a simple process, outlined below.
1. Make sure the ventilator is off, as well as the fl owmeter.
2. Remove the breathing hoses and patient Y from the machine.
3. Remove one breathing hose from the Y piece (it doesn’t matter which one)
4. Connect the single breathing hose between the expiratory valve on top of the absorber canister and inspiratory valve on
top of the bellows canister.
5. Make sure that the short sidemount hose is connected between the bottom of the absorber and the back of the inspiratory
valve on top of the bellows canister. Also check to make sure the pop-off valve (21) is closed.
6. With the machine plugged in to its oxygen source, press the fl ush valve to fi ll the bellows. When the bellows are full (when
they touch the bottom), check to make sure that the bottom plate valve is properly operating. This is achieved by holding
the fl ush so the bellows touch the bottom and actuate the valve (33). This relieves pressure in the line that closes the
exhalation valve assembly (21) on top of the bellows top plate and you should feel gas coming out of the exhaust of the
exhalation valve assembly (21). If you feel gas only when the bellows strikes the bottom plate, this system is working
properly.
7. Turn the Expiratory Time valve (5) on the Servo off (all the way clockwise).
8. Set the Sensitivity Control (Starting Effort) Lever is at 20 (12 O’clock position)
9. Set the Inspiratory Pressure Lever at 20cm / H₂O to start (12 O’clock position)
10. Set the Inspiratory Flowrate Knob (2) between 5 and 10. We recommend using the lowest possible Inspiratory Flowrate
possible which can vary depending on the age of the machine. New machines should cycle reliably at 5, older machines
may need to be set between 5 and 10.
11. Manually trigger a breath by pressing the Hand Timer (6). The bellows should not move signifi cantly because there is very
little volume in the circuit. If the bellows climb up to the top and the triggered breath does not stop, then there is a leak.
The needle on the manometer (7) should move up to the set pressure in a smooth arc. As long as the breath is achieved
and the bellows returns to the bottom after completing one breath cycle, move on to step 12. If the bellows have moved
up or the cycle does not complete normally, check to make sure all the absorber and bellows wingnuts are tight, the pop-
off valve is closed, and that all the tubes are properly connected. Signifi cant leaks can be felt when the inspiratory cycle
is triggered, so you can open the Expiratory Timer Valve to have the machine cycle on its own so you can attempt to feel
any leaks around common leak areas such as around the absorber canister, directional valves, and bellows canister. If a
leak cannot be found, please contact EICKEMEYER®.
12. Once the 20cm / H₂O cycle has completed successfully, move the Inspiratory Pressure Lever to the notch (~60cm / H₂O).
The lever will click into the notch and will not move past it unless you pull the lever out and choose to do so.
13. Manually trigger a breath again by pressing the Hand Timer (6). The needle on the manometer (7) should move to
60cm / H₂O in a smooth arc without faltering. Once it hits 60cm / H₂O, the breath should stop, and the bellows should
return to the bottom. If the cycle does not complete or the needle falters or hangs at a lower pressure, this is an indicator
of a leak in the system which should be addressed as above. If the cycle completes properly, proceed to step 14.
14. Now that the cycle has completed at 60cm / H₂O, the system is operating normally. To check for smaller leaks, you can
open the Expiratory Timer Valve (5) to roughly 4 seconds of expiratory time and let the machine cycle. Over the course of
a few minutes, the bellows should remain close to the bottom and should not move signifi cantly up to the top of the
bellows canister.