Do you have a question about the ekwb EK-XTOP D5 and is the answer not in the manual?
Instructions for unscrewing the original pump top and preparing the pump body for installation.
Guidance on attaching the EK-XTOP D5 to the pump motor housing and securing it.
Details on screwing in G1/4 fittings and connecting tubes for the pump top.
Key notices regarding leak testing, liability, and product usage recommendations.
Details on product warranty terms, conditions, and exclusions.
Specifies the required allen key size for installation.
This document provides installation and mounting instructions for the EK-XTOP D5 (Original CSQ), a product designed for expert users in liquid cooling systems. It is crucial to consult with a qualified technician for installation, as improper setup can lead to equipment damage. EK Water Blocks disclaims all liability for the use or installation of these products. Users are advised to review the latest instructions on the EK Water Blocks website and read the important notice, disclosure, and warranty conditions on the back of the box before proceeding with installation.
Before beginning the installation process, users should carefully read the entire manual. When using EK High Flow and EK-PSC type fittings, only a small amount of force is needed to screw them firmly into place, as the liquid seal is ensured by rubber o-ring gaskets. The use of corrosion-inhibiting coolants is always recommended for any liquid cooling system to maintain optimal performance and longevity.
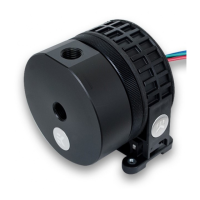
The installation process begins with preparing the pump. First, unscrew the ribbed threaded ring that attaches the Laing pump's original factory top and the main pump core housing with the motor. This is done by twisting to the left. The original top, the original o-ring gasket, and the attaching ring should be stored in a safe place for future reference. This step essentially disassembles the pump's original housing to prepare it for integration with the EK-XTOP D5.
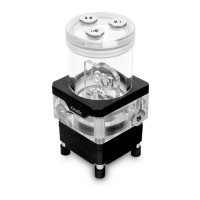
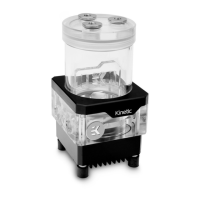
Next, the EK-XTOP D5 is installed. The EK-XTOP D5 should be placed onto the pump main motor housing. It is essential to ensure that the EK-provided 61x3mm o-ring gasket is properly installed. If needed, the gasket should be reseated to ensure a secure seal. The pump can be rotated in any direction to best suit the specific installation requirements, offering flexibility in system design. The XTOP is then secured using the two enclosed M4x16 DIN7380 screws and the provided Allen (hex) key. Users are cautioned not to overtighten these screws, as excessive force can strip the threading, potentially damaging the unit. Finally, the mounting plate is attached to the bottom of the pump top using the two enclosed countersunk M4x10 DIN7991 screws. This completes the physical assembly of the EK-XTOP D5 with the pump motor.
The final step involves attaching the fittings. Fittings are screwed into the G1/4 threaded openings on the plastic top of the water block. EKWB recommends using EK-PSC fittings with the EK-XTOP D5 series pump tops for optimal compatibility and performance. To ensure that the tubes are securely attached to the barb/fittings, users should utilize hose clamps or an appropriate substitute. This prevents leaks and ensures a robust connection within the cooling loop.
It is mandatory to use the correct INLET and OUTLET ports for proper functionality. The OUTLET (pressure port) is the G1/4 threaded opening located on the side of the pump top housing. An additional OUTLET port is situated on the upper right edge of the pump's front plate. The INLET port (suction port) is the central G1/4 threaded opening on the EK-XTOP D5 front face plane. These specific port designations are crucial for the pump to operate correctly and efficiently.
To prime the pump, it is necessary to use a reservoir. The reservoir's outlet port should be connected to the EK-XTOP D5's inlet port. This setup ensures that the pump receives a continuous supply of coolant, preventing it from running dry.
The EK-XTOP D5 water pump and EK-XTOP D5 combo can be used in any mounting configuration or position, with one critical exception: it must not be mounted upside down. Mounting the pump upside down may result in the pump running dry, which can eventually lead to premature failure of the pump. Therefore, users must ensure the pump is always oriented correctly to maintain proper coolant flow and prevent damage.
Upon completion of the installation, it is highly recommended to perform a leak test of the cooling circuit before powering up the computer. A 24-hour leak test is advised to ensure all connections are secure and leak-free. It is crucial not to test the water block using tap water pressure, as this will rupture the top of the housing and render the block unusable, voiding the warranty. EK Water Blocks has made every effort to provide a comprehensive tutorial, but assumes no liability for any consequential damage to equipment resulting from errors or omissions in the instructions, or from failure or defect in their cooling products.
The products are warranted against defects in materials or workmanship for a period of 24 months from the date of delivery to the end user. During this period, products will be repaired or parts replaced at EK Water Blocks' discretion, provided certain conditions are met: the product must be returned to the agent from whom it was purchased; it must have been purchased by an end user and not used for commercial purposes; and it must not have been misused, handled carelessly, or used in a manner inconsistent with the provided instructions for installation and proper use. This warranty does not grant rights beyond those explicitly stated and does not cover claims for consequential loss or damage. This warranty is an additional benefit and does not affect statutory consumer rights. The warranty is voided if the product comes into contact with aggressive UV additives or other improper liquids. For any other RMA issues, users can contact support@ekwaterblocks.com for further analysis. The required tool for installation is an Allen key 2.5mm.
| Pump Type | D5 |
|---|---|
| Max Flow Rate | 1500 L/h |
| Max Head | 3.9m |
| Inlet Port Size | G1/4" |
| Outlet Port Size | G1/4" |
| Color | Black |
| Material | Acetal |
| Pump Speed | up to 4800 RPM |
| Ports | G1/4" |