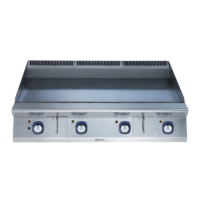
The Frytop 1200, models N9E and EFT93, is a commercial appliance designed for cooking food directly on a hotplate, such as hamburgers, chops, eggs, sausages, fish, and vegetables. It can also be used for cooking food in containers like pots and pans. This appliance is intended for commercial and collective use, not for continuous mass production of food.
Technical Specifications:
The Frytop 1200 is available in both gas and electrical models, with specific technical data provided on the appliance's dataplate.
-
Gas Models (+9IIKAAOMIA, +9IIMAAOMIA):
- Connection: ISO 7/1, 1/2" SP connection.
- Nominal Heat Output: Maximum 33 kW.
- Type of Construction: A1.
- Gas Type: Arranged and tested to operate with G20 gas at 20 mbar. Conversion to other gas types is possible by following specific instructions in the manual, including nozzle replacement and adjustment of primary air supply and minimum flame screws.
- Gas Pressure Regulator: An optional gas pressure regulator (accessory code 927225) may be installed if gas pressure is higher than specified or unstable.
- Fume Exhaust: "A1" type appliances must be positioned under an extraction hood to ensure removal of fumes and steam. For Australia, ventilation must comply with AS/NZS1668.1 and AS 1668.2.
-
Electrical Models (+9IIKDAOMIA, +9IIMDAOMIA - EFT93):
- Power Supply Voltage: 380-400 V.
- Phases: 3/3+N.
- Frequency: 50-60 Hz.
- Nominal Max. Power: 20 kW.
- Power Supply Cable Section: Minimum recommended 6 mm².
- Safety Thermostat: Equipped with an overheating safety thermostat that trips automatically when temperatures exceed a set value, shutting off the electricity supply. Resetting requires specialized personnel and disconnection from the mains.
General Technical Data (applicable to both models, where relevant):
- Dust and Water Protection Rating: Indicated on the dataplate.
- CE Marking: Present.
- Gas Safety Certificate Number: Present for gas models.
- Certification Group: Present.
- Notified Body: Present.
- EU Standard: Present.
- Logo IMQ/GS: Present.
- Gas Category: Present for gas models.
- Gas Pressure: Present for gas models.
- Manufacturer: Electrolux Professional SpA, Viale Treviso 15, 33170 Pordenone, Italy.
Usage Features:
- Controls: Gas models feature four cooking zones, each controlled by a thermostatic gas valve. Electrical models have four cooking zones controlled by four thermostats.
- Ignition (Gas Models): To switch on, press the knob lightly and turn it anticlockwise to the "Pilot ignition" position. Keep pressed for about 15-20 seconds to allow the gas to reach the pilot burner and the thermocouple to heat up. Then, turn to the "On" position and set the desired temperature using the temperature adjusting knob.
- Switching Off (Gas Models): Turn the knob to the "Off" position.
- Switching On/Off (Electrical Models): Turn the control knob to the desired temperature to switch on. Turn the control knob to "0" to switch off.
- Interlock (Gas Models): The valve features a thermal re-light locking device. If the pilot burner goes out, the gas supply to the main burner is shut off.
- Preheating: If possible, preheat the appliance immediately before use.
- Oil Collection Tray: Empty the oil collection tray daily before use when the appliance is cold.
- Improper Use: Do not use the appliance empty or in conditions that compromise its optimum efficiency. Do not use the fry top to heat pots or pans.
Maintenance Features:
- Cleaning:
- General: Disconnect from power supply before cleaning. Do not use water jets or steam. Do not use products containing chlorine (sodium hypochlorite, hydrochloric or muriatic acid, etc.) or metal tools (wire brushes, Scotch Brite pads) on steel parts.
- Stainless Steel Surfaces: Clean vigorously with a cloth moistened with paraffin oil to create a protective film. Remove glue traces with a non-corrosive solvent.
- Chrome Plated Surfaces (Daily): Do not use chlorine-based products, lemon, or excessive salt. Use stainless steel spatulas for food. Clean with a scraper, sponge, and vinegar (rinse afterwards). Do not use steel wool, abrasive powders, or aggressive chemicals.
- Tanks and Collection Drawers: Remove grease, oil, and food residuals. Clean daily and empty when nearly full.
- Maintenance Intervals:
- Ordinary Cleaning: Daily (Operator responsibility).
- Mechanical Protection Devices: Yearly check for condition, deformation, loosening, or removed parts (Service responsibility).
- Control: Yearly check of mechanical parts, screws, readability of signs (Service responsibility).
- Machine Structure: Yearly tightening of main bolts (Service responsibility).
- Safety Signs: Yearly check of readability and condition (Service responsibility).
- Electrical Control Panel: Yearly check of electrical components and wiring (Service responsibility).
- Electrical Connection Cable and Plug: Yearly check and replacement if necessary (Service responsibility).
- Preventive Maintenance (Gas Components): Yearly check (Service responsibility).
- Preventive Maintenance (Dirt Deposits): Every 6 months removal (Service responsibility).
- Internal Parts Condition: Every 6 months check (Service responsibility).
- Discharge System: Every 6 months check and clean (Service responsibility).
- General Machine Overhaul: Every 10 years (Service responsibility).
- Repair and Extraordinary Maintenance: Must be carried out by specialized authorized personnel. Unauthorized intervention invalidates the warranty.
- Long Periods of Non-Use: Close valves/main switches, apply paraffin oil to stainless steel, air premises periodically, and have the appliance checked before reuse. For electric models, switch on at minimum heat for 45 minutes to evaporate moisture.
- Troubleshooting (Gas Models): A brief guide is provided for common malfunctions like pilot burner not lighting, pilot burner going out, main burner not lighting, and temperature adjustment issues, along with possible causes.
- Disposal: Dismantling must be carried out by specialized personnel. Electrical equipment work requires disconnection from power supply. The appliance should be made unusable by removing the power cable and compartment closing devices. Parts must be disposed of according to their material characteristics and local environmental protection laws. The product symbol indicates it should not be treated as domestic waste.