3.5a
3.5 USING THE AUTOMATIC HOPPER
The automatic hopper is always used with the impeller screwed
onto the tool holder shaft.
The vegetable slicer output is increased when there is a
continuous feed. The maximum section of the vegetables or
vegetable quarters which can be accepted by the automatic
hopper is 100 mm.
4) Long vegetable feed hopper (available in option)
- Passage for long, thin vegetables (carrots, cucumbers, cour-
gettes, leeks, bananas, etc.) and fragile products (tomatoes,
kiwis, etc.).
- The hopper has three inlet diameters, 50, 60 and 70 mm, which
means that the products can be supported correctly according
to their size.
- The direction and method of loading is the same as that of the
small hopper (see § 3.4.2).
5) Cabbage hopper
- The special hopper for cabbage can be used for thin slicing
by using the plate fi tted with a stem-removal device.
3.5c
Never insert a hard object in the feed hopper when the machine
is in operation.
3.5d
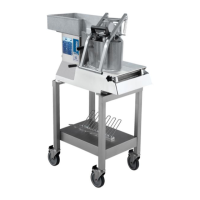
3.6. USING THE LEVER-OPERATED HOPPER
•
This vegetable cutter will only operate if the cover is closed.
- Leave the feed stick inside the small feed hopper to prevent
the products from coming back out.
- Place the products on the feed tray.
- Maximum capacity is a 10 L bucket.
- Press the start button B.
- Lift up the feed arm with one hand and move clear towards
the right.
- As soon as the feed arm is clear of the feed hopper, the motor
stops immediately (the green light remains lit), thus allowing
the products to be changed in complete safety.
- With your left hand, push the products in the feed tray towards
the inside of the feed hopper, taking care not to exceed the
upper level.
- Bring the feed arm back into its original position.
- When the feed arm is above the feed hopper, the TR 260 will
start up again automatically.
- Using the feed arm, push the products into the hopper until it
reaches its lower stop.
- Raise the feed arm and repeat this sequence of operations.
- When the work has been completed, press STOP button A.
Tips: Adjust the force applied to the feed arm to suit:
- the product being processed (soft product: less force)
- the cutter chosen (a grating disc requires more force than a
slicing disc).
Do not leave the power supply to the machine switched on if
stopped for a long time with the feed arm out of the hopper.
Never insert a hard object in the feed hopper when the machine
is in operation.
3.6c
3.6b
3.7 USE OF THE SMALL FEED HOPPER AND THE FEED STICK
- Leave the feed arm in its lower position and the cover locked.
- Pull the knob A to remove the feed stick.
- Place the products in the feed tray within reach.
- Press the start button B.
- With your left hand, place the products in the hopper one
by one or in handfuls, fi lling the hopper opening as much as
possible.
- Push the products using the feed stick.
Tips:
- Always introduce long products lengthways.
- To avoid angled and irregular cuts, place thin products in
«head fi rst».
- Cut off the ends of the vegetables to avoid blockages.
Never place your hand inside of the small hopper, always use
the feed stick.
3.7a
3.7b
Never insert a hard object in the feed hopper when the machine
is in operation.
3.8 USE OF THE HIGH OUTPUT LONG VEGETABLE FEED HOPPER (AVAILABLE IN OPTION).
•
To fi t the long vegetable feed hopper, proceed as follows:
- Press the STOP button A.
- Place the feed arm in the raised position.
- Unscrew the locking knob A
- Raise the feed arm in order to remove it from the hinge pin
B.
- Fit the long vegetable feed hopper onto the hinge pin B and
lower it down to the bottom of the feed hopper.
- Tighten the knob A to lock the assembly in place.
Note: With the long vegetable feed hopper in position, the machine
can then be started.
- Press the start button B.
- Introduce the products one after the other in the tubes which
match their size.
- Push them in with the feed stick or the following vegetable.
Tips: (see § 3.6)
•
If the products remain blocked in the tubes:
- press the STOP button A.
- unlock and raise the cover (see § 3.3).
- push the products from the inside towards the outside of the
tube.
5 TR260 GB 10 07
 Loading...