Do you have a question about the Elster F90S and is the answer not in the manual?
Mounting temperature sensors directly into pipes via ball valves or T-pieces.
Installing temperature sensors into dedicated pockets with specific diameter requirements.
PC communication via optocoupler and dedicated software.
Details and requirements for M-bus interface communication.
Function and specifications for the pulse output option.
Method for attaching the calculator to the wall using a sticker pad.
Method for attaching the calculator to the wall using dowels.
Procedure for detaching the heat meter from its wall mount.
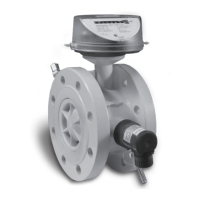
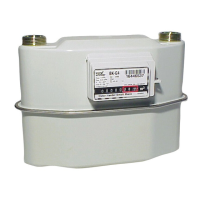
The Elster F90S is a compact single-jet heat meter designed for measuring consumed heat energy in closed heating systems. It consists of a calculator, a flow sensor, and two temperature sensors, all permanently connected. An installation kit and operating instructions are included. For separable versions, a wall support installation kit is also provided.
The meter adheres to EN 1434, parts 1 and 6, for heat meter applications and complies with EMC Directive 2004/108/EC. Its measurement stability is guaranteed when water quality meets AGFW Recommendation FW-510. Deviations from these water quality standards necessitate regular inspection and refurbishment by the manufacturer. The instrument identification and seals must remain intact to preserve the warranty and approved application. All maintenance and repair work must be performed by qualified and authorized technical personnel. The direct-mounted temperature sensor or its plug must not be altered, and sealing wires must not be removed. The instrument should be stored and transported above freezing, with ambient temperatures not falling below 5°C. All specifications on the data sheet must be observed.
Electrical connections must be laid at a minimum distance of 50 cm from sources of electromagnetic interference (switches, controllers, pumps, etc.) and at least 10 cm from other current-carrying wires. Temperature sensor cables must not be kinked, rolled up, lengthened, or shortened. Instruments with a return-flow temperature sensor mounted directly in the flow sensor must be installed in the return flow. To prevent damage and dirt, the heat meter should only be removed from its packaging immediately before installation.
For meters with two declarations on the identification plate (e.g., Q ≥ 100l/h ΔT: 3-100 K / Q ≥ 20l/h ΔT: 6-100 K), the declaration not valid for the local installation situation must be made unrecognizable. For floor heating, this means obscuring "Q ≥ 20l/h ΔT: 6-100 K," and for radiator heating, obscuring "Q ≥ 100l/h ΔT: 3-100 K." The heat meter should be cleaned with a slightly moist (not dripping wet) cloth only if necessary. If multiple heat meters are installed in one unit, consistent installation conditions must be ensured for all meters. The standard installation point for the heat meter is in the return flow pipe; forward flow pipe installation is optional and must be specified when ordering.
Pipes should be flushed according to DIN/EN. Shut-off valves must be closed, and the nearest draining valve opened to release pressure and drain the closed-off pipe section. The old heat meter is removed by loosening the coupling ring, and all old gaskets are discarded. Sealing surfaces are cleaned, and new gaskets inserted. The flow sensor must be positioned correctly, observing the direction of flow indicated by the arrow on its side. Coupling rings are then tightened, and the calculator rotated to the correct reading position. For separable versions, the calculator can be detached from the flow sensor by pressing its lateral surfaces and carefully lifting off the top part of the housing, simplifying mounting in narrow spaces.
For pipe systems with a size of DN25 or less, MID regulations require direct mounting of temperature sensors for new installations (new construction or retrofitted heating systems). During installation, the return flow sensor (blue label) must be mounted in the colder pipe, and the forward flow sensor (red label) in the warmer pipe.
The blind plug/old temperature sensor and gasket/old O-ring are removed, and connection surfaces cleaned. The O-ring is slid off the temperature sensor and inserted into the bottom of the threaded opening of the ball valve or T-piece. The required mounting depth of the temperature sensor tip is set by tightening the cross-head screw in the correct beading on the sheath. The temperature sensor must not touch the bottom of the ball valve or T-piece. The temperature sensor is inserted into the ball valve or T-piece, and the screw nut is tightened to the stop.
Before installation, the inner diameter of the temperature pocket must be checked with a suitable caliber (5.0, 5.2, and 6.0 mm). Only temperature sensors with the matching diameter may be installed; adapters or reducing bushes are not permitted. The protective sheath of the temperature sensor must be inserted at least 36 mm into the pocket. The O-ring is removed from the temperature sensor and carefully inserted into the temperature pocket, ensuring it sits properly. The temperature sensor is inserted into the pocket as far as it will go (to the stop), ensuring it sits on the bottom of the pocket. The screw nut on the temperature sensor is then tightened as much as possible.
Shut-off valves are slowly opened, and the meter is checked for proper functioning and leaks. After confirming proper function, sealing wires for the temperature sensors and flow sensor are inserted and tightened. When replacing a meter at the end of a verification period, the meter readings and serial numbers of both the old and new meters should be noted.
The calculator features an 8-digit liquid crystal display with special characters. Values are organized into three display loops. All data is retrieved using the Engelmann pushbutton next to the display. The standard display shows the total heat energy consumed since the meter was put into operation. The main loop (1st level) is accessed automatically at startup. Pressing the key for longer than 4 seconds switches to the next display loop. Keeping the key pressed cycles through the information loops. A brief press scans information within a loop. After one minute of inactivity, the display automatically returns to the main loop.
Main Loop:
Technician's Loop:
Statistics Loop:
When the instrument detects an error, an error symbol and number are displayed. The error can also be displayed by selecting the "error display" menu item in the first level/main loop. There are seven possible causes of error, which can appear in combination. If an error occurs in the standard display (Total heat energy), with the exception of the "reset" error, the instrument must be exchanged and sent to the manufacturer for examination.
To communicate with a F90S instrument via PC, an optocoupler must be connected to the corresponding PC interface. The optocoupler and necessary software are available as options. The optical infrared interface is activated with the key. If no valid telegram is received or the key is not pressed again within 60 seconds, the interface is deactivated.
An M-bus interface is available on request. It is crucial to ensure that the bus network structure (connecting cable length and diameter) corresponds to the instrument's baud rate (2400 Bd). The M-bus protocol complies with EN 13757-2, EN 13757-3, EN 1434-3, and the M-bus Recommendation (version 4.8 dated Nov. 1997), standard ICE870 ports 1, 2, and 4. During M-bus communication, other instrument interfaces (key, opto head) cannot be used.
The potential-free pulse output, available as a built-in option (state when ordering), is an electronic switch for flexible use (class A0 according to EN1434), which outputs the counting pulses of the heat meter. The pulse output closes corresponding to the pulse value (indicated on the identification plate). As long as the nominal and boundary values of the contact are considered, the user can define contact data within a wide range. A variety of data acquisition instruments can be connected to the contact outputs. The pulse value is indicated on the instrument.
When the calculator is detached from the flow sensor, it can be mounted on the wall using the mounting support. If possible, the wall mounting support should be placed above the flow sensor. The display must remain accessible and readable without auxiliary tools.
Press the locking positions on the side of the adapter lightly with one hand while pulling up the calculator housing with the other hand. Latch the wall mounting support onto the instrument. Remove the protective foil from the sticker pad and press the pad firmly onto the wall support. Remove the second protective foil from the sticker pad and press the instrument with the wall mounting support firmly in place on the wall.
Press the locking positions on the side of the adapter lightly with one hand while pulling up the calculator housing with the other hand. Drill holes for the dowels (Ø 6 mm, depth 40 mm), taking into account the maximum length of the connecting cable (300 mm) between the flow sensor and the heat meter. Screw on the wall mounting support. Attach the instrument to the mounting support.
Pull the instrument upwards and away from the wall.
Subject to technical change. Return shipment of lithium batteries must be carried out appropriately.
| Brand | Elster |
|---|---|
| Model | F90S |
| Category | Measuring Instruments |
| Language | English |