16
ANDERSON GREENWOOD SERIES 400 PISTON PILOT POPRV
InstallatIon and MaIntenance InstructIons
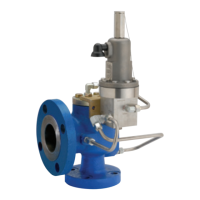
Set pressure adjustment (turnintoincrease set pressure)
(turn out to decrease set pressure)
Bleed valve
Dome pressure gauge
Supply pressure gauge
Block valve
Mounting stub
Pilot exhaust*
Flexible hose
(toinlet port)
Shut-off valve
Accumulator (approx. ¼ cu ft)
Air supply
Vent valve
Vent fitting in pilot exhaust port not supplied with
standard pilots after Nov. 1999
FIGURE 6
CAUTION
To avoid damaging any of the lift lever
components, do not rotate the lift lever handle
past that position where the cam surface of the
handle assembly first contacts the lower face of
the lift lever nut.
4.6 Lift lever handle assembly installation
For pilot equipped with a lift lever, install
the lift lever handle assembly (Item 42) after
completing the final pilot adjustment.
Screw the lift lever nut (Item 45) on the
threaded portion of the lift lever rod (Item46)
until the lower face of the lift lever nut is
approximately 2
1
/
16” above the top of the spring
bonnet (Item 14). Use the jam nut (Item 44) to
lightly lock the lift lever nut in place. Screw the
cap on the threaded projection of the bonnet
insert (Item 37) until it is hand tight against
the spring bonnet. The lower face of the lift
lever nut should be even with the center of the
threaded hole in the cap. If the lift lever nut is
not positioned correctly, remove the cap and
adjust the nuts as required, and reinstall the cap.
With the lift lever handle held in the position
shown in Figure 3, install the handle assembly
by screwing the handle assembly bushing
(Item43) into the cap. The cam surface of the
lift lever handle assembly must contact the
lower face of the lift lever nut between 15° and
45° of clockwise or counterclockwise rotation
of the handle past its null or centered position.
Resistance of the handle indicates contact has
occurred. If resistance occurs at less than 15°,
the lift lever nut must be positioned higher. If
resistance first occurs at more than 45°, the
nut must be positioned lower on the lift lever rod.
If necessary, remove the handle assembly from
the cap following the procedure of paragraph
3.1 and repeat this assembly procedure in order
to correctly position the lift lever nut and jam
nut on the threaded portion of the lift lever rod.
When correctly positioned lock the lift lever nut
with the jam nut, install and securely tighten the
cap, install the handle assembly, and securely
tighten the handle assembly bushing.
 Loading...