Instruction Manual
D103031X012
D2 FloPro Valve
June 2011
10
procedure. Continue the actuator disassembly by removing these parts: washer (key 24) diaphragm plate (key 25),
diaphragm (key 19), washer (key 36), and O-ring (key 37). Inspect the diaphragm for any wear or damage. Replace
with a new one if necessary.
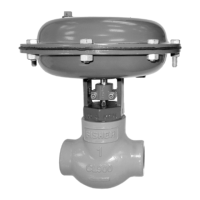
If you wish to inspect/replace the bonnet to actuator casing O-ring (key 16), mark the orientation of the actuator
pressure connection to the bonnet for later reference (see figure 3). Unscrew the hex nut (key 18) from the bonnet.
Remove the bottom casing (key 20).
8. Unscrew the flow adjuster socket head cap screws (key 29), and remove the flow adjuster halves.
9. Unscrew the packing retainer (key 7) from the bonnet (key 2). After the packing retainer has been unscrewed from
the bonnet, pull the valve stem and plug out of the bonnet.
10. Remove the five Belleville springs (key 9), packing spacer (key 10), packing (key 11), and two anti-extrusion rings
(key12)fromthebonnet.Seefigure4.
11. Clean and inspect the packing box wall to ensure that the packing surfaces are not damaged. If the surface
condition is damaged, and cannot be improved by light sanding, replace the bonnet by contacting your Emerson
Process Management sales office.
12. Inspect the valve stem for scratches or wear, and valve plug for wear or damage. Replace if necessary.
13. If the valve plug requires replacement, use an appropriate tool on the machined flats located on the valve stem
above the flow adjuster and unscrew the valve plug from the valve stem. Replace it with a new valve plug. Screw the
valve plug into the valve stem, being careful not to damage the plug seat or plug contour. Tighten to 18 NSm(13
lbfSft).
14. Inspect the valve stem bushing (key 8) located in the upper end of the bonnet. If damaged, remove and replace it
with new bushing (key 8). Replace the valve stem bushing by inserting the bushing, flange end first, into the bore
located at the top of the bonnet flow adjuster window. Insert until the flange snaps into the groove provided for it.
15. Remove the O-ring (key 17) from the upper end of the bonnet. Replace it with a new one, and lubricate it with
lithium grease.
Assembly
1. Use the packing spacer (key 10) and a tube to push the upper anti-extrusion washer (key 12) into place. Using the
packing spacer in this manner will ensure the upper anti-extrusion washer is fully seated and flat when installed in
the packing bore.
2. Remove the packing spacer from the packing bore.
CAUTION
All D2 FloPro packing kits include a single use packet of high performance fluorinated grease. This is the only acceptable D2
packing lubricant.
Note
In the following procedure, carefully install each packing ring individually over the valve stem and push completely into the
packing box with a non-marring tube. A 12-inch length of 1/2 inch PVC pipe works well for this. It is recommended that the
lubricated packing rings be installed individually rather than pushed in as a set.
3. Apply a 3mm (1/8 inch) bead of the supplied high performance fluorinated grease (key 38) around the groove of
the female packing adaptor as shown in figure 5 and install over the valve stem.
4. Apply a 3mm (1/8 inch) bead of the supplied high performance fluorinated grease (key 38) around the groove of
the packing ring as shown in figure 5 and install over the valve stem.
 Loading...


